background image

English

English-9

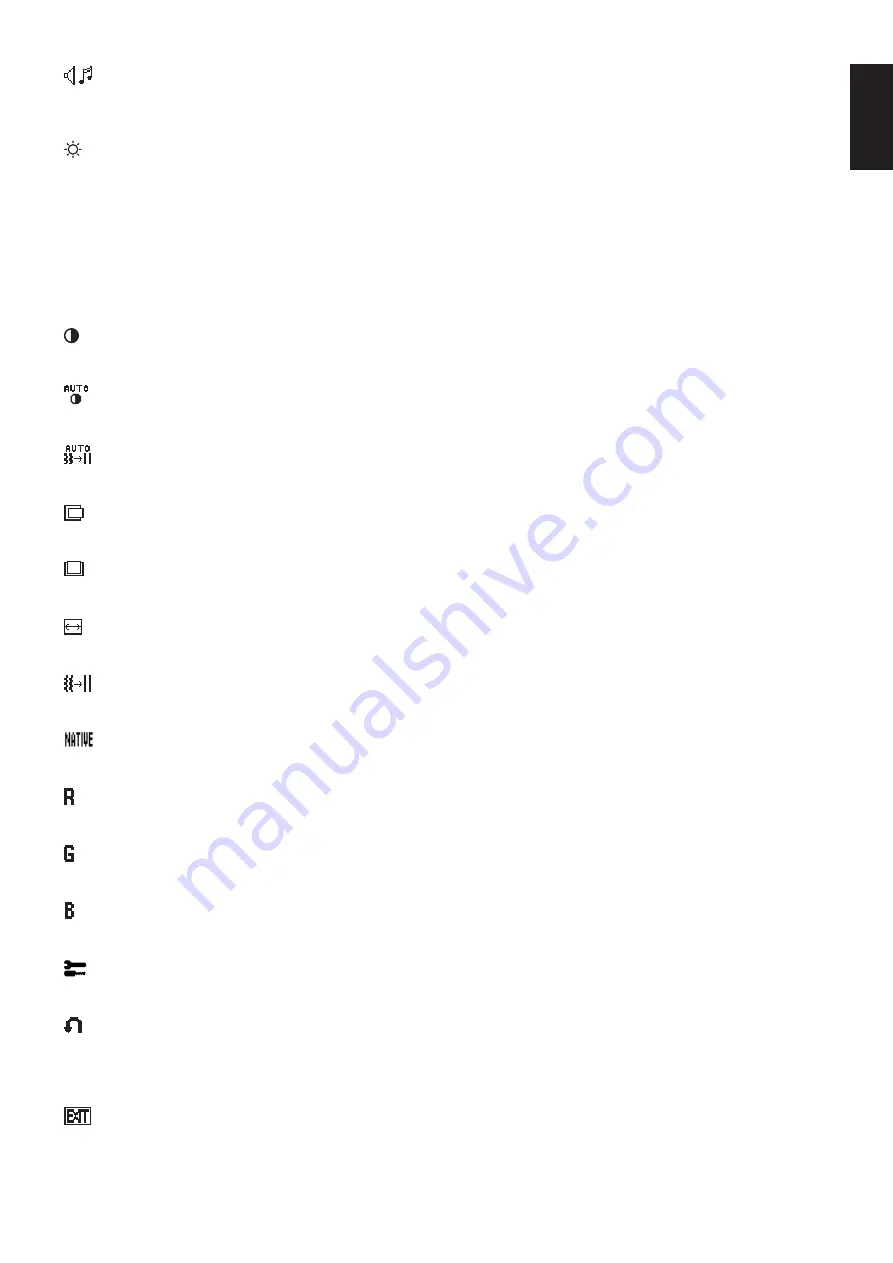
AUDIO

Controls the volume of the speakers or headphones.
To mute the speaker output, press the “1

2/RESET” button.

BRIGHTNESS

Adjusts the overall image and background screen brightness.
To enter the ECO MODE, press the “1

2/RESET” button.

ECO MODE OFF:

 Sets brightness variable to 100%

ECO MODE1:

 Sets brightness to 80%.

This setting can adjust brightness to a range in which power is reduced to meet Energy Star measurement
conditions.

ECO MODE2:

 Sets brightness to 30%.

This setting can adjust brightness to a range in which power is reduced by 30% compared to the maximum
brightness setting.

CONTRAST

Adjusts the image brightness in relation to the background.

AUTO CONTRAST

Adjusts the image displayed for non-standard video inputs.

AUTO ADJUST

Automatically adjusts the Image Position, the H. Size and Fine setting.

LEFT/RIGHT

Controls Horizontal Image Position within the display area of the LCD.

DOWN/UP

Controls Vertical Image Position within the display area of the LCD.

H. SIZE

Adjusts the horizontal size by increasing or decreasing this setting.

FINE

Improves focus, clarity and image stability by increasing or decreasing this setting.

COLOUR CONTROL SYSTEMS

Five colour presets (9300/7500/sRGB/USER/NATIVE) select the desired colour setting.

COLOUR RED

Increase or decreases Red. The change will appear on screen.

COLOUR GREEN

Increase or decreases Green. The change will appear on screen.

COLOUR BLUE

Increase or decreases Blue. The change will appear on screen.

TOOL

Selecting TOOL allows you to get into the sub menu.

FACTORY PRESET

Selecting Factory Preset allows you to reset all OSD control settings back to the factory settings. The 1

2/RESET

button will need to be held down for several seconds to take effect. Individual settings can be reset by highlighting
the control to be reset and pressing the 1

2/RESET button.

EXIT

Selecting EXIT allows you exit OSD menu/ sub menu.

Содержание NECE171M

Страница 1: ...MultiSync LCD175M User s Manual...

Страница 2: ...English 1 Recommended use English 3 Contents English 5 Quick Start English 5 Controls English 8 Specifications English 11 Features English 12 Troubleshooting English 13 TCO Displays 5 0 English 14 Ma...

Страница 3: ...GE COMPONENTS INSIDE REFER SERVICING TO QUALIFIED SERVICE PERSONNEL Declaration of the Manufacturer We hereby certify that the colour monitor MultiSync LCD175M L174F1 is in compliance with Council Dir...

Страница 4: ...ase the separation between the equipment and receiver Connect the equipment into an outlet on a circuit different from that to which the receiver is connected Consult your dealer or an experienced rad...

Страница 5: ...oily areas Do not cover vent on monitor Immediately unplug your monitor from the wall outlet and refer servicing to qualified service personnel under the following conditions When the power supply co...

Страница 6: ...image persistence after image effects Get regular eye checkups Ergonomics To realize the maximum ergonomics benefits we recommend the following Use the preset Size and Position controls with standard...

Страница 7: ...igure A 3 Macintosh Cable Adapter not included Figure A 2 NOTE Reverse this procedure if you need to re pack the monitor To attach the MultiSync LCD monitor to your system follow these instructions 1...

Страница 8: ...A 4 NOTE Please confirm that the tabs are completely secure 4 Connect all cables to the appropriate connector on the back of the monitor Figure B 1 Connect the Headphone not included to the appropriat...

Страница 9: ...of Bracket Arm 2 0 3 2 mm 4 SCREWS M4 MAX depth 7 0 mm If use other screw check depth of hole Weight of LCD assembly 4 2 kg MAX Specifications Remove Monitor Stand for Mounting To prepare the monitor...

Страница 10: ...Cursor goes to left Cursor goes to right At OSD showing Adjustment stage Go to Icon selection stage Adjust value decrease or Cursor for adjust goes to left Adjust value increase or Cursor for adjust...

Страница 11: ...orizontal Image Position within the display area of the LCD DOWN UP Controls Vertical Image Position within the display area of the LCD H SIZE Adjusts the horizontal size by increasing or decreasing t...

Страница 12: ...the model and serial numbers of your monitor CARBON SAVINGS Display the estimated carbon saving information in kg The carbon footprint factor in the carbon saving calculation is based on the OECD 2008...

Страница 13: ...at 75 Hz 1280 x 960 1 at 60 Hz to 75 Hz Recommended resolution is 60 Hz for optimal 1280 x 1024 at 60 Hz to 75 H display performance Active Display Area Horizontal 337 9 mm Vertical 270 3 mm Speakers...

Страница 14: ...its capabilities such as screen size and resolutions supported directly to your computer automatically optimizing display performance IPM Intelligent Power Manager System Provides innovative power sa...

Страница 15: ...all personal display devices NEC DISPLAY SOLUTIONS recommends using a screen saver at regular intervals whenever the screen is idle or turning off the monitor when not in use Image is unstable unfocu...

Страница 16: ...ndards at an impartial laboratory Electric and magnetic fields emissions as low as normal household background levels Low acoustic noise emissions Some of the Environmental features of the TCO Certifi...

Страница 17: ...ay com in Japan or http www necdisplay com in USA Energy Saving This monitor features an advanced energy saving capability When a VESA Display Power Management Signalling DPMS Standard signal is sent...

Отзывы: