background image


2

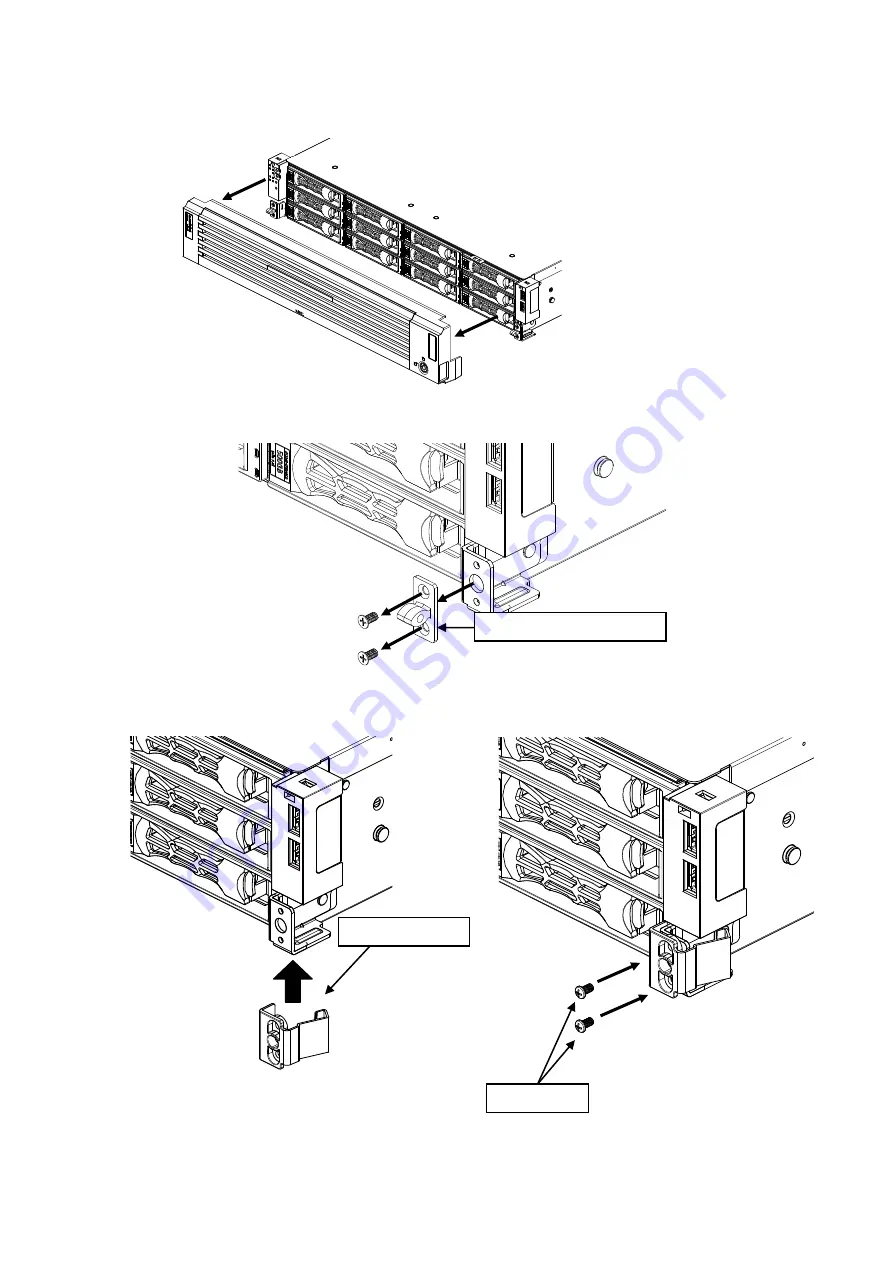
.キャッチの取り外し、取り付け(※防塵ベゼルからお取り替え時)


下記の手順で装置に添付のキャッチ部品を取り付けて下さい。


1. 

装置からフロントベゼルを取り外します。


2. 

装置からキャッチを取り外します。


3. 

装置に添付のネジを使用し、添付のキャッチを取り付けます。


※取り外したフロントベゼル・キャッチ・ネジは大切に保管して下さい。


ネジ(添付) 

キャッチ(添付) 

キャッチ(防塵ベゼル用) 

Содержание N8146-89

Страница 1: ...1 N8146 89 GZR 000008 089 01...

Страница 2: ...2 OFF...

Страница 3: ...3 1 1 1 2 2 3 4 4 2 5 R120g 2E 1 R120g 2E 6 NS500Rg 1 NS500Rg 7 1 R120g 2E NS500Rg...

Страница 4: ...4 2 1 2 3...

Страница 5: ...5 3 1 2 3 R120g 2E NS500Rg...

Страница 6: ...6 4 1 2 10 1 2 3 4 5 4 N8146 89 GZR 000008 089 01 2 10...

Страница 7: ...terms are defined as follows Precautions and notices against hazards are presented with one of the following two symbols The individual symbols are defined as follows Attentions Prohibited Actions Man...

Страница 8: ...changes in temperature Place where vibration or impact may be generated Places with corrosive gas sulfur dioxide hydrogen sulfide nitrogen dioxide chlorine ammonia ozone etc in presence Places where t...

Страница 9: ...list below Item No Name Q ty Description 1 Front bezel white 1 2 Catch 2 3 Screw 4 4 Security Lock Key 2 5 Name Plate R120g 2E 1 For R120g 2E 6 Name Plate NS500Rg 1 For NS500Rg 7 User s Guide 1 This...

Страница 10: ...s in the User s Guide of the server in which you are going to install the bezel to install or remove the bezel safely and properly 1 Install the front bezel as shown in figure below 2 Lock the front b...

Страница 11: ...e copied or altered without the prior written permission of NEC Corporation 4 All efforts have been made to ensure the accuracy of all information in this User s Guide If you notice any part unclear i...

Отзывы: