background image

English-8

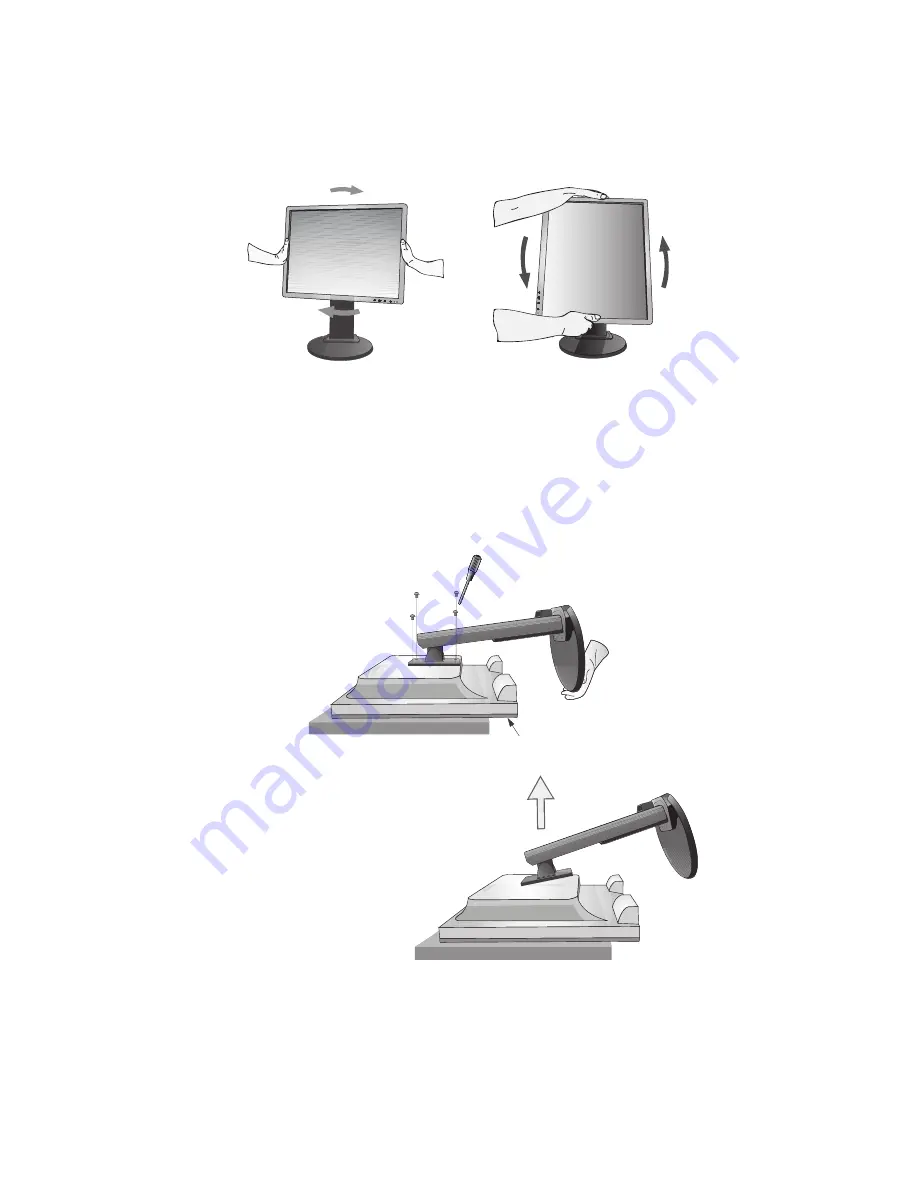
Remove Monitor Stand for Mounting

To prepare the monitor for alternate mounting purposes:

1. Disconnect all cables.

2. Place monitor face down on a non-abrasive surface (

Figure S.1

).

NOTE:

Handle with care when monitor facing down, for avoiding damage to the front control buttons.

3. Remove the 4 screws connecting the stand to the monitor (

Figure S.1

).

NOTE:

In order to avoid stand drop, when removing screws, please support stand with your hand.

Screen Rotation

Before rotating, the screen must be raised to the highest level to avoid knocking the screen on the desk or pinching with your
fingers.
To raise the screen, with one hand, grip the top of the display by the handle using the other hand to grip the bottom. Lift up to
the highest position (

Figure RL.1

).

To rotate screen, place hands on each side of the monitor screen and turn clockwise from Landscape to Portrait or counter-
clockwise from Portrait to Landscape (

Figure R.1

).

Figure R.1

Figure S.1

Figure S.2

Control buttons

4. Remove the stand (

Figure S.2

).

5. The monitor is now ready for mounting in an alternate manner.

6. Connect the cables to the back of the monitor.

Содержание MultiSync EA190M

Страница 1: ...MultiSync EA190M User s Manual...

Страница 2: ...English 1 Recommended use English 3 Contents English 5 Quick Start English 6 Controls English 10 Specifications English 13 Features English 14 Troubleshooting English 15 TCO Displays 5 0 English 16 Ma...

Страница 3: ...AGE COMPONENTS INSIDE REFER SERVICING TO QUALIFIED SERVICE PERSONNEL Declaration of the Manufacturer We hereby certify that the colour monitor MultiSync EA190M L197HL is in compliance with Council Dir...

Страница 4: ...receiver is connected Consult your dealer or an experienced radio TV technician for help If necessary the user should contact the dealer or an experienced radio television technician for additional su...

Страница 5: ...ng Immediately unplug your monitor from the wall outlet and refer servicing to qualified service personnel under the following conditions When the power supply cord or plug is damaged If liquid has be...

Страница 6: ...image persistence after image effects Get regular eye checkups Ergonomics To realize the maximum ergonomics benefits we recommend the following Adjust the Brightness until the background raster disapp...

Страница 7: ...15 pin mini D SUB male to 15 pin mini D SUB male Video Signal Cable DVI D to DVI D Audio Cable Setup Manual Power Cord Type of power cord included will depend on the where the LCD monitor is to be shi...

Страница 8: ...ith Analog output Connect the 15 pin mini D SUB signal cable to the connector of the display card in your system Figure A 2 Tighten all screws For the MAC Connect the Macintosh cable adapter to the co...

Страница 9: ...r screen Figure TS 1 6 Connect the power cord to the power outlet Figure C 1 NOTE Please refer to Caution section of this manual for proper selection of AC power cord 7 Turn on the monitor with the fr...

Страница 10: ...on Before rotating the screen must be raised to the highest level to avoid knocking the screen on the desk or pinching with your fingers To raise the screen with one hand grip the top of the display b...

Страница 11: ...s from the stand removal attach the arm to the monitor Figure F 1 NOTE 1 When mounting use ONLY the screws 4 pcs that were removed from the stand to avoid damage to the monitor or stand 2 The LCD moni...

Страница 12: ...ess variable range from 0 to 30 This setting can adjust brightness within the range that power has reduced 30 from maximum brightness setting When this function is set to ON a bar for CARBON FOOTPRINT...

Страница 13: ...function ON or OFF FACTORY PRESET Selecting Factory Preset allows you to reset all OSD control settings back to the factory settings Individual settings can be reset by pressing the RESET ECO MODE but...

Страница 14: ...ves a warning when there is no Horizontal or Vertical Sync After power is turned on or when there is a change of input signal the No Signal window will appear OUT OF RANGE When input signal is non sup...

Страница 15: ...optimal display performance Active Landscape Horiz 376 3 mm 14 8 inches Display Area Vert 301 1 mm 11 9 inches Portrait Horiz 301 1 mm 11 9 inches Vert 376 3 mm 14 8 inches Speakers Practical Audio O...

Страница 16: ...on by allowing the monitor to send its capabilities such as screen size and resolutions supported directly to your computer automatically optimizing display performance IPM Intelligent Power Manager S...

Страница 17: ...hould be turned off for one hour to erase the image NOTE As with all personal display devices NEC DISPLAY SOLUTIONS recommends displaying moving images and using a moving screen saver at regular inter...

Страница 18: ...ndards at an impartial laboratory Electric and magnetic fields emissions as low as normal household background levels Low acoustic noise emissions Some of the Environmental features of the TCO Certifi...

Страница 19: ...lay com in Japan or http www necdisplay com in USA Energy Saving This monitor features an advanced energy saving capability When a VESA Display Power Management Signalling DPMS Standard signal is sent...

Отзывы: