background image

Quick Start cont.

4

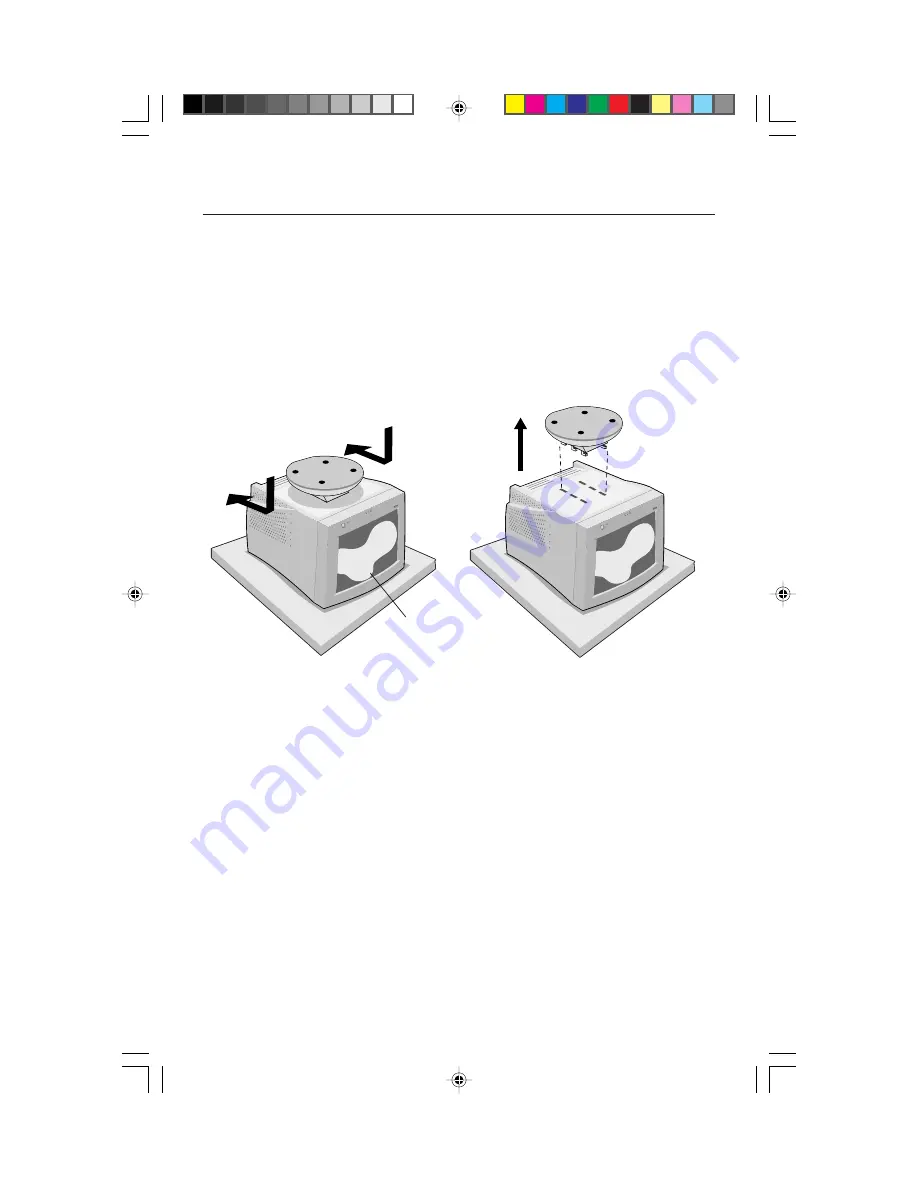
Remove Tilt/Swivel Base
To remove the tilt/swivel base from the MultiSync monitor, follow

these instruction:

1. With the monitor unplugged from your system and the wall outlet, carefully

turn the monitor upside down on a firm table 

(Figure TS-1).

2. Push down on the latch of the tilt/swivel base and slide the tilt/swivel base

backward from the front of the monitor 

(Figure TS.5).

3. Pull out the tilt/swivel base from the six holes on the bottom of the monitor

(Figure TS.6).

Figure TS-5

Figure TS-6

front of monitor

15500411.wpc

11/23/99, 7:57 AM

6

Содержание MultiSync 55

Страница 1: ...MultiSync 55 75 95 User s Manual MultiSync 55 75 95 User s Manual NEC MultiSync Series You can register your product online at www nectech com productregistration 15500411 wpc 11 23 99 7 57 AM 1 ...

Страница 2: ...ations 11 13 Features 14 Troubleshooting 15 References 16 Limited Warranty 17 Avertissement 19 Contenu 20 Mise en marche rapide 21 24 Commandes 25 26 Usage recommandé 27 28 Fiche techniques 29 31 Fonctions 32 Dépannage 33 Références 34 Garantie limitée 35 15500411 wpc 11 23 99 7 57 AM 2 ...

Страница 3: ...nt to ensure FCC compliance 2 Shielded captive type signal cable Use of other cables and adapters may cause interference with radio and television reception 2 This equipment has been tested and found to comply with the limits for a Class B digital device pursuant to part 15 of the FCC Rules These limits are designed to provide reasonable protection against harmful interference in a residential ins...

Страница 4: ...c 55 75 or 95 Power Cord Captive Signal Cable User s Manual Contents Power Cord User s Manual Remember to save your original box and packing material to transport or ship the monitor Captive Signal Cable You can register your product online at www nectech com productregistration Tilt Swivel Base 15500411 wpc 11 23 99 7 57 AM 4 ...

Страница 5: ...to the six holes on the bottom of the monitor Figure TS 2 3 Slide the tilt swivel base forward until the latch of the tilt swivel base is secure Figure TS 3 4 Having successfully installed your tilt swivel base carefully turn the monitor right side up Figure TS 4 Figure TS 1 Figure TS 2 Bottom of monitor Top of monitor Firm Table Figure TS 4 Figure TS 3 CAUTION Make certain that the tilt swivel ba...

Страница 6: ...the wall outlet carefully turn the monitor upside down on a firm table Figure TS 1 2 Push down on the latch of the tilt swivel base and slide the tilt swivel base backward from the front of the monitor Figure TS 5 3 Pull out the tilt swivel base from the six holes on the bottom of the monitor Figure TS 6 Figure TS 5 Figure TS 6 front of monitor 15500411 wpc 11 23 99 7 57 AM 6 ...

Страница 7: ...intosh Figure B 1 Attach the 15 pin mini D SUB end of the captive signal cable to the Macintosh cable adapter on the computer Figure B 1 Tighten all screws NOTE To obtain the Macintosh cable adapter call NEC Technologies at 800 820 1230 4 Connect one end of the power cord to the MultiSync monitor and the other end to the power outlet Figure C 1 5 Turn on the monitor Figure D 1 and the computer NOT...

Страница 8: ...Figure D 1 Figure C 1 Figure B 1 Quick Start cont 6 Captive Signal Cable 15 pin mini D SUB Mac Adapter Not Included Power Cord Power Outlet Power Button 15500411 wpc 11 23 99 7 57 AM 8 ...

Страница 9: ... Color Contrast Adjust the green contrast of the display Blue Color Contrast Adjust the blue contrast of the display Moves the image horizontally left or right Moves the image vertically up or down Increases or decreases the horizontal size of the image Increases or decreases the vertical size of the image The Geometry controls allow you to adjust the curvature or angle of the sides of your displa...

Страница 10: ...Sync 95 stated Kelvin There are 3 colors 9300K 7550K 6550K and one user color Choose your color preference by pressing the SELECT button on the OSM window OSM There are 3 background colors blue black and white To choose background color press SELECT button after the selection of OSM in Icon select window MultiSync 55 75 To exit the OSM menu Select EXIT in Icon select window then push SELECT button...

Страница 11: ...f possible position the monitor so that it is facing the east to minimize the effects of the earth s magnetic field Changing the direction of the monitor while it is powered on may cause image discoloration To correct this turn the monitor off for 20 minutes before powering it back on Immediately unplug your monitor from the wall outlet and refer servicing to qualified service personnel under the ...

Страница 12: ...y Use a document holder placed close to the screen Position whatever you are looking at most of the time the screen or reference material directly in front of you to minimize turning your head while you are typing Get regular eye checkups Ergonomics To realize the maximum ergonomics benefits we recommend the following Adjust the Brightness until the background raster disappears Do not position the...

Страница 13: ... 55 to 110 Hz all modes listed vertical frequencies only 832 x 624 55 to 106 Hz 1024 x 768 55 to 87 Hz NEC cites recommended resolution at 1152 x 875 55 to 77 Hz 85 Hz for optimal display performance 1280 x 1024 55 to 66 Hz Active Display Area Horizontal 275 mm 10 6 inches Dependent upon signal timing used Factory Setting Vertical 203 mm 8 inches and does not include border area Active Display Are...

Страница 14: ...o 110 Hz all modes listed vertical frequencies only 832 x 624 55 to 106 Hz 1024 x 768 55 to 87 Hz NEC cites recommended resolution at 1152 x 875 55 to 77 Hz 85 Hz for optimal display performance 1280 x 1024 55 to 66 Hz Active Display Area Horizontal 310 mm 12 2 inches Dependent upon signal timing used Factory Setting Vertical 232 mm 9 1 inches and does not include border area Active Display Area 3...

Страница 15: ...tical frequencies only 832 x 624 55 to 144 Hz 1024 x 768 55 to 120 Hz 1152 x 875 55 to 105 Hz 1280 x 1024 55 to 89 Hz NEC cites recommended resolution at 1600 x 1200 55 to 76 Hz 85 Hz for optimal display performance Active Display Area Horizontal 356 mm 14 0 inches Dependent upon signal timing used Factory Setting Vertical 267 mm 10 5 inches and does not include border area Active Display Area 366...

Страница 16: ...ples include OSM controls for quick and easy image adjustments tilt swivel base for pre ferred angle of vision and compliance with MPRII guidelines for lower emissions Plug and Play The Microsoft solution with the Windows 95 98 operating system facilitates setup and installation by allowing the monitor to send its capabilities such as screen size and resolutions supported directly to your computer...

Страница 17: ...ge yellow color can be seen Power Switch should be in the ON position and power cord should be connected Picture is fuzzy or color looks blotchy Adjust Brightness and Contrast Controls Access the Degauss Control through OSM controls Activate the Degauss Control CAUTION A minimum interval of 20 minutes should elapse before the Deguass Control is used a second time when not switching between modes P...

Страница 18: ...n Windows 95 98 INF file http cssweb nectech com common drivers htm Then download the file NECMSINF ZIP FastFacts Information 630 467 4363 INFORMATION DESCRIPTION DOCUMENT Glossary Definition of terms related 950203 to functions features and installation of the MultiSync monitor More Information Names and addresses of 950204 other groups involved in standards and features of the MultiSync monitor ...

Страница 19: ...eturned to NECTECH for service MUST have prior approval which may be obtained by calling 1 800 632 4662 The Product shall not have been previously altered repaired or serviced by anyone other than a service facility authorized by NECTECH to render such service the serial number of the product shall not have been altered or removed In order to be covered by this warranty the Product shall not have ...

Страница 20: ...18 Notes 15500411 wpc 11 23 99 7 57 AM 20 ...

Страница 21: ...rer la conformité FCC 2 Câble de signal de type captif blindé L utilisation d autres câbles et adaptateurs peut provoquer des interférences avec la réception radio et télévision 2 Cet appareil a passé avec succès les tests de conformité des spécifications d équipements de Classe A section 15 de la réglementation FCC Ces spécifications ont été établies pour garantir un niveau inoffensif des interfé...

Страница 22: ... Câble de signal captif Mode d emploi Contenu Cordon d alimentation Manuel de l utilisateur 20 Ne pas oublier de conserver la boîte et le matériel d emballage d origine pour trans porter ou expédier le moniteur Votre produit peut être enregistré sur Internet à l adresse http www nectech com productregistration Câble de signal captif 15500411 wpc 11 23 99 7 57 AM 22 ...

Страница 23: ...le rotatif dans les six trous sur le bas du moniteur Figure TS 2 3 Glissez le socle inclinable rotatif de base en avant jusquà ce que le verrou de le socle inclinable rotatif soit bloqué Figure TS 3 4 Une fois la nouvelle le socle inclinable rotatif posée remettre soigneusement le moniteur à l endroit comme Figure TS 4 Figure TS 1 Figure TS 2 bas du moniteur Dessus du moniteur Table solide Figure ...

Страница 24: ...solide Figure TS 1 2 Appuyez sur le verrou de le socle inclinable rotatif et glissez le socle inclin able rotatif vers l arriére de l avant du moniteur Figure TS 5 3 Retirez le socle inclinable rotatif des six trous sur le bas du moniteur Figure TS 6 Figure TS 5 Figure TS 6 l avant du moniteur Mise en marche rapide suite 15500411 wpc 11 23 99 7 57 AM 24 ...

Страница 25: ...he D SUB à 15 broches du câble d interface à l adaptateur de câble Macintosh sur l ordinateur Figure B 1 Serrer toutes les vis REMARQUE Pour obtenir un adaptateur de câble Macintosh appeler NEC Technolo gies au 800 820 1230 4 Connecter une extrémité du cordon d alimentation au moniteur MultiSync et l autre extrémité à la prise de courant Figure C 1 5 Allumer le moniteur Figure D 1 et l ordinateur ...

Страница 26: ...re C 1 Figure B 1 Mise en marche rapide suite 24 Câble d interface Mini fiche D SUB à 15 broches Adaptateur Mac non fourni Cordon d alimentation Prise de courant Bouton d alimentation 15500411 wpc 11 23 99 7 57 AM 26 ...

Страница 27: ... le contraste bleu de l affichage Déplace l image horizontalement vers la gauche ou vers la droite Déplace l image verticalement vers le haut ou vers le bas Augmente ou diminue le format horizontal de l image Augmente ou diminue le format vertical de l image Les commandes Geometry permettent de régler la courbure ou l angle des côtés de l affichage Augmente ou diminue la courbure des côtés vers l ...

Страница 28: ...ans le window d OSM OSMMC Il existe trois couleurs d arrière plan bleu noir et blanc Pour sélectionner une couleur d arrière plan appuyez sur le bouton SELECT après avoir sélectionné OSM dans la fenêtre de sélection des icônes MultiSync 55 75 Pour quitter le menu OSM sélectionnez EXIT dans la fenêtre de sélection des icônes et appuyez sur le bouton SELECT pour quitter le menu OSM MultiSync 95 Pour...

Страница 29: ...xternes lesquels peuvent créer des champs magnétiques puissants Si possible positionner le moniteur de sorte qu il soit orienté vers l est afin de minimiser les effets du champs magnétique terrestre Changer le moniteur d orientation alors qu il est sous tension peut occasionner une décoloration de l image Pour éviter cela mettre le moniteur hors tension pendant 20 minutes avant de le remettre sous...

Страница 30: ...raste du moniteur pour améliorer la lisibilité Utiliser un support de document placé près de l écran Positionner ce que l on regarde le plus souvent l écran ou les documents de référence directement devant soi pour réduire au maximum les mouvements de la tête lorsque l on dactylographie Consulter régulièrement un ophtalmologiste Ergonomie Pour des raisons ergonomiques nous vous recommandons de rég...

Страница 31: ...s 800 x 600 55 à 110 Hz tous les modes listés horizontales et verticales uniquement 832 x 624 55 à 106 Hz 1 024 x 768 55 à 87 Hz NEC recommande une résolution à 85 Hz 1 152 x 875 55 à 77 Hz pour des performances d affichage 1 280 x 1 024 55 à 66 Hz optimales Zone d affichage active Horizontale 275 mm 10 6 po Dépend de la synchronisation du signal réglage d usine Verticale 203 mm 8 po utilisée et n...

Страница 32: ...s 800 x 600 55 à 110 Hz tous les modes listés horizontales et verticales uniquement 832 x 624 55 à 106 Hz 1 024 x 768 55 à 87 Hz NEC recommande une résolution à 85 Hz 1 152 x 875 55 à 77 Hz pour des performances d affichage 1 280 x 1 024 55 à 66 Hz optimales Zone d affichage active Horizontale 310 mm 12 2 po Dépend de la synchronisation du signal réglage d usine Verticale 232 mm 9 1 po utilisée et...

Страница 33: ...5 à 153 Hz tous les modes listés horizontales et verticales uniquement 832 x 624 55 à 144 Hz 1 024 x 768 55 à 120 Hz 1 152 x 875 55 à 105 Hz 1 280 x 1 024 55 à 89 Hz NEC recommande une résolution à 85 Hz 1 600 x 1 200 55 à 76 Hz pour des performances d affichage optimales Zone d affichage active Horizontale 356 mm 14 0 po Dépend de la synchronisation du signal réglage d usine Verticale 267mm 10 5 ...

Страница 34: ... un réglage rapide et aisé de l image une base d inclinaison de rotation pour un angle de vision préféré et la conformité aux directives MPRII concernant les réductions d émissions Plug and Play La solution Microsoft avec le système d exploitation Windows 95 98 facilite la configuration et l installation en permettant au moniteur d envoyer ses capacités telles que le format et les résolutions d éc...

Страница 35: ...nge ou jaune n est visible Le commutateur d alimentation doit être en position ON et le cordon d alimentation doit être connecté L image est floue ou les couleurs semblent brouillées Régler les commandes de luminosité et de contraste Accéder à la commande Degauss via les commandes OSMMC Activer la commande Degauss ATENTION Un intervalle d au moins 20 minutes doit s écouler avant que la commande De...

Страница 36: ...Fichier INF Windows 95 98 http cssweb nectech com common drivers htm Ensuite charger le fichier NECMSINF ZIP Informations FastFactsMC 630 467 4363 INFORMATION DESCRIPTION DOCUMENT Glossaire Définition des termes en relation 900203 avec les fonctions les caractéristiques et l installation du moniteur MultiSync Informations complémentaires Noms et adresses d autres 900204 groupes impliqués dans les ...

Страница 37: ... faits après approbation laquelle peut être obtenue en composant le 1 800 632 4662 Le produit ne pourra avoir été modifié réparé ou anentreu au préalable par personne d autre que du personnel technique autorisé par NECTECH de rendre un tel service et le numéro de série du produit ne pourra pas avoie été enlevé Pour être couvert par dette garantie le produit ne pourra pas avoir été soumis à l affic...

Страница 38: ...36 Notes 15500411 wpc 11 23 99 7 57 AM 38 ...

Страница 39: ...onforme à l article 15 du règlement de la FCC L utilisation est soumise à deux conditions 1 Cet appareil ne peut pas occasionner d interférences nuisibles et 2 cet appareil doit accepter toutes interférences reçues y compris les interférences qui peuvent occasionner un mauvais fonctionnement Partie responsable américaine NEC Technologies Inc Adresse 1250 N Arlington Heights Road Itasca Illinois 60...

Страница 40: ...ion is subject to the following two conditions 1 This device may not cause harmful interference and 2 this device must accept any interference received including interference that may cause undesired operation U S Responsible Party NEC Technologies Inc Address 1250 N Arlington Heights Road Itasca Illinois 60143 Tel No 630 467 5500 Type of Product Computer Monitor Equipment Classification Class B P...

Отзывы: