background image

59

6. Network control

 Image setup: Click this option to display the [image setup] page.

 Network setup: Click this option to display [Network setup] page.

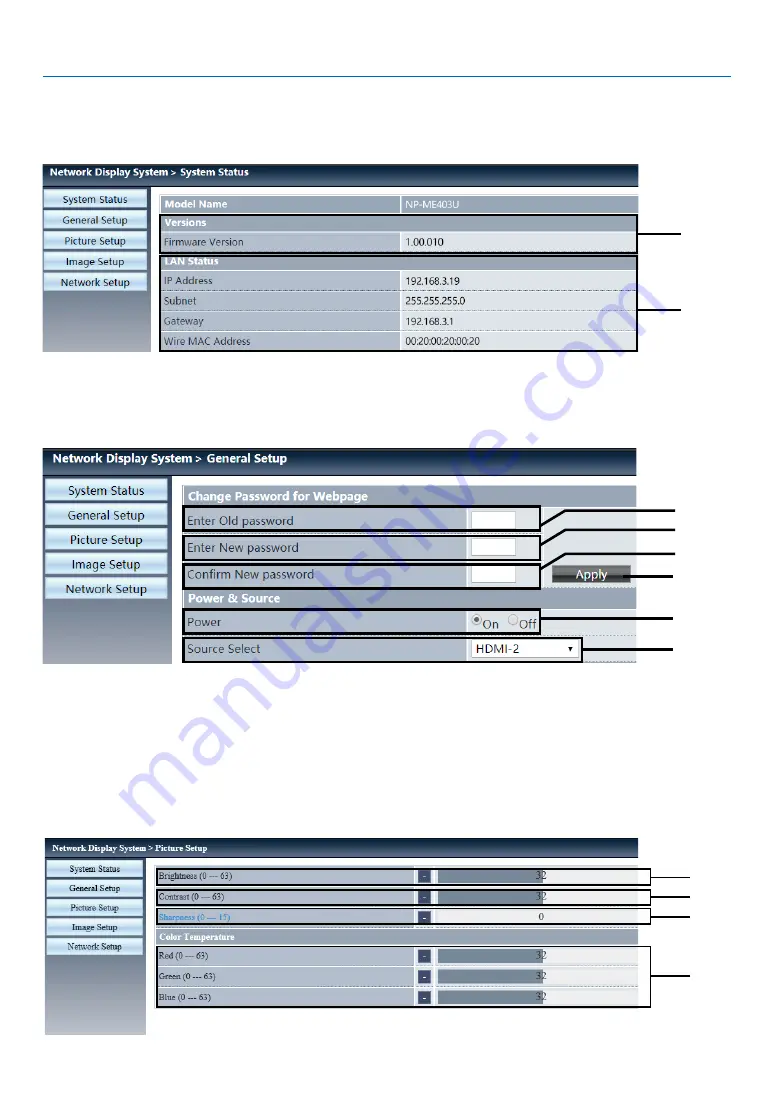
 [System status] page

 Versions: Displays the firmware version of the projector.

 LAN status: Displays the LAN. connection status.

4

 [General setup] page


① 

Enter old password: Enter the password for the configuration.

② 

Enter new password: Enter a new password.

③ 

Confirm new password: Re-enter the new password to confirm.

④ 

Power & source: Update settings.

 Power: Switch on the power of the projector on / off.

 Source select: Switch the input source of the projector.

 [Picture setup] page

Содержание ME403U

Страница 1: ...ual Please visit our web site for User s Manual in the latest version https www sharp nec displays com dl en pj_manual lineup html The ME383W and MC393W are not distributed in North America Model No N...

Страница 2: ...RESTRON and ROOMVIEW are registered trademarks of Crestron Electronics Inc in the United States and other countries Other product names and logos mentioned in this user s manual may be the trademarks...

Страница 3: ...images being temporarily sustained on the surface of the LCD panel If this should happen continue to use your projector The static background from previous images will disappear Disposing of your used...

Страница 4: ...conformity for USA only This device complies with Part 15 of the FCC Rules Operation is subject to the following two conditions 1 This device may not cause harmful interference and 2 this device must...

Страница 5: ...bjects which are easily affected by heat in front of the projection window Doing so could lead to the object melting from the heat that is emitted from the light output Do not use a spray containing f...

Страница 6: ...ctor gets wet turn off the projector unplug the power cord and have the projector serviced by a qualified service personnel Handle the power cord carefully A damaged or frayed power cord can cause ele...

Страница 7: ...ector has a discharge lamp for special purposes as a light source A lamp has a characteristic that its brightness gradually decreases with age Also repeatedly turning the lamp on and off will increase...

Страница 8: ...ement function The projector has power management functions To reduce power consumption the power management functions 1 and 2 are factory preset as shown below To control the projector from an extern...

Страница 9: ...g the Power Cord 10 Turning on the Projector 11 Selecting a Source 12 Selecting the computer or video source 12 Adjusting the Picture Size and Position 13 Adjust the Tilt Foot 14 Zoom 15 Focus 15 Corr...

Страница 10: ...scriptions Functions Setting 36 On start 36 Standby mode 37 High altitude 37 ECO mode 38 Cooling fast 38 Closed caption 39 Key lock 39 Iris 40 Baud rate 40 Sound 41 HDMI setup 41 Menu Descriptions Fun...

Страница 11: ...nnecting to a Wired LAN 77 Connecting to a Wireless LAN Optional NP05LM series 77 8 Connecting to a Network 80 1 Things you can do by connecting the projector to a network 80 2 Connecting to MultiPres...

Страница 12: ...omputer cable VGA 310002200 Strap 1 410035000 NEC Projector CD ROM User s manual PDF 510048500 For North America only Limited warranty For customers in Europe You will find our current valid Guarantee...

Страница 13: ...e for better and proper maintenance of the projector Security Function The Security function helps you to ensure security of the projector With the Key lock function you can lock the operation on the...

Страница 14: ...ote Sensor page 8 Exhaust Vent Heated air is exhausted from here Indicators page 5 Zoom Lever page 15 Lens Cap For protecting lens Make sure to take it off during projection Focus Ring page 15 Adjusta...

Страница 15: ...on measure fix on the supplied strap Monaural Speaker 16 W Terminal Panel page 6 Intake Vent Filter Cover page 82 88 Built in Security Slot Security chain opening Attach an anti theft device The secur...

Страница 16: ...n page 11 18 2 POWER Indicator page 10 11 18 90 3 STATUS Indicator page 90 4 LAMP Indicator page 90 5 ECO Button page 21 6 INPUT Button page 12 7 AUTO ADJ Button page 17 8 MENU Button page 24 9 Volume...

Страница 17: ...UDIO OUT Mini Jack Stereo Mini page 73 NOTE The AUDIO OUT mini jack does not support earphone headphone terminal 8 VIDEO IN Terminal RCA page 74 9 VIDEO AUDIO IN L MONO R RCA page 74 10 LAN Port RJ 45...

Страница 18: ...k on this series of projectors 14 APPS Button page 14 15 ID SET Button page 52 16 Numeric Keypad Button CLEAR Button page 52 17 PIP Button PIP button does not work on this series of projectors 18 FREE...

Страница 19: ...the remote control for a long time remove the batteries Ensure that you have the batteries polarity aligned correctly Do not use new and old batteries together or use different types of batteries toge...

Страница 20: ...or page 11 Step 3 Selecting a source page 12 Step 4 Adjusting the picture size and position page 13 Correcting keystone distortion KEYSTONE page 16 Step 5 Adjusting a picture and sound Optimizing a co...

Страница 21: ...rst connect the supplied power cord s three pin plug to the AC IN terminal of the projector and then connect another plug of the supplied power cord directly in the wall outlet Do not use any plug con...

Страница 22: ...t or the POWER ON button on the remote control The POWER indicator will blink and the projector will become ready to use TIP When the message PIN code is displayed it means that the SECURITY feature i...

Страница 23: ...n once The projector will search for the available input source and display it The input source will change as follows Computer HDMI1 HDMI2 Video USB A LAN With the INPUT screen displayed you can pres...

Страница 24: ...ables are omitted for clarity Adjusting the throw angle the height of an image Tilt foot page 14 Finely adjusting the size of an image Zoom lever page 15 Adjusting the focus Focus ring page 15 Adjusti...

Страница 25: ...ilt Foot Lever on the front of the projector to extend the adjustable tilt foot 3 Lower the front of the projector to the desired height 4 Release the Adjustable Tilt Foot Lever to lock the Adjustable...

Страница 26: ...15 2 Projecting an Image Basic Operation Zoom Use the ZOOM lever to adjust the image size on the screen Zoom Lever Focus Use the FOCUS ring to obtain the best focus Focus Ring...

Страница 27: ...ion Adjust the projected image when the projector linearity is uneven or the projected images bent vertically and horizontally Grid Image Tune Adjust the local points of the projected image Reset The...

Страница 28: ...ation cannot optimize the computer signal try to adjust Fine sync H position V position and H size manually page 30 31 Turning Up or Down Volume Sound level from the speaker or audio output can be adj...

Страница 29: ...ll turn off when Normal is selected for STANDBY MODE Power On Steady blue light Standby Blinking orange light CAUTION Parts of the projector may become temporarily heated if the projector is turned of...

Страница 30: ...ration When Moving the Projector Preparation Make sure that the projector is turned off 1 Put on the lens cap 2 Unplug the power cord 3 Disconnect any other cables Remove the USB memory if it is inser...

Страница 31: ...e even if you press the AV MUTE button immediately after the start of the power saving function the lamp brightness may not be restored to its original level Freezing a Picture Press the FREEZE button...

Страница 32: ...21 3 Convenient Features 2 Press the button The area of the magnified image will be moved...

Страница 33: ...e controller and on the top control panel and select the input source of USB A 2 Insert the USB memory into the USB A terminal directly Press RC enter to display standby screen instanly while the USB...

Страница 34: ...e projector or the projector is reading data do not remove the USB memory When the light is flashing b If you use a USB memory device without indicator the projector will not recognize when reading da...

Страница 35: ...2 Color adjust menu Available options in the Image mode menu are Dynamic Standard Cinema Blackboard Green Color board or User image For video signal input the available color adjust options Contrast...

Страница 36: ...Wide Full 16 10 Video signal only supports Normal Wide WXGA WUXGA Normal Wide Full 4 3 Orientation Front Rear Ceiling Front Ceiling Rear Auto ceiling Front Auto ceiling Rear Menu position Upper left U...

Страница 37: ...de Normal ECO1 ECO2 Boost Cooling fast Normal 0 Sec 30 Sec Closed caption Off CC1 CC2 CC3 CC4 Key lock On Off Iris On Off Baud rate 19200 4800 38400 9600 Sound Volume 0 25 Mute On Off HDMI setup Image...

Страница 38: ...Blue Cross hatch White Black Raster gray Network setup Wired LAN DHCP On Off IP address Subnet Gateway DNS Wireless LAN Setting On Off Control ID Control ID On Off Control ID number 1 254 Factory defa...

Страница 39: ...ignal is connected to the COMPUTER IN terminal select Computer HDMI1 and HDMI2 Selects the HDMI compatible equipment connected to your HDMI1 or 2 IN terminal Video Selects what is connected to your Vi...

Страница 40: ...stment function may fail to work if computer models is not compatible with the input signal Auto PC Adjustment function may fail to work if you select the following system signal format 480i 576i 480p...

Страница 41: ...ress button to adjust H size level Adjustment range is from 15 to 15 Aspect Adjust the image to fit the screen size while keeping aspect of input signal s unchanged Press MENU button on the remote con...

Страница 42: ...in front of the screen Auto ceiling Rear when the projector is projected in rear of the screen H size Display Auto PC adj Fine sync 0 0 0 0 H position V position Aspect Normal Front Upper left Blue O...

Страница 43: ...PC adj Fine sync 0 0 0 0 H position V position Aspect Normal Front Upper left Blue Orientation Menu position Background display System Signal format If a PC is selected as the input signal source you...

Страница 44: ...ER button 3 Press button to select wanted Signal format Computer input signal 1024x768 60HZ etc display the compatible name input signal name Auto When projector has no compatible input signal with on...

Страница 45: ...es Blackboard Green An image mode designed for displaying on a blackboard Green It boosts quality of image projected on blackboard Green This is designed for a board in green rather than black as indi...

Страница 46: ...and Blue values by yourself Color For Video input Press button to decrease saturation press button to increase saturation Tint For Video input Press button to select required tint Red Press button to...

Страница 47: ...button to set options Setting On start Standby mode High altitude ECO mode Cooling fast Closed caption Key lock lris Baud rate Sound HDMI setup Off Normal Normal Off Normal Off Off Off 19200 On start...

Страница 48: ...in standby mode there are no restraint on network function and serial communication function On start HDMI setup Setting Standby mode High altitude ECO mode Cooling fast Closed caption Key lock lris...

Страница 49: ...t the cooling time after projector is turned off 1 Press button to select Cooling fast menu 2 Press ENTER button 3 Press button to switch required menu Normal Running in normal way 30 Sec Running fast...

Страница 50: ...setup Setting Standby mode High altitude ECO mode Cooling fast Closed caption Key lock lris Baud rate Sound Off Normal Normal Off Normal Off Off Off 19200 Key lock Select this function to lock and unl...

Страница 51: ...e High altitude ECO mode Cooling fast Closed caption Key lock lris Baud rate Sound Off Normal Normal Off Normal Off Off Off 19200 Baud rate Select this function to adjust the projector transmission ra...

Страница 52: ...rmally please switch on the image or sound setting Press MENU button on the remote controller or on the top control panel to display the OSD menu Press button to select the setting menu then press ENT...

Страница 53: ...cted to the HDMI setup ter minal also Sound HDMI When connect to the HDMI cable to tansmite images and audio while the users donot need connect to audio signal separatly Computer When the output of an...

Страница 54: ...ed the language displayed on the screen 1 Press button to select language menu 2 Press ENTER button 3 Press button to select required language 4 Press ENTER button The name of menus setting the OSD bu...

Страница 55: ...Ceiling Front or Ceiling Rear Auto keystone function is invaild When you set Project way as Auto ceiling Front or Auto ceiling Rear and users put their projector in ceiling state the Auto keystone fun...

Страница 56: ...ttom width Press button to reduce left width Press button to reduce right width 4 Conner correction Select this function to correct the projected images of four corners distorted Press button to keyst...

Страница 57: ...left Expand the top an and bottom while maintaining the central area Curved cerrection X Offset Press Correct the vertical lins on the right Expand the top an and bottom while maintaining the central...

Страница 58: ...ress Correct vertical lines on both sides Expand the lower corners while maintaining the central and upper regions Curved cerrection Y Offset Press Correct vertical lines on both sides Expand the lowe...

Страница 59: ...o switch required item PIN code lock This function helps preventing unauthorized personnel from changing projector setting Off PIN code lock function is not available On The PIN code screen will appea...

Страница 60: ...oled down Off Disable the power management function Timer Once the input signal is interrupted and no keys has been pressed for 30 seconds afterwards the No signal message displays in the timer The ti...

Страница 61: ...filter Off DO NOT check filter NOTE The screen will display the icon Filter warning please change the filter when the projector has checks one warning And the the warn ing icon will disappear 30S lat...

Страница 62: ...ou are somehow familiar with networking 3 Enter the network setup menu 1 Press MENU button on remote controller or top of the control panel press button to select LAN icon 2 Press button select networ...

Страница 63: ...hile pressing and holding the ID SET button on the remote control Example To assign 3 press the 3 button on the remote control No ID means that all the projectors can be operated together with a singl...

Страница 64: ...TER button Return to factory default Yes No Move Select ENTER Back EXIT Lamp counter reset Make sure to reset the lamp counter when replacing the lamp Then the warning indicator goes out and the lamp...

Страница 65: ...vailable In addition to Set slide menu even change the settings If you do not implement the Application the setting value of the change is invalid USB A Set slide Slide transition effect Sort order Ro...

Страница 66: ...tate counterclockwise by 270 degrees 180 degree Rotate clockwise by 180 degrees 90 degree rotate clockwise by 90 degrees Best fit Set the image to be compatible with projection screen 1 Press button t...

Страница 67: ...c freq Display H sync freq of input signal in unit of KHz Show KHz when no signals are in existence V sync freq Display V sync freq of input signal in unit of KHz Show KHz when no signals are in exist...

Страница 68: ...enu 1 Press MENU button on remote controller or top control panel press button to select LAN icon 2 Press ENTER button or button and the network menu displays 3 Press button select network settings an...

Страница 69: ...right corner of the Web browser screen to select the display language Do not start multiple Web browser settings or control Do not use more than one computer set or control the projector Please change...

Страница 70: ...ion of the projector LAN status Displays the LAN connection status 4 General setup page Enter old password Enter the password for the configuration Enter new password Enter a new password Confirm new...

Страница 71: ...he phase of the projected image H position Adjust the horizontal position of the projected image V position Adjust the vertical position of the projected image H size Adjust the horizontal dimension o...

Страница 72: ...ease enter the gateway when you do not use the DHCP server DNS Please enter the DNS address when you do not use the DHCP server Available characters digital 0 9 a period For example 192 168 0 253 Appl...

Страница 73: ...een height from the center of the projector lens Projection distance When zoom lever turned to telescopic Screen center line telescopic Screen center line wide When zoom lever turned to wide Projector...

Страница 74: ...zoom lever turned to telescopic Screen center line telescopic Screen center line wide When zoom lever turned to wide Projector lens center m m When zoom lever turned to wide When zoom lever turned to...

Страница 75: ...hen zoom lever turned to telescopic Screen center line telescopic Screen center line wide When zoom lever turned to wide Projector lens center m m When zoom lever turned to wide When zoom lever turned...

Страница 76: ...er line telescopic Screen center line wide When zoom lever turned to wide Projector lens center m m When zoom lever turned to wide When zoom lever turned to telescopic Reading the Table From the upper...

Страница 77: ...er line telescopic Screen center line wide When zoom lever turned to wide Projector lens center m m When zoom lever turned to wide When zoom lever turned to telescopic Reading the Table From the upper...

Страница 78: ...zoom lever turned to telescopic Screen center line telescopic Screen center line wide When zoom lever turned to wide Projector lens center m m When zoom lever turned to wide When zoom lever turned to...

Страница 79: ...0 18 457 6 157 31 778 52 1327 3 71 11 4 6 8 40 1016 32 813 24 610 8 210 42 1056 70 1788 4 95 11 2 6 7 60 1524 48 1219 36 914 12 314 63 1612 107 2710 6 143 11 0 6 6 80 2032 64 1626 48 1219 17 419 85 21...

Страница 80: ...2 2342 111 2831 4 111 10 3 8 6 100 2540 85 2154 53 1346 21 534 116 2937 140 3545 5 139 10 3 8 6 120 3048 102 2585 64 1615 25 641 139 3531 168 4260 7 166 10 3 8 6 150 3810 127 3231 79 2019 32 802 174 4...

Страница 81: ...e ground you can be injured and the projector severely damaged Do not use the projector where temperatures vary greatly The projector must be used at temperatures between 41 F 5 C and 104 F 40 C Eco m...

Страница 82: ...ng on the projector Input terminal INPUT button on the projector cabinet Button on the remote control COMPUTER IN COMPUTER COMPUTER HDMI 1 IN HDMI1 HDMI 1 HDMI 2 IN HDMI2 HDMI 2 HDMI 1 IN HDMI 2 IN CO...

Страница 83: ...sing a DVI signal When the computer has a DVI output terminal use a commercially available converter cable to connect the com puter to the projector s HDMI 1 or HDMI 2 input terminal only digital vide...

Страница 84: ...ou re projecting NOTE The AUDIO OUT mini jack does not support earphone headphone terminal When audio equipment is connected the projector speaker is disabled The signal output from the COMPUTER OUT o...

Страница 85: ...he source name for its appropriate input terminal after turning on the projector Input terminal INPUT button on the projector cabinet Button on the remote control VIDEO IN VIDEO VIDEO NOTE Refer to yo...

Страница 86: ...CA 3 cable not supplied Audio cable not supplied DVD player Audio Equipment Select the source name for its appropriate input terminal after turning on the projector Input terminal INPUT button on the...

Страница 87: ...PC to the HDMI IN terminal of your projector Select the source name for its appropriate input terminal after turning on the projector Input terminal INPUT button on the projector cabinet Button on th...

Страница 88: ...is working Your computer s wireless LAN adapter or unit must be complied with IEEE802 11b g n standard Attaching the USB Wireless LAN Unit NOTE The USB Wireless LAN Unit must be inserted into the USB...

Страница 89: ...it Set the supplied strap onto the strap fixing hole for the measure of anti theft and dropping off To remove the USB Wireless LAN Unit disconnect the power cord and use the above procedure NOTE The g...

Страница 90: ...use the HTTP server function the projector must be connected to a network First connect the projector to a network by the wired LAN and then perform required settings for the wireless LAN on the HTTP...

Страница 91: ...nter app to the projector and project them onto a screen See our company s website for more details about MultiPresenter https www sharp nec displays com dl en soft multipresenter index html Using the...

Страница 92: ...is displayed 2 Start MultiPresenter The target device screen is displayed 3 Enter the 4 digit PIN code displayed in the start up screen in the target device screen When connection with the projector i...

Страница 93: ...ayed for one minute after the projector is turned on or off When the message is displayed clean the filter The time to clean the filter is set to 10000 H at time of shipment To cancel the message pres...

Страница 94: ...d push the button to close the filter unit Push the filter unit until it clicks into place 6 Clear the filter usage hours Plug the power cord into the wall outlet and then turn on the projector From t...

Страница 95: ...dust off the cabinet If heavily soiled use a mild detergent Never use strong detergents or solvents such as alcohol or thinner When cleaning the vents or the speaker using a vacuum cleaner do not for...

Страница 96: ...urface on the lamp housing Leaving finger prints on the glass surface might cause an unwanted shadow and poor picture quality The lamp warning icon displays when its usage time are more than the repla...

Страница 97: ...removable One of the screws is interlocked to prevent electric shock Do not attempt to circumvent this interlock 2 Remove the lamp housing by holding it CAUTION Make sure that the lamp housing is coo...

Страница 98: ...k until it snaps into place 2 Tighten the screw to secure the lamp cover Be sure to tighten the screw 3 Install a new lamp housing 1 Insert a new lamp housing until the lamp housing is plugged into th...

Страница 99: ...oap and water Soap and water will damage the filter membrane Put filter into place Incorrect attachment of a filter may cause dust and dirt to get into the inside of the projector 1 Push button to rel...

Страница 100: ...he power cord into the wall outlet and then turn on the projector 3 Clear the lamp usage hours and the filter usage hours 1 Press MENU button and the OSD displays Press button to select Expand menu pr...

Страница 101: ...ge time of the lamp and the status of ECO MODE Indicator Message Status message POWER STATUS LAMP Projector status Power is off Off Off Off Standy Normal Orange Blink 2 Off Off Standy Network Orange O...

Страница 102: ...tays near the exhaust vent Red Blink 4 Off Off Red Red Blink 4 Off Power problem Please contact your dealer or service personnel Red Red Off FAN problem Please contact your dealer or service personnel...

Страница 103: ...11 5 Wide 6 6 6 8 Tele 10 2 10 6 Wide 8 5 8 7 Tele 10 2 10 3 Wide 8 5 8 6 Tele 10 7 11 4 Wide 6 5 6 8 Tele 10 2 10 3 Wide 8 5 8 6 Tele 1 Effective pixels are more than 99 99 2 When ECO1 is selected t...

Страница 104: ...wer resolution than the projector s native resolution ME453X MC453X 1024 768 ME423W ME383W MC423W MC393W 1280 800 ME403U 1920 1200 will be displayed with Advanced AccuBlend page 97 Mechanical Model Nu...

Страница 105: ...94 10 Appendix 345 13 6 284 5 11 2 261 10 3 113 5 4 5 104 6 4 1 95 3 7 54 2 1 175 6 9 154 6 1 5 0 2 195 7 7 126 2 5 0 Cabinet Dimensions Unit mm inch ME403U...

Страница 106: ...95 10 Appendix 261 10 3 345 13 6 104 6 4 1 108 4 4 3 95 3 7 54 2 1 5 0 2 154 6 1 126 2 5 0 195 7 7 175 6 9 Unit mm inch ME423W ME383W MC423W MC393W ME453X MC453X...

Страница 107: ...9 7 8 Pin No RGB Signal Analog YCbCr Signal 1 Red Cr 2 Green or Sync on Green Y 3 Blue Cb 4 Ground 5 Ground 6 Red Ground Cr Ground 7 Green Ground Y Ground 8 Blue Ground Cb Ground 9 Hotplug 10 Sync Si...

Страница 108: ...15 1920x1080p 50Hz 148 500 56 250 50 000 16 640x480 60Hz 640x480 25 175 31 469 59 940 17 640x480 67Hz 30 240 35 000 66 667 18 640x480 72Hz 31 500 37 861 72 809 19 640x480 75Hz 31 500 37 500 75 000 20...

Страница 109: ...1366x768 60Hz 1366x768 84 750 47 720 59 799 49 1400x1050 60Hz 1400x1050 121 750 65 317 59 978 50 1400x1050 75Hz 156 000 82 278 74 867 51 1440x900 60Hz 1440x900 106 500 55 935 59 887 52 1600x900 60Hz 1...

Страница 110: ...12H 00H 00H 00H 14H SOUND MUTE OFF 02H 13H 00H 00H 00H 15H NOTE Contact your local dealer for a full list of the PC Control Codes if needed Cable Connection Communication Protocol Baud rate 38400 bps...

Страница 111: ...N INTERFACE 1 Connection thru the serial port Communication Protocol Item Information Baud rate 19200 4800 38400 9600 bps Data length 8 bits Parity bit No parity Stop bit 1 bit Flow control None Commu...

Страница 112: ...ource connected to the projector is active and available Still no image even though you adjust the brightness and or the contrast Input source s resolution and frequency are supported by the projector...

Страница 113: ...Red cycles Lights in Blue Green Orange Red Remote control model number Installation environment Screen size inch Screen type White matte Beads Polarization Wide angle High contrast Throw distance feet...

Страница 114: ...r warranty and InstaCare service program Visit our web site at https www sharpnecdisplays us click on support center register product and submit your completed form online Upon receipt we will send a...

Страница 115: ...Sharp NEC Display Solutions Ltd 2021...

Отзывы: