background image

31

Refer to 

User

’s Guide

 and Help

7. Refer to “User’s Guide” and Help

7

7. Refer to “User’s Guide” and Help

Each software program in User Supportware 3 contains each help file that explains the functions
and operation methods in detail.
Also, “User’s Guide” (PDF) explains the basic operation procedure of each software program
carefully.

7-1. Displaying “User’s Guide” (PDF)

Important

• User Supportware 3 CD-ROM does not contain Acrobat Reader or Adobe Reader. If no

PDF file can be opened from your personal computer, download Adobe Reader from the
Adobe Systems Incorporated home page, and install it.

1

Turn on your personal computer to start Windows.

2

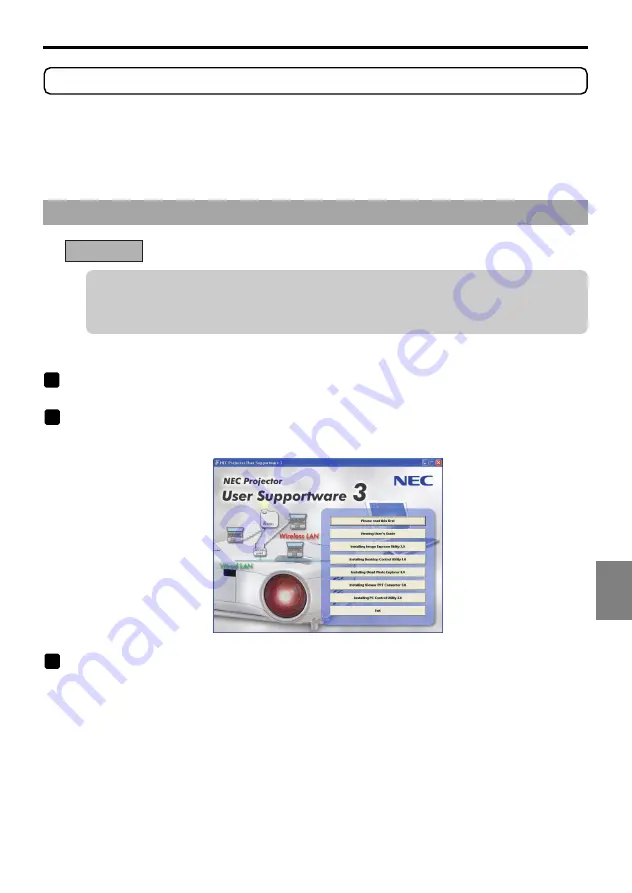
Insert User Supportware 3 CD-ROM in the CD-ROM drive.

The menu will be displayed.

3

Click [Viewing User’s Guide].

[User’s Guide] will be displayed.
For the following operations, browse User’s Guide according to Acrobat Reader or Adobe Reader
operation method.

Содержание LT380 - MultiSync XGA LCD Projector

Страница 1: ...use the software programs included in the supplied User Supportware 3 CD ROM For how to operate each software program refer to User s Guide PDF on User Supportware 3 CD ROM NEC Projector LT380 LT280 W...

Страница 2: ...0 Desktop Control Utility 1 0 Ulead Photo Explorer 8 0 SE Basic Viewer PPT Converter 3 0 PC Control Utility 3 0 This document explains how to configure the LAN settings to use the above software prog...

Страница 3: ...r electric shock Do not use a wireless LAN card in wet or moist places such as in bathrooms or near humidifiers Doing so could lead to fire electric shock or malfunctions To prevent damage due to stat...

Страница 4: ...rol Utility 3 0 7 2 Operating Environment 8 2 1 Supported Projector 8 2 2 Operating Environment 9 3 Connecting LAN Cable 10 4 Attaching Wireless LAN Card 11 5 Setting the LAN Setting of Projector 13 5...

Страница 5: ...rojection by multiple projectors Images can be sent from a personal computer to not only one projector but also to two or more projectors at the same time PC CARD COMPONENT IN USB LAN AUDIO IN COMPUTE...

Страница 6: ...of the projecting personal computer Using the Training Mode allows you to use a single personal computer Manager to manage which personal computer Attendant projects Possible operation includes switc...

Страница 7: ...C CARD COMPONENT IN USB LAN AUDIO IN COMPUTER 3 IN COMPUTER 1 IN COMPUTER 2 IN PC CONTROL MONITOR OUT AUDIO OUT S VIDEO IN VIDEO IN AUDIO Cb Pb L MONO R Cr Pr AC IN PC CARD LAMP STATUS POWER ON STAN D...

Страница 8: ...oftware for when an NEC projector is connected Additional functions are listed below For details of each function refer to the help function of Ulead Photo Explorer 8 0 Image transmission Sends images...

Страница 9: ...r function of the projector If PowerPoint 2000 2002 2003 is installed in your personal computer you can activate Viewer PPT Converter 3 0 from PowerPoint PPT Converter add in is automatically register...

Страница 10: ...Projector User Supportware 3 supports the following NEC projector as of October 2005 LT380 LT280 LT Series Reference PC Control Utility 3 0 can be used with projectors other than the above projectors...

Страница 11: ...r higher recommended Recipient personal computer Pentium III 800 MHz or higher required Pentium III 1 2 GHz or higher recommended Windows XP 128 MB or more required 192 MB or more recommended More mem...

Страница 12: ...or to wired LAN After connecting LAN cable to the projector set the required settings for the projector page 24 PC CARD COMPONENT IN USB LAN AUDIO IN COMPUTER 3 IN COMPUTER 1 IN COMPUTER 2 IN PC CONTR...

Страница 13: ...LAN card touch a metallic object such as a door knob or aluminum window frame to discharge the static electricity from your body Setting card in PC card slot 1 Press POWER ON STAND BY button to set th...

Страница 14: ...IN CO MP UT ER 1 IN CO MP UT ER 2 IN PC CO NT RO L MO NITO R OU T AU DIO OU T Cb Pb L M ON O R Y Cr Pr S VIDE O IN VIDE O IN AU DIO IN AC IN PC CA RD LA MP ST AT US PO WER O N S T A N D B Y SO UR CE...

Страница 15: ...emote control of the projector refer to User s Manual included in the User s Manual CD ROM 5 1 Displaying On Screen Menu LAN Mode Preparation Turn on the power to the projector and project images to t...

Страница 16: ...hlight the Installation tab 5 Press the SELECT button three times to highlight LAN Mode and press the button The LAN Mode screen will be displayed To make setting of wireless LAN Proceed to 5 2 Wirele...

Страница 17: ...ct Mode if necessary Select Channel if necessary Setting of WEP Select the number of bits of WEP Select Key Select Set Key 1 to Key 4 If Easy Connection is selected 8 8 9 10 11 12 13 14 15 16 16 1 3 S...

Страница 18: ...eld and press the button 2 Use the SELECT button to highlight Profile 1 and press the button Profile 1 or Profile 2 can be stored in the memory of the projector as the setting for LAN Easy Connection...

Страница 19: ...t to Advanced and press the button Proceed to step 9 page 19 4 Input IP Address If DHCP is not checked input the IP address assigned to the projector by the administrator of the network to which the p...

Страница 20: ...which the projector is connected The method of inputting is the same as that of the IP Address field 7 Input DNS Configuration Set the IP address of the DNS server of the network to which the project...

Страница 21: ...n searching SSID is complete a list of SSID is displayed Icon Access point Personal computer Ad Hoc WEP setting 2 Use the SELECT button to highlight the SSID of the network to be connected Press the b...

Страница 22: ...e is 802 11 Ad Hoc Wired LAN Access point PC CARD COMPONENT IN AUDIO IN COMPUTER 3 IN COMPUTER 1 IN COMPUTER 2 IN PC CONTROL MONITOR OUT AUDIO OUT S VIDEO IN VIDEO IN AUDIO Cb Pb L MONO R Cr Pr AC IN...

Страница 23: ...erform WEP encryption set an encryption key Disable WEP encryption is not performed There is a danger that the contents of communication are monitored 64 bit 64 bit data is used as an encryption key o...

Страница 24: ...input the encryption key The character will be input Each button on the software keyboard has the following function Move the character insertion position in the encryption key field to the left or th...

Страница 25: ...highlight OK and press the button The PC card page will be displayed again 18 Reconnect the network 1 Use the SELECT button to highlight Reconnect and press the button 19 Finalize the setting 1 Use t...

Страница 26: ...page of LAN Mode selected from On Screen Menu Flow of setting 1 3 Step Display Built in page of LAN Mode 4 Step Input IP Address Input Subnet Mask Input Gateway 2 Step Select Profiles 5 Step Input DN...

Страница 27: ...o highlight the Profiles field and press the button 2 Use the SELECT button to highlight Profile 1 or Profile 2 and press the button 3 Set DHCP Follow the same procedure as in 5 2 Wireless LAN page 17...

Страница 28: ...If a network connection utility dedicated to a wireless LAN card is executed terminate that utility Make the wireless LAN setting of the projector For details refer to 4 Attaching Wireless LAN Card pa...

Страница 29: ...ion icon and click Property 3 2 3 1 Right click Click A property window for wireless network connections will be displayed 4 From the list of This connection uses the following Items select click Inte...

Страница 30: ...l computer as shown below Example of setting the IP address and subnet mask Projector page 26 192 168 100 10 255 255 255 0 IP Address Subnet Mask Personal computer Screen Below 192 168 100 20 255 255...

Страница 31: ...the Wireless Network Connection icon and click ViewAvailable Wireless Networks 9 1 Right click 9 2 Click The Wireless Network Connection window is displayed 10 From the list select SSID of the project...

Страница 32: ...nected Follow the steps below to change the encryption settings For details see the Windows Help file 1 Click Change advanced settings from the screen in step 10 above The Wireless Network Connection...

Страница 33: ...ser s Guide PDF Important User Supportware 3 CD ROM does not contain Acrobat Reader or Adobe Reader If no PDF file can be opened from your personal computer download Adobe Reader from the Adobe System...

Страница 34: ...yed follow these steps 1 Click Start of Windows 2 Click Run 3 In the Open field enter the CD ROM drive name 1 e g Q followed by SETUP EXE e g Q SETUP EXE 1 The CD ROM drive name will vary depending on...

Страница 35: ...rom the User Supportware 3 CD ROM You cannot run the programs nor view Help directly from the CD ROM Displaying Helps other than Ulead Photo Explorer 8 0 Click in the following order Start All Program...

Страница 36: ...NEC Projector User Supportware Help Help Screen Layout Explanation displaying area Displays content for the topic selected in the left pane Hide button Shows hides the left pane Back button Displays t...

Страница 37: ...35 MEMO...

Страница 38: ...36 MEMO...

Страница 39: ...trademarks of Ulead Systems Inc Adobe Adobe Acrobat Reader and Adobe Reader are registered trademarks or trademarks of Adobe Systems Incorporated in the U S or other countries Other manufacturer name...

Страница 40: ...are 3 Image Express Utility 2 0 Desktop Control Utility 1 0 Ulead Photo Explorer 8 0 SE Basic Viewer PPT Converter 3 0 PC Control Utility 3 0 LT380 LT280 Wired and Wireless Network Setup Guide Printed...

Отзывы: