background image

English-6

Controls

OSD (On-Screen Display) control buttons on the front of the monitor function
as follows:

1. Basic Key function

2. OSD Lock function

To lock the OSD, press and hold the MENU button while the monitor is off and then press power button to turn the monitor on.
To un-lock the OSD press and hold the MENU button while the monitor is off and then press power button to turn the monitor
on.

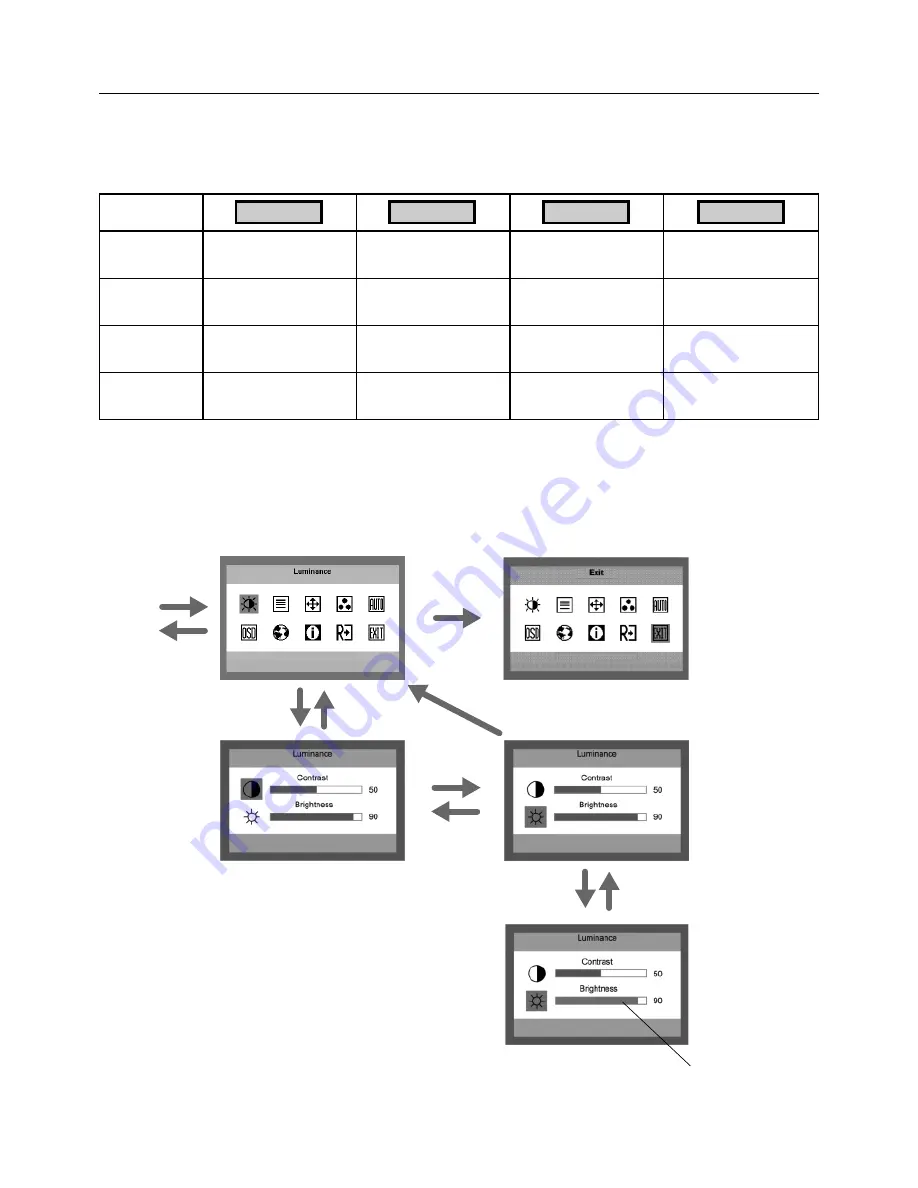
3. OSD structure

Active
Auto Adjustment function
(press over 2 seconds)

Shortcut to volume
adjust window.

Button

OSD Off

Shortcut to volume
adjust window.

OSD displayed.

OSD ON

(Icon selection stage)

Active
Auto Adjustment function
(press over 2 seconds)

Cursor moves left/down.

Cursor moves right/up.

OSD ON

(Adjustment stage)

Act Exit-key.

Adjust value decrease or
Cursor for adjust moves left.

Adjust value increase or
Cursor for adjust moves
right.

Go to Adjustment stage.

AUTO

– / <

+ / >

MENU

Main Menu

(Icon Select, Analog Input)

Sub Menu (Icon Select)

Press

“MENU”

key

Press

“- / <” or “+ / >”

Main Menu (Exit)

Press “AUTO” key

Press

“MENU” key

Adjust by using

“- / <” or “+ / >”

OSD Lock

Go to Icon selection
stage.

Active
Auto Adjustment function
(press over 2 seconds)

Shortcut to volume adjust
window.

Shortcut to volume adjust
window.

Message displayed
“OSD Loked”.

Press

“AUTO” key

Press

“AUTO” key

Press

“- / <” or “+ / >”

Press

“MENU” key

Press

“AUTO” key

Sub Menu (Adjust)

Содержание LCD19WMGX - AccuSync - 19" LCD Monitor

Страница 1: ...AccuSync LCD19WMGX User s Manual ...

Страница 2: ...emblem does not represent EPA endorsement of any product or service ErgoDesign is a registered trademark of NEC Display Solutions Ltd in Austria Benelux Denmark France Germany Italy Norway Spain Sweden U K IBM PC XT AT PS 2 MCGA VGA 8514 A and XGA are registered trademarks of International Business Machines Corporation Apple and Macintosh are registered trademarks of Apple Computer Inc Microsoft a...

Страница 3: ...se harmful interference to radio communications However there is no guarantee that interference will not occur in a particular installation If this equipment does cause harmful interference to radio or television reception which can be determined by turning the equipment off and on the user is encouraged to try to correct the interference by one or more of the following measures Reorient or reloca...

Страница 4: ...B signal cable connected with the monitor to the connector of the display card in your system Figure A 2 Tighten all screws For the Mac Connect the MultiSync Macintosh cable adapter not included to the computer Attach the 15 pin mini D SUB signal cable to the MultiSync Macintosh cable adapter Figure A 3 Tighten all screws For the DVD Player Connect the HDMI to DVI D adapter not included to the DVD...

Страница 5: ...l settings upon initial setup for most timings For further adjustments use the following OSD controls Auto Adjust Contrast Auto Adjust Refer to the Controls section of this User s Manual for a full description of these OSD controls NOTE If you have any problem please refer to the Troubleshooting section of this User s Manual Tilt Grasp both sides of the monitor screen with your hands and adjust th...

Страница 6: ...r is designed for use with a flexible arm Please use the screws 4pcs as shown in the picture when installing To meet the safety requirements the monitor must be mounted to an arm which guaranties the necessary stability under consideration of the weight of the monitor The LCD monitor shall only be used with an approved arm e g GS mark 4 x 12 mm with lock washer and flat washer Tighten all screws 1...

Страница 7: ... window OSD displayed OSD ON Icon selection stage Active Auto Adjustment function press over 2 seconds Cursor moves left down Cursor moves right up OSD ON Adjustment stage Act Exit key Adjust value decrease or Cursor for adjust moves left Adjust value increase or Cursor for adjust moves right Go to Adjustment stage AUTO MENU Main Menu Icon Select Analog Input Sub Menu Icon Select Press MENU key Pr...

Страница 8: ...al position of the picture V Position Adjusts the vertical position of the picture Color Temp Warm Recalls Warm Color Temperature from EEPROM Cool Recalls Cool Color Temperature from EEPROM sRGB Recalls sRGB Color Temperature from EEPROM User Red Red Gain from Digital register User Green Green Gain Digital register User Blue Blue Gain from Digital register Input Select Analog Selects input signal ...

Страница 9: ...alposition of the OSD OSD Timeout Adjusts the OSD timeout Language Language Sets OSD language Information Information Shows the resolution H V frequency and input port of current input timing Reset Yes Clear each old status of Auto configuration No Do not execute reset return to main menu Exit Exits OSD ...

Страница 10: ... not bend power cord Do not use monitor in high temperature humid dusty or oily areas Do not cover vent on monitor Immediately unplug your monitor from the wall outlet and refer servicing to qualified service personnel under the following conditions When the power supply cord or plug is damaged If liquid has been spilled or objects have fallen into the monitor If the monitor has been exposed to ra...

Страница 11: ...ont of you to minimize turning your head while you are typing Avoid displaying fixed patterns on the monitor for long periods of time to avoid image persistence after image effects Get regular eye checkups Ergonomics To realize the maximum ergonomics benefits we recommend the following Use the preset Size and Position controls with standard signals Use the preset Colour Setting Use non interlaced ...

Страница 12: ... x 864 1 75 Hz 1280 x 768 1 60 Hz 1280 x 960 1 60 Hz 1280 x 1024 1 60 Hz to 75 Hz Recommended resolution is 60 Hz for 1440 x 900 1 60 Hz optimal display performance HDTV 480p 60Hz 576p 50Hz 720p 60Hz 1080i 60Hz 2 1080p 60Hz 2 Active Display Area Horizontal 410 4 mm Vertical 256 5 mm Power Supply 100 240 V 50 60 Hz Speaker Practical Audio Output 1 1 Watts Dimensions Landscape 440 0 mm W x 363 0 mm ...

Страница 13: ...tically optimizing display performance IPM Intelligent Power Manager System Provides innovative power saving methods that allow the monitor to shift to a lower power consumption level when on but not in use saving two thirds of your monitor energy costs reducing emissions and lowering the air conditioning costs of the workplace Multiple Frequency Technology Automatically adjusts monitor to the dis...

Страница 14: ... residual image remains the monitor should be turned off for one hour to erase the image NOTE As with all personal display devices NEC DISPLAY SOLUTIONS recommends using a screen saver at regular intervals whenever the screen is idle or turning off the monitor when not in use Image is unstable unfocused or swimming is apparent Signal cable should be completely attached to the computer Use the OSD ...

Страница 15: ... as signal cables or power cords When you need to dispose of your NEC display products please follow the guidance of your local authority or ask the shop where you purchased the product or if applicable follow any agreements made between yourself and NEC The mark on electrical and electronic products only applies to the current European Union Member States Outside the European Union If you wish to...

Отзывы: