background image

English

English-5

  Setup

Manual

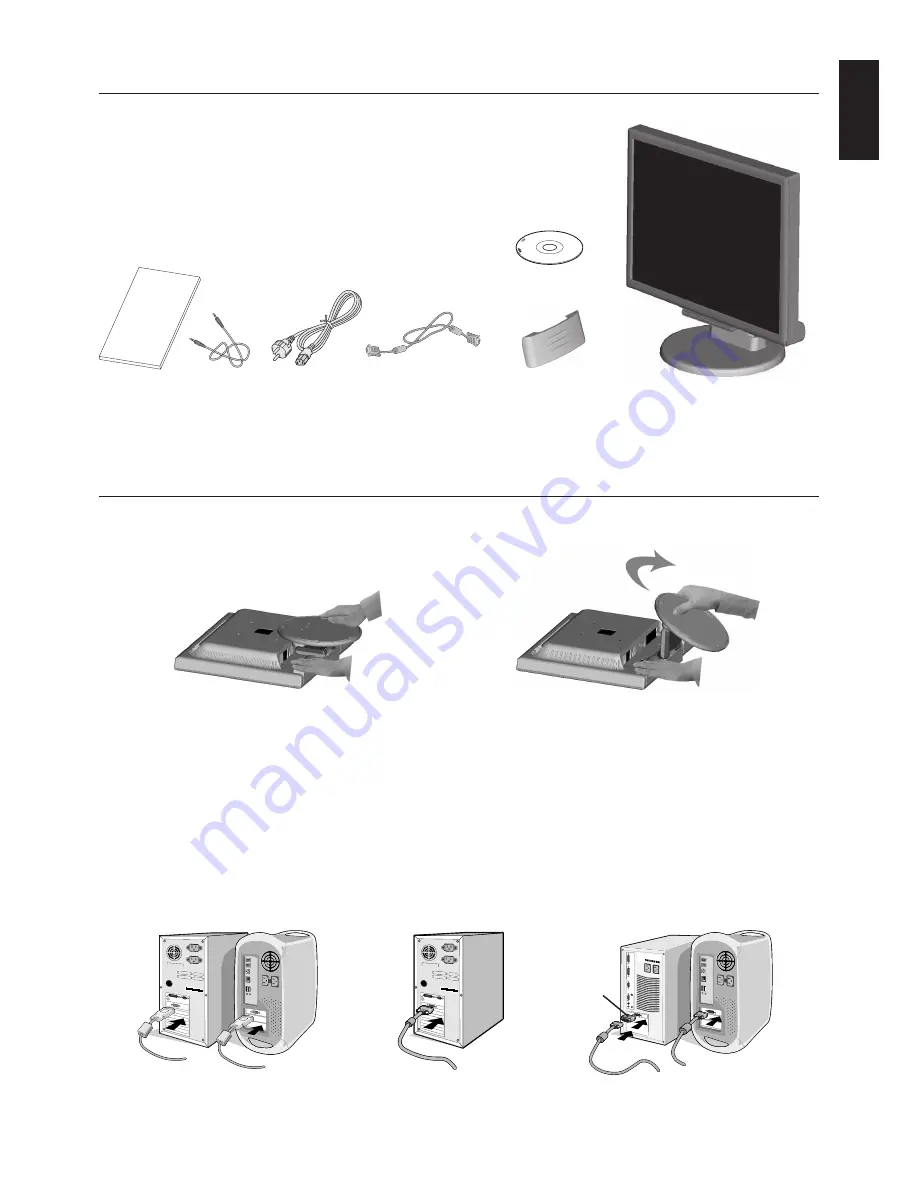
Figure 1

Figure 2

Contents

Your new NEC MultiSync LCD monitor box* should contain the following:

MultiSync LCD monitor with tilt base

Audio Cable

Power Cord

Video Signal Cable (15-pin mini D-SUB male to 15-pin mini D-SUB male)

Setup Manual

CD-ROM (only EU)

Cable management cover

Quick Start

To pull the stand, follow these instructions:

1. Place monitor face down on a non-abrasive surface (

Figure 1

).

2. Pull the stand holding the monitor with the other hand until the stand clicks (

Figure 2

).

NOTE:

Handle with care when pulling the stand.

Setup Manual

Audio Cable

Power Cord

15-pin mini D-SUB

male to 15-pin mini

D-SUB male

Cable management

cover

MultiSync LCD monitor

CD-ROM

Figure A.1

Figure A.3

Macintosh
Cable Adapter
(not included)

Figure A.2

NOTE:

Reverse this procedure if you need to re-pack the monitor.

To attach the MultiSync LCD monitor to your system, follow these instructions:

1. Turn off the power to your computer.

2.

For the PC or MAC with DVI digital output:

 Connect the DVI-D signal cable to the connector of the display card in your

system (

Figure A.1

). Tighten all screws.

For the PC with Analog output:

 Connect the 15-pin mini D-SUB signal cable to the connector of the display card in your

system (

Figure A.2

). Tighten all screws.

For the Mac: 

Connect the MultiSync Macintosh cable adapter (not included) to the computer. Attach the 15-pin mini

D-SUB signal cable to the MultiSync Macintosh cable adapter


(

Figure A.3

). Tighten all screws.

NOTE:

Some Macintosh systems do not require a Macintosh cable adapter.

*

Remember to save your original box and packing material to transport or ship the monitor.

Содержание LCD175M-BK

Страница 1: ...MultiSync LCD175M User s Manual ...

Страница 2: ...n English 1 Recommended use English 3 Contents English 5 Quick Start English 5 Controls English 8 Specifications English 11 Features English 12 Troubleshooting English 13 TCO Displays 5 0 English 14 Manufacturer s Recycling and Energy Information English 15 ...

Страница 3: ...AGE COMPONENTS INSIDE REFER SERVICING TO QUALIFIED SERVICE PERSONNEL Declaration of the Manufacturer We hereby certify that the colour monitor MultiSync LCD175M L174F1 is in compliance with Council Directive 2006 95 EC EN 60950 1 Council Directive 2004 108 EC EN 55022 EN 61000 3 2 EN 61000 3 3 EN 55024 and marked with NEC Display Solutions Ltd 4 13 23 Shibaura Minato Ku Tokyo 108 0023 Japan CAUTIO...

Страница 4: ...ease the separation between the equipment and receiver Connect the equipment into an outlet on a circuit different from that to which the receiver is connected Consult your dealer or an experienced radio TV technician for help If necessary the user should contact the dealer or an experienced radio television technician for additional suggestions The user may find the following booklet prepared by ...

Страница 5: ...r oily areas Do not cover vent on monitor Immediately unplug your monitor from the wall outlet and refer servicing to qualified service personnel under the following conditions When the power supply cord or plug is damaged If liquid has been spilled or objects have fallen into the monitor If the monitor has been exposed to rain or water If the monitor has been dropped or the cabinet damaged If the...

Страница 6: ... image persistence after image effects Get regular eye checkups Ergonomics To realize the maximum ergonomics benefits we recommend the following Use the preset Size and Position controls with standard signals Use the preset Colour Setting Use non interlaced signals with a vertical refresh rate between 60 75 Hz Do not use primary colour blue on a dark background as it is difficult to see and may pr...

Страница 7: ...Figure A 3 Macintosh Cable Adapter not included Figure A 2 NOTE Reverse this procedure if you need to re pack the monitor To attach the MultiSync LCD monitor to your system follow these instructions 1 Turn off the power to your computer 2 For the PC or MAC with DVI digital output Connect the DVI D signal cable to the connector of the display card in your system Figure A 1 Tighten all screws For th...

Страница 8: ... A 4 NOTE Please confirm that the tabs are completely secure 4 Connect all cables to the appropriate connector on the back of the monitor Figure B 1 Connect the Headphone not included to the appropriate connector at the rear side of the monitor Figure C 1 5 Connect one end of the power cord to the monitor and the other end to the power outlet Place the Video Signal Cable Audio cable and power cord...

Страница 9: ...s of Bracket Arm 2 0 3 2 mm 4 SCREWS M4 MAX depth 7 0 mm If use other screw check depth of hole Weight of LCD assembly 4 2 kg MAX Specifications Remove Monitor Stand for Mounting To prepare the monitor for alternative mounting purposes 1 Disconnect all cables 2 Place monitor face down on a non abrasive surface Figure R 1 3 Remove the 4 screws connecting the monitor to the stand and remove the stan...

Страница 10: ...e Cursor goes to left Cursor goes to right At OSD showing Adjustment stage Go to Icon selection stage Adjust value decrease or Cursor for adjust goes to left Adjust value increase or Cursor for adjust goes to right Reset operation Mute off on switch on Volume adjustment window SELECT 1 2 RESET Main Menu Icon Select Sub Menu Icon Select Press SELECT key Press SELECT key Press or Main Menu Adjust Su...

Страница 11: ...Horizontal Image Position within the display area of the LCD DOWN UP Controls Vertical Image Position within the display area of the LCD H SIZE Adjusts the horizontal size by increasing or decreasing this setting FINE Improves focus clarity and image stability by increasing or decreasing this setting COLOUR CONTROL SYSTEMS Five colour presets 9300 7500 sRGB USER NATIVE select the desired colour se...

Страница 12: ... the model and serial numbers of your monitor CARBON SAVINGS Display the estimated carbon saving information in kg The carbon footprint factor in the carbon saving calculation is based on the OECD 2008 Edition The carbon saving information can be reset by pressing the 1 2 RESET button OSD Warning OSD Warning menus disappear with SELECT button NO SIGNAL This function gives a warning when there is n...

Страница 13: ...1 at 75 Hz 1280 x 960 1 at 60 Hz to 75 Hz Recommended resolution is 60 Hz for optimal 1280 x 1024 at 60 Hz to 75 H display performance Active Display Area Horizontal 337 9 mm Vertical 270 3 mm Speakers Practical Audio Output 1 0 W 1 0 W Power Supply 100 240 V 50 60 Hz Current Rating 0 5 0 3 A with Audio Power Maximun Operation 27 W Consumption Normal Operation 19 W Dimensions Landscape 368 0 mm W ...

Страница 14: ...d its capabilities such as screen size and resolutions supported directly to your computer automatically optimizing display performance IPM Intelligent Power Manager System Provides innovative power saving methods that allow the monitor to shift to a lower power consumption level when on but not in use saving two thirds of your monitor energy costs reducing emissions and lowering the air condition...

Страница 15: ...h all personal display devices NEC DISPLAY SOLUTIONS recommends using a screen saver at regular intervals whenever the screen is idle or turning off the monitor when not in use Image is unstable unfocused or swimming is apparent Signal cable should be completely attached to the computer Use the OSD Image Adjust controls to focus and adjust display by increasing or decreasing the fine total When th...

Страница 16: ...andards at an impartial laboratory Electric and magnetic fields emissions as low as normal household background levels Low acoustic noise emissions Some of the Environmental features of the TCO Certified for displays The brand owner demonstrates corporate social responsibility and has a certified environmental management system EMAS or ISO 14001 Very low energy consumption both in on and standby m...

Страница 17: ...lay com in Japan or http www necdisplay com in USA Energy Saving This monitor features an advanced energy saving capability When a VESA Display Power Management Signalling DPMS Standard signal is sent to the monitor the Energy Saving mode is activated The monitor enters a single Energy Saving mode Manufacturer s Recycling and Energy Information WEEE Mark European Directive 2002 96 EC Within the Eu...

Отзывы: