English-6
Quick Start
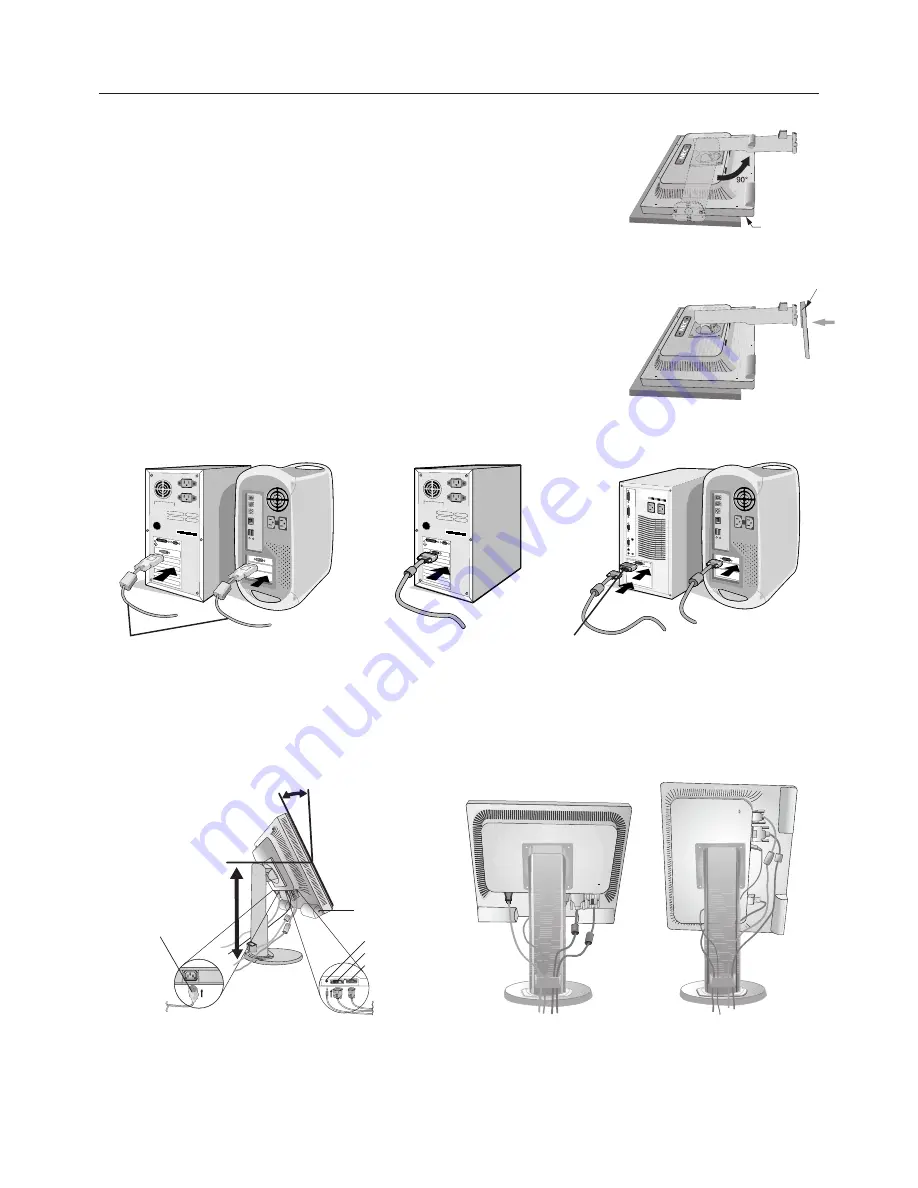
To attach the Base to the LCD stand:
1. Place monitor face down on a non-abrasive surface (
Figure 1
).
NOTE:
Handle with care when monitor facing down, for avoiding damage to the front
control buttons.
2. Please pivot base 90 degrees as shown in
Figure 1
.
NOTE:
Handle with care when pulling the stand.
3. Attach the base stand to LCD monitor and properly lock screw of base stand bottom
(
Figure 2
).
NOTE:
Reverse this procedure if you need to re-pack the monitor.
To attach the MultiSync LCD monitor to your system, follow these instructions:
1. Turn off the power to your computer.
2.
For the PC or MAC with DVI digital output:
Connect the DVI signal cable to the
connector of the display card in your system (
Figure A.1
). Tighten all screws.
For the PC with Analog output:
Connect the 15-pin mini D-SUB signal cable to the
connector of the display card in your system (
Figure A.2
). Tighten all screws.
For the MAC:
Connect the Macintosh cable adapter to the computer, then attach the
15-pin mini D-SUB signal cable to the Macintosh cable adapter (
Figure A.3
).
Tighten all screws.
NOTE:
Some Macintosh systems do not require a Macintosh cable adapter.
3. Place hands on each side of the monitor to tilt the LCD panel 15-degree angle and lift up to the highest position
(
FigureB.1
).
4. Connect all cables to the appropriate connector on the back of the monitor (
Figure B.1
).
5. Position the Video Signal Cable and power cord between the holes on the Stand, as indicated in
Figure B.2
/
Figure B.3
.
Figure A.1
Figure A.3
Macintosh
Cable Adapter
(not included)
Figure A.2
DVI signal cable
Figure B.2
Figure 2
Figure B.3
Figure 1
Control
buttons
Screw
Power Cord
Audio Input
Figure B.1
Highest
stand position
15˚ Tilt
Headphone
DVI
D-Sub
Содержание EA190M-BK - MultiSync - 19" LCD Monitor
Страница 1: ...MultiSync EA190M User s Manual ...


