background image

English-11

English-10

3�  following procedures:

• 

Reorient or relocate the receiving display�

• 

Increase the separation between the equipment and display�

• 

Connect the equipment into a different outlet than the receiver�

• 

Consult your dealer or an experienced radio/display technician for 

assistance�

If necessary, the user should contact the dealer or an experienced radio/television 

technician for additional suggestions. The user may find the following booklet, prepared 

by the Federal Communications Commission, helpful: “How to Identify and Resolve 

Radio-display Interference Problems�” This booklet is available from the U�S� 

Government Printing Office, Washington, D.C., 20402, Stock No. 004-000-00345-4.

Windows is a registered trademark of Microsoft Corporation�
NEC is a registered trademark of NEC Corporation�
All other brands and product names are trademarks or registered trademarks of their 

respective owners�

®

HDMI, the HDMI logo and High-Definition Multimedia Interface are trademarks or 

registered trademarks of HDMI Licensing LLC in the United States and other countries�

Please keep the factory default settings as shipped, in which the product can meet 

ENERGY STAR

®

 requirements�

Содержание E323

Страница 1: ...User s Manual E553 E463 E423 E323 ...

Страница 2: ...f Your New LCD Display English 15 Source Connection Guide English 16 RS 232C Port Specifications English 17 Power Mode Status English 17 Operating Instructions English 18 Using The Side Panel Controls English 18 Using The Remote Control English 19 Timing Table English 20 Navigating The On Screen Menu English 21 Video Menu English 21 Audio Menu English 22 Channels Menu English 22 Setup Menu English...

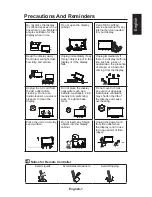
Страница 3: ...nce of smoke or a bad odor coming from the display Unplug the AC cord from the AC outlet before cleaning Do not use liquid cleaners or aerosol cleaners to clean the display Do not place the display near water such as a bathtub washbasin sink laundry tub swimming pool or a damp base ment Do not cover or block any vents or openings Inadequate ventilation may shorten the life of the display and cause...

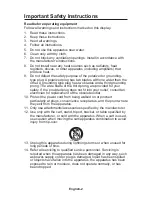
Страница 4: ...your safety If the provided plug does not fit into your outlet consult an electrician for replacement of the obsolete outlet 10 Protect the power cord from being walked on or pinched particularly at plugs convenience receptacles and the point where they exit from the apparatus 11 Only use attachments accessories specified by the manufacturer 12 Use only with the cart stand tripod bracket or table ...

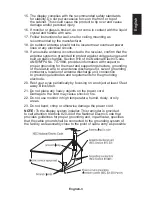
Страница 5: ...84 provides information with respect to proper grounding for the mast and supporting structure grounding of the lead in wire to an antenna discharge unit size of grounding connectors location of antenna discharge unit connection to grounding electrodes and requirements for the grounding electrode 20 Rest your eyes periodically by focusing on an object at least 5 feet away Blink often 21 Do not pla...

Страница 6: ...erminal can be fully inserted to prevent blade exposure Never connect the LCD display to 50 Hz direct current or anything other than the specified voltage CAUTION Never remove the back cover of the LCD display as this can expose you to very high voltages and other hazards If the display does not operate properly unplug the LCD display and call your authorized dealer or service center Adjust only t...

Страница 7: ... antenna 2 Increase the separation between the equipment and receiver 3 Connect the equipment into an outlet on a circuit different from that to which the receiver is connected 4 Consult the dealer or an experienced radio TV technician for help FCC CAUTION To assure continued compliance and possible undesirable interference ferrite cores may be used when connecting this LCD display to video equipm...

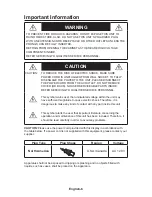
Страница 8: ...E REFER SERVICING TO QUALIFIED SERVICE PERSONNEL This symbol warns user that uninsulated voltage within the unit may have sufficient magnitude to cause electric shock Therefore it is dangerous to make any kind of contact with any part inside this unit This symbol alerts the user that important literature concerning the operation and maintenance of this unit has been included Therefore it should be...

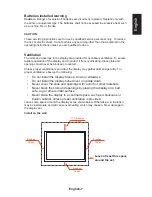
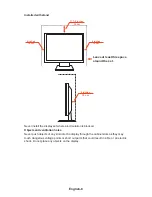
Страница 9: ...nd openings must never be blocked or covered Unless proper ventilation is provided the display may gather dust and get dirty For proper ventilation observe the following Do not install the display face up down or sideways Do not install the display turned over or upside down Never cover the slots and openings with a cloth or other materials Never block the slots and openings by placing the display...

Страница 10: ...ches 10 cm Never install the display set where air circulation is blocked Objects and ventilation holes Never push objects of any kind into the display through the cabinet slots as they may touch dangerous voltage points or short out parts that could result in a fire or an electric shock Do not place any objects on the display ...

Страница 11: ...ccording to CAN CSA C22 2 No 60065 03 FCC Information 1 Use the attached specified cables with the E323 E423 E463 E553 color monitor so as not to interfere with radio and television reception 1 Please use the supplied power cord or equivalent to ensure FCC compliance 2 Please use the supplied shielded video signal cable Mini D SUB 15 pin to Mini D SUB 15 pin 2 This equipment has been tested and fo...

Страница 12: ...s Commission helpful How to Identify and Resolve Radio display Interference Problems This booklet is available from the U S Government Printing Office Washington D C 20402 Stock No 004 000 00345 4 Windows is a registered trademark of Microsoft Corporation NEC is a registered trademark of NEC Corporation All other brands and product names are trademarks or registered trademarks of their respective ...

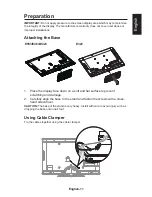
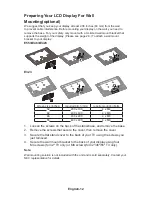
Страница 13: ...ations Attaching the Base E553 E463 E423 E323 1 Place the display face down on a soft and flat surface to prevent scratching and damage 2 Carefully align the base to the stand and fasten the screws with a cross head screwdriver CAUTION The base of the stand is very heavy Install with care to avoid injury such as dropping the base onto one s foot Using Cable Clamper Tie the cables together using th...

Страница 14: ...423 E323 screen size inches required pitch mm require mounting bolts 32 200 x 100 4 x M4 42 400 x 400 4 x M6 46 400 x 400 4 x M6 55 400 x 400 4 x M6 1 Loosen the screws on the back of the stand base and remove the base 2 Remove the screws that secure the cover then remove the cover 3 Secure the flat stand cover to the back of your TV using the screws you just removed 4 Secure the wall mount bracke...

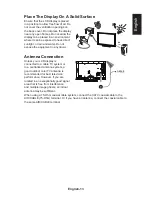
Страница 15: ... the equipment to any liquid Antenna Connection Unless your LCD display is connected to a cable TV system or to a centralized antenna system a good outdoor color TV antenna is recommended for best television performance However if you are located in an exceptionally good signal area that is free from interference and multiple image ghosts an indoor antenna may be sufficient When using a 75 Ohm coa...

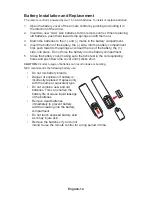
Страница 16: ... into place Do not force the battery into the battery compartment 5 Close the battery cover making sure the tabs rest in the corresponding holes and push down the cover until it clicks shut CAUTION Incorrect usage of batteries can result in leaks or bursting NEC recommends the following battery use Do not mix battery brands Danger of explosion if battery is incorrectly replaced Replace only with t...

Страница 17: ...may cause image degradation If there is power to the display the front LED at the bottom of the display will be either blue or red A blue LED means the display is powered on A red LED means the display is in standby mode Power On Off Your New LCD Display Press the power key on the remote control or press the power button located on the side of the display The display will power on Power Key or ...

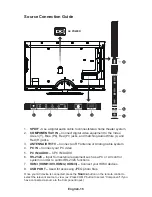
Страница 18: ...og Cable system 4 PC IN Connect your PC video 5 PC IN AUDIO CPC IN AUDIO 6 RS 232C Input from external equipment such as a PC or AV control system in order to control RS 232C functions 7 HDMI HDMI1 DVI HDMI2 HDMI3 Connect your HDMI devices 8 USB PORT Used for accessing JPEG photo files Once your AV device is connected press the Source button on the remote control to select the relevant source to v...

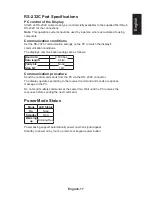
Страница 19: ... communication settings are as follows Baud rate 9 600 bps Data length 8 bits Parity bit None Stop bit 1 bit Communication procedure Send the control commands from the PC via the RS 232C connector The display operates according to the received command and sends a response message to the PC Do not send multiple commands at the same time Wait until the PC receives the response before sending the nex...

Страница 20: ...L Press to increase the volume Press this key to shift Right in the OSD menu 4 VOL Press to decrease the volume Press this key to shift Left in the OSD menu 5 CH Press to increase the channel number Press this key to shift up in the OSD menu 6 CH Press to decrease the channel number Press this key to shift down in the OSD menu 7 Press to turn on off standby the display ...

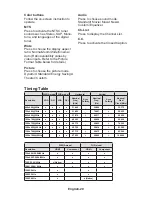
Страница 21: ... mode 0 9 number Press to select channel Press to choose the sub channel PRE CH Press to display the previous channel Source Press repeatedly to choose the various input sources Mute Switch the sound On Off VOL VOL Press or to adjust the volume CH CH Press or to browse through the channels Exit Press to exit the OSD menu Display Press to show the information about the input source and tuner channe...

Страница 22: ...t Press to display the Channel List C C Press to activate the Closed Caption Timing Table WXGA model FHD model Horizontal Vertical Resolution VGA DVI VGA DVI Nominal Freq KHz Sync Polarity Nominal Freq Hz Sync Polarity Nominal Pixel Clock MHz 640x480 60Hz 31 469 _ 59 940 _ 25 175 720x400 70Hz 31 469 _ 70 087 28 322 800x600 60Hz 37 879 60 317 40 000 1024x768 60Hz 48 363 _ 60 004 _ 65 000 1280x720 6...

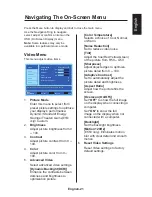
Страница 23: ...om 0 100 3 Contrast Adjust picture contrast from 0 100 4 Color Adjust picture color from 0 100 5 Advanced Video Select advanced video settings Dynamic Backlight DCR Enhance the contrasts between darkness and brightness to optimization picture Color Temperature Selects a choice of Cool Normal or Warm Noise Reduction Set to reduce video noise Tint Adjust the hue Red Yellow Green of the picture from ...

Страница 24: ...eo Mono SAP in analog channels Audio Language Select language options in digital channels 4 Reset Audio Settings Reset Audio settings to factory default settings Channels Menu The channel menu sets your signal source options According to various requirements in different source modes certain features could be hidden disabled on the menu EXIT OK MENU Video Audio Channels Setup Photos Auto Channel S...

Страница 25: ...l Controls feature is a 4 digit number 0000 Panel Lock Lock or unlock all buttons on the display s panel Block Unrated TV Block or unblock the unrated programs US Set the parental control level using the Movie or TV Rating Canadian Set the parental control level using the Canadian English or Canadian French Change Password Change the 4 digit password You will have to enter the new password first a...

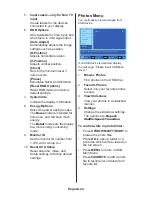
Страница 26: ...D number from 1 100 All or Group A J 10 Reset AV Setup Reset all Audio Video and Setup settings to factory default settings Photos Menu You could easily browse images from USB device EXIT OK MENU Video Audio Channels Setup Photos Photos View files from a USB flash drive that is connected to the TV MOVE SELECT RETURN EXIT If no USB device is detected display the message Please Insert USB flash driv...

Страница 27: ...w and return to photo browser Data Format for USB Photo Viewer Data format JPEG JPG JPE Max folder layer 9 Max number of photos 1200 Max number of favorite photos 250 Min image resolution 75 x 75 pixels Max image resolution Progressive DCT 1024 x 768 pixels Max image resolution Baseline Sequential DCT 15360 x 8640 pixels Supported file system FAT32 CAUTION USB photo viewer only supports USB Mass s...

Страница 28: ...ly causing permanent damage to your display End Of Life Directives In an effort to produce environmentally friendly products your new display contains materials that can be recycled and reused At the end of your displays life specialized companies can minimize display waste by separating the reusable materials from non reusable materials Please ensure you dispose of your display according to local...

Страница 29: ...d band A 8 through A 1 A through I Super band J through W Hyper band AA through ZZ AAA BBB Ultra band 65 through 94 100 through 125 CONNECTIONS Connectors Downward AIR CABLE SPDIF DIGITAL OUT Component and L R Audio Input Composite share with component PC IN D SUB Side HDMI 1 HDMI 2 HDMI 3 PC IN PC Audio RS 232C use earphone jack USB WEIGHT DIMENSIOIN Dimensions w Stand W x H x D inch 29 34 x 20 2...

Страница 30: ...Height 3000m STORAGE ENVIRONMENT Temperature 10 C 50 C 14 F 122 F Relative Humidity 5 85 Absolute Air Humidity 1 25 g m3 Max Change of Temp 0 5 C min max 10 C 30min Air Pressure 700 1060 mbar 70 106Kpa Raditiation Solar Heat 700 W m2 PACKAGE CONTENTS Supplied Accessories 1x Display 1x Power Cord 1x D sub Cable 1x Stand Base 1x Remote Control 1x Mini jack to D sub 9 pin cable 2x 1 5V AAA Size Batte...

Страница 31: ... the Closed Caption settings as some text modes may block the visibility of the images on the display Good picture but no sound Increase the VOLUME Confirm that the display is not muted by pressing the MUTE button on the remote control Good sound but poor color Adjust the contrast color and brightness settings Poor picture Poor picture quality may occur when an activated S VHS camera or camcorder ...

Страница 32: ... made available for user adjustments MPAA Motion Picture Association of America Multichannel Television sound MTS The broadcasting standard which allows stereo sounds to be transmitted with the display picture RF Radio Frequency or modulated signal design used by the carrier for television broadcasts Second Audio Program SAP Another or additional audio channel provided for in the Multichannel Tele...

Страница 33: ...for service MUST have prior approval which may be obtained by calling 1 800 632 4662 The Product shall not have been previously altered repaired or serviced by anyone other than a service facility authorized by NEC DISPLAY SOLUTIONS to render such service The serial number of the product shall not have been altered or removed In order to be covered by this warranty the Product shall not have been ...

Страница 34: ...tion www necdisplay com Online Technical Support www necdisplay com Sales and Product Information Sales information Line 888 632 6487 Canadian Customers 866 771 0266 Ext 4037 Government Sales 800 284 6320 Government Sales email gov necdisplay com Electronic Channels http www necdisplay com Product Registration http www necdisplay com Drivers and Downloads http www necdisplay com ...

Отзывы: