background image

 128 

1.

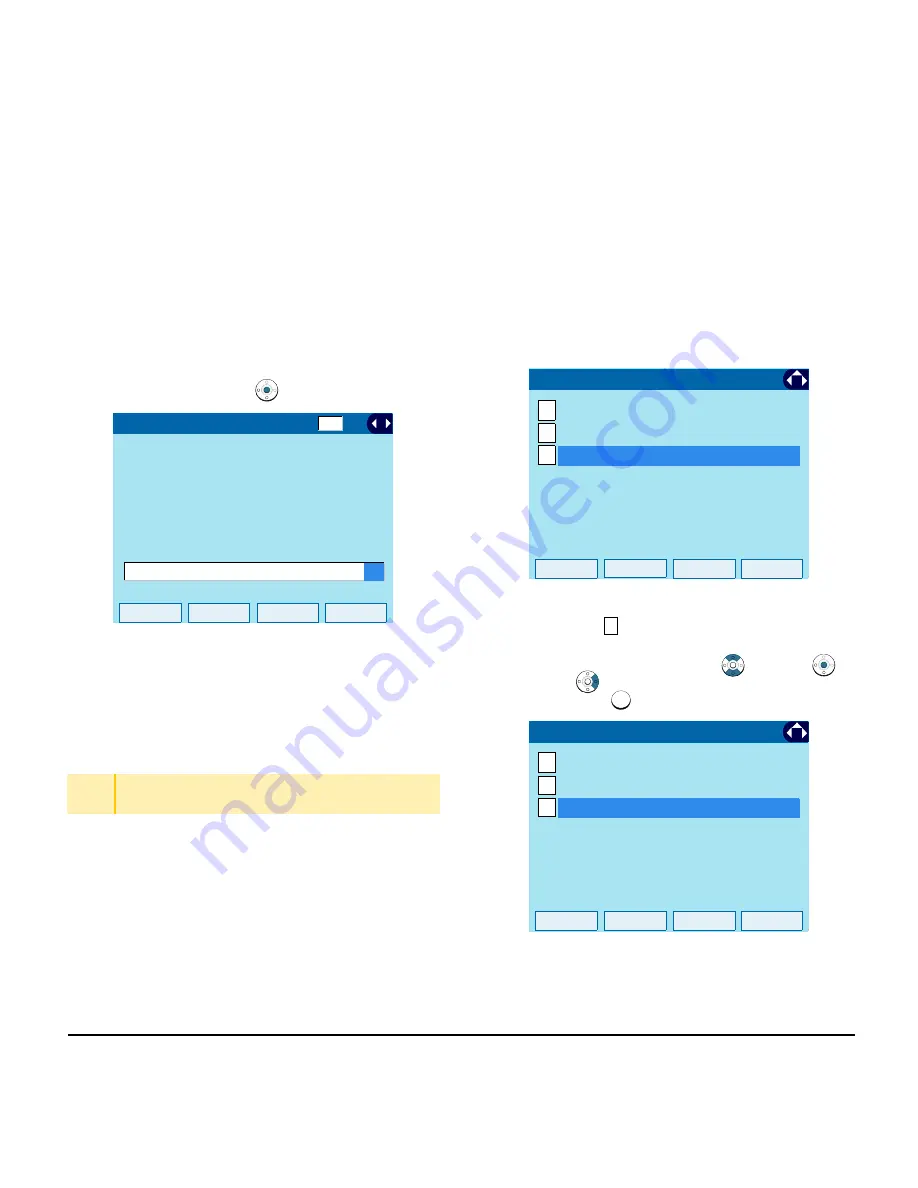
STEP 6:

Specify interval time.

Enter the interval time to switch with digit 
keys, and press 

 or 

OK

.  

• Remove USB Memory

The following explains how to remove a connected 
USB memory from the terminal while the Photo 
Frame application is activated.

STEP 1:

Press 

Soft Key 4

 (the soft key on the far 

right) while the Photo Frame application is 
activated.

STEP 2:

On the 

Photo Frame Setting

 screen, 

select 

Peripherals

.

Select an item by one of the following operations.
• Highlight an item by using 

, and press 

 or 

OK

.

• Press  . 


TIP

For how to remove the USB memory, you can also refer 

Safely Remove USB Device

.

OK

Back

[Interval (s)]

Input interval time to switch

3-999 (Seconds)

10

Delete

1

OK

Back

1/1

1

2

Peripherals

3

Slide Show

Sorting

[Photo Frame Setting]

3

3

OK

Back

1/1

1

2

Peripherals

3

Slide Show

Sorting

[Photo Frame Setting]

Содержание DT730G (CG): ITL-12CG-3

Страница 1: ...DT730G ITL 12CG DG NEC Corporation of America April 2014 INT 31425 UNIV ISSUE 1 0 USER GUIDE...

Страница 2: ......

Страница 3: ...The information contained herein is the property of NEC Corporation of America and shall not be reproduced without prior written approval of NEC Corporation of America Dterm NEAX and UNIVERGE are reg...

Страница 4: ......

Страница 5: ...tcut Menu 20 Soft Keys 22 Multi Window 24 Pop up Windows 30 2 TERMINAL SETUP Setup With Up Down Key 33 Setup With Feature Key 33 Setup with Menu Key 34 3 BASIC OPERATION To Login 89 To Logout 89 To Ma...

Страница 6: ...97 Security Mode 110 Phonebook 113 4 DIRECTORY OPERATION To Add New Data 115 To Find Registered Data 116 To Make a Call from Directory 117 To Add Prefix Number 117 To Delete All Data 119 To Delete Sp...

Страница 7: ...h Photo Frame Application 123 Display Sample and Key Operations 123 How to Use the Photo Frame Application Using USB Memory 124 MENU LIST Menu List DT730G ITL 12CG 3 131 Menu List DT730G ITL 12DG 3 13...

Страница 8: ...iv TABLE OF CONTENTS THIS PAGE INTENTIONALLY LEFT BLANK...

Страница 9: ...n Face layout of DT Series Keys and Parts of DT Series Icon Display Menu List CHAPTER 2 TERMINAL SETUP Explains the operating procedures for terminal settings of the DT Series CHAPTER 3 BASIC OPERATIO...

Страница 10: ...2 1 Face Layout DT730G CG ITL 12CG 3 For North America DT730G DG ITL 12DG 3 For North America...

Страница 11: ...gotiation Fixed Except 1000BASE T Voice CODEC G 711 law A law G 729a G 722 IP Address Setting Sets via DHCP server Sets Statically QoS ToS IP Precedence Diffserv VLAN Tag VLAN IEEE802 1Q p Security IE...

Страница 12: ...lex Half duplex Auto Negotiation Fixed Except 1000BASE T Voice CODEC G 711 law A law G 729a G 722 IP Address Setting Sets via DHCP server Sets Statically QoS ToS IP Precedence Diffserv VLAN Tag VLAN I...

Страница 13: ...tion user to transfer established calls to another station without attendant assistance 8 Speaker Key To control the built in speaker which can be used for Hands Free dialing monitoring LED on key lig...

Страница 14: ...y the shortcut menu see Multi Window and determine the selected item in the menu Also this key is used as cursor movement key on the local menu of the telephone 10 Menu Key To access the local menu of...

Страница 15: ...ice into the terminal USB port is on the backside of the terminal 19 LCD Liquid Crystal Display Color LCD ITL 12CG 3 and gray scale LCD ITL 12DG 3 20 Call Indicator Lamp The lamp at the top corner of...

Страница 16: ...STEP 1 Use the small notch at the lower right corner of the terminal to lift the Faceplate up STEP 2 Remove the Faceplate STEP 1 Remove the DESI Printer Sheet Attaching Faceplate and DESI Printer She...

Страница 17: ...key side down STEP 2 Raise Tilt Legs to desired height STEP 3 Turn the terminal over key side up Lowering Tilt Legs STEP 1 Turn the terminal over key side down STEP 2 Lower Tilt Legs to desired height...

Страница 18: ...to Lowering Tilt Legs STEP 3 Remove stopper protrusion a b from the groove of the Tilt Legs A B and place them flat against the terminal STEP 4 Push downward c d and slide downward Attaching Tilt Legs...

Страница 19: ...ep is not required when PoE hub is used STEP 2 Gently press the cable into the grooved cutout STEP 3 Connect LAN cable to LAN cable connector LAN of the terminal STEP 4 Press the LAN cable into the gr...

Страница 20: ...UNIT is optional STEP 1 Attach the Directory Card to the Directory Card Holder STEP 2 Take the protective sheet off from the plastic cover The surface of the plastic cover is put out STEP 3 Push the D...

Страница 21: ...13 1...

Страница 22: ...er and spread the Tilt Legs Refer to steps 1 through 3 of Removing Tilt Legs STEP 4 Install the WM L UNIT on the wall or on the wall plate Select one of the following procedures Mount Terminal on Wall...

Страница 23: ...ut a home URL registered Desktop screen is displayed after the phone is started TIP HOME URL A home URL is the address information of the application that is to be accessed first after the phone is st...

Страница 24: ...MON 26 MAR 201 VM RTP USB Cursor icon Status icon LCD 4 line display Bottom line Soft key MIC DND 7 25 MON 26 MAR 201 Service Icon Description Status Icon The LCD of DT730G displays icons which provi...

Страница 25: ...Press to display the menu screen The screen displayed as the Portal icon is the screen of the XML application that is registered as the home URL Note Normally the name of the Portal screen icon is di...

Страница 26: ...hin 5 minutes x Reservation x Chinese Restaurant Japanese Restaurant Miyabi Other Candidates Italian Restaurant Genova 5 minutes from Tokyo Station PM 5 00 PM 11 00 Italian Restaurant Map Photo More I...

Страница 27: ...Phone icon a pop up screen is displayed on an XML application screen For details see Pop up Windows When XML application is registered in the home URL the phone icon is displayed When a home URL is no...

Страница 28: ...one of the following operations Highlight an item by using cursor key and press or OK Press STEP 2 XML Application will start up Shortcut Menu The LCD displays icons when there are missed calls or ne...

Страница 29: ...of Missed Calls The icon disappears after checking the history Voice Mail Access history of incoming Voice Mail The icon disappears after checking the voice mails IM Currently Not Used grayed out Pre...

Страница 30: ...ng state of the telephone How to Use Soft Keys This section provides some sample operations of features using Soft Keys Exit Help List 3 18 TUE 3 49PM STA 150 Dir VMsg 150 DIAL TONE DIALING IDLE VMsg...

Страница 31: ...Press Prog STEP 3 Press Cfwd STEP 4 Select the Call Forward type STEP 5 Press Set to set Call Forward or Cncl to cancel STA 150 List Dir VMsg 150 3 18 TUE 3 49PM STA 150 ICM Prog 150 3 18 TUE 3 49PM P...

Страница 32: ...rch Lake Sea of XXX Ubiquitous St 1 2 3 4 5 8 9 6 7 10 11 12 15 16 13 14 17 18 19 22 23 20 21 24 25 26 29 30 27 28 2010 June City Map Related Sites Distance Admission Fee Small Children Categories Tra...

Страница 33: ...home URL is registered Portal History Directory Setting Service When a home URL is registered Ubiquitous Tourist Hotel Map Restaurant Transportation Miscellaneous Portal History Directory Setting Serv...

Страница 34: ...hin 5 minutes Within 100 x City Hall West Park Lib rary East Park Japanese Restaurant Italian Restaurant French Restaurant Main St North Park East Park River North City Music Hall National Theater Nat...

Страница 35: ...application and press Menu History icon is added to the right of the Portal icon This icon shows the last screen you used By selecting this icon you can continue the operation of the application wher...

Страница 36: ...ITL 12CG 3 ITL 12DG 3 TIP If you select a local application by using a One Touch key while launching other local application new local application is not running The initial screen of the currently ru...

Страница 37: ...x Reservation x Chinese Restaurant Japanese Restaurant Miyabi Other Candidates Italian Restaurant Genova 5 minutes from Tokyo Station PM 5 00 PM 11 00 Italian Restaurant Map Photo More Info Please clo...

Страница 38: ...Other Information Ubiquitous City 2010 07 12 3 3 2 0 within 100 night Hotel Search Lake Sea of XXX Ubiquitous St 1 2 3 4 5 8 9 6 7 10 11 12 15 16 13 14 17 18 19 22 23 20 21 24 25 26 29 30 27 28 2010 J...

Страница 39: ...tact the System Administrator How to Display By selecting Phone icon on the menu screen When there is an incoming call to the phone By going off hook lifting the handset etc When receiving a request f...

Страница 40: ...32 1 This page is for your notes...

Страница 41: ...lume STEP 1 Press Up or Down during speakerphone operation or during a call Adjust Ringer Tone STEP 1 Press Up or Down during ringing Adjust LCD Contrast ITL 12DG 3 STEP 1 Press the Up Down key in the...

Страница 42: ...an item by one of the following operations Highlight an item by using and press or OK Press STEP 4 Select Offhook Ring Select an item by one of the following operations Highlight an item by using and...

Страница 43: ...User Setting Select an item by one of the following operations Highlight an item by using and press or OK Press STEP 3 Select Incoming Call Select an item by one of the following operations Highlight...

Страница 44: ...he procedure below shows how to change the ringer tone for internal call and external call STEP 1 Display the Menu screen select Setting STEP 2 Select User Setting Select an item by one of the followi...

Страница 45: ...g operations Highlight an item by using and press or OK Press or STEP 6 Select a desired tone type You can preview designated ringer tone Select an item by one of the following operations Highlight an...

Страница 46: ...ype 1 520 660 16Hz modulation 2 Tone Type 2 520 660 8Hz modulation 3 Tone Type 3 1400 1100 Door Phone 4 Tone Type 4 1100 No modulation 5 Tone Type 5 540 No modulation 6 Tone Type 6 1100 1400 16Hz modu...

Страница 47: ...Call Select an item by one of the following operations Highlight an item by using and press or OK Press STEP 4 Select Illumination Select an item by one of the following operations Highlight an item b...

Страница 48: ...em by using and press or OK Press and press or OK Note When selecting Automatic the preview function will not operate Note When selecting Automatic or not performing this illumination setting Red is a...

Страница 49: ...n item by one of the following operations Highlight an item by using and press or OK Press STEP 4 Select RTP Alarm Select an item by one of the following operations Highlight an item by using and pres...

Страница 50: ...or OK Press STEP 3 Select Talk Select an item by one of the following operations Highlight an item by using and press or OK Press Menu Items Description 0 Automatic Follow the system settings If no s...

Страница 51: ...ssword Peripherals Security Incoming Call Talk 7 Usability 2 2 Back OK 1 1 Talk 1 2 3 4 5 Key Touch Tone Hold Music Prefix RTP Alarm DTMF Tone Menu Items Description 0 Automatic Follow the system sett...

Страница 52: ...or OK Press STEP 3 Select Talk Select an item by one of the following operations Highlight an item by using and press or OK Press STEP 4 Select Key Touch Tone Select an item by one of the following op...

Страница 53: ...P 2 Select User Setting Select an item by one of the following operations Highlight an item by using and press or OK Press STEP 3 Select Talk Select an item by one of the following operations Highligh...

Страница 54: ...of the following operations Highlight an item by using and press or OK Press or and press or OK Note You can preview the designated music on hold When selecting Download the music on hold file must be...

Страница 55: ...using and press or OK Press STEP 3 Select Display Select an item by one of the following operations Highlight an item by using and press or OK Press STEP 4 Select Time Format Select an item by one of...

Страница 56: ...ect Setting STEP 2 Select User Setting Select an item by one of the following operations Highlight an item by using and press or OK Press STEP 3 Select Display Select an item by one of the following o...

Страница 57: ...able is applied OK Back 1 1 User Setting 1 2 3 4 5 6 7 Change Password Peripherals Security Incoming Call Talk Display Usability 2 2 Back OK 1 1 1 2 3 4 5 6 Back Light Language Font Size Screen Saver...

Страница 58: ...tem by one of the following operations Highlight an item by using and press or OK Press STEP 3 Select Display Select an item by one of the following operations Highlight an item by using and press or...

Страница 59: ...K Press or and press or OK STEP 7 The display returns to the Screen Saver screen When Enable is selected on Step 7 Select Wait Time Input Wait Time to launch the screen saver 1 999 min and press or OK...

Страница 60: ...tem by one of the following operations Highlight an item by using and press or OK Press STEP 4 Select Back Light Select an item by one of the following operations Highlight an item by using and press...

Страница 61: ...item by one of the following operations Highlight an item by using and press or OK Press STEP 3 Select Display Select an item by one of the following operations Highlight an item by using and press or...

Страница 62: ...the Menu screen select Setting STEP 2 Select User Setting Select an item by one of the following operations Highlight an item by using and press or OK Press STEP 3 Select Display Select an item by on...

Страница 63: ...ck 1 1 User Setting 1 2 3 4 5 6 7 Change Password Peripherals Security Incoming Call Talk Display Usability 6 6 Back OK 1 1 1 2 3 4 5 6 Screen Saver Time Format Display 7 Advanced Local Volume Back Li...

Страница 64: ...an item by one of the following operations Highlight an item by using and press or OK Press STEP 4 Select Advanced Select an item by one of the following operations Highlight an item by using and pre...

Страница 65: ...wing steps show how to set the displayed character color on the LCD Note Font characters are displayed in LCD 4 line display area Note ITL 12DG 3 does not support Font Color setting STEP 1 Display the...

Страница 66: ...ress STEP 6 Select a desired color Select an item by one of the following operations Highlight an item by using and press or OK Press the digit key of desired number and press or OK For example press...

Страница 67: ...of the color selection TIP Default setting is Color 2 TIP The enabled item is highlighted 1 2 8 1 Color 1 Back OK 2 Color 3 3 Color 4 4 Color 5 5 Color 6 6 Color 7 7 Color 8 Font Color Color 2 2 2 16...

Страница 68: ...elect Display Select an item by one of the following operations Highlight an item by using and press or OK Press STEP 4 Select Advanced Select an item by one of the following operations Highlight an i...

Страница 69: ...application For details contact the System Administrator STEP 8 The display returns to the Turn Off Display screen When Enable is selected at Step 7 Choose Wait Time 4 4 Back OK 1 2 Advanced 3 1 1 4 5...

Страница 70: ...ht an item by using and press or OK Press STEP 3 Select Display Select an item by one of the following operations Highlight an item by using and press or OK Press TIP When App priority is selected for...

Страница 71: ...ect an item by one of the following operations Highlight an item by using and press or OK Press or and press or OK OK Back 1 1 User Setting 1 2 3 4 5 6 7 Change Password Peripherals Security Incoming...

Страница 72: ...ons Highlight an item by using and press or OK Press STEP 3 Select Change Password Select an item by one of the following operations Highlight an item by using and press or OK Press STEP 4 Enter the o...

Страница 73: ...K Note A maximum of 32 digits 0 9 and can be used when setting a new password STEP 7 When the password entry completes successfully the display changes as follows Press or OK OK Cancel BK 1 Change Pas...

Страница 74: ...ght an item by using and press or OK Press TIP When overcurrent of the USB device is detected power supply to the USB port will be suspended To restart the USB device power supply remove the USB devic...

Страница 75: ...Highlight an item by using press or OK Press STEP 6 Press or OK STEP 7 When Remove complete is displayed Press or OK and remove the USB device from the terminal Note If the USB device is not removed s...

Страница 76: ...r OK Press STEP 3 Select Usability Select an item by one of the following operations Highlight an item by using and press or OK Press STEP 4 Ensure Help Key Mode is specified Select an item by one of...

Страница 77: ...elect User Setting Select an item by one of the following operations Highlight an item by using and press or OK Press STEP 3 Select Setting Reset Select an item by one of the following operations High...

Страница 78: ...e personal data off the telephone OK Back 1 1 User Setting 2 3 4 5 6 0 Peripherals Security Talk Display Change Password Setting Reset 7 Usability OK Back Setting Reset Input a password BK 1 TIP When...

Страница 79: ...d directory for Windows IIS the default is C InetPub ftproot of the FTP server TFTP server Put the downloading file into a desired directory of TFTP server and specify it as the directory for download...

Страница 80: ...to STEP 15 STEP 7 Select FTP Settings Select an item by one of the following operations Highlight an item by using and press or OK Press STEP 8 Select User ID Select an item by one of the following o...

Страница 81: ...OK STEP 12 The display returns to the FTP Settings screen Select Folder Select an item by one of the following operations Highlight an item by using and press or OK Press TIP For details on character...

Страница 82: ...Download Address Select an item by one of the following operations Highlight an item by using and press or OK Press TIP For details on character entry method see How to Input Characters OK Back 1 1 1...

Страница 83: ...is displayed Select either Download 1 Download 2 or Download 3 Select an item by one of the following operations Highlight an item by using and press or OK Press OK Back BK 1 Download Address For 0 0...

Страница 84: ...fault file name is Directory csv When downloading a file for Wallpaper the default file name is WallPaper bmp File Format Maximum Size PCM law 8kHz s wav under 32 seconds Hold Music BK A Input a file...

Страница 85: ...nds in failure Downloading Failed is displayed on the LCD Check the following and retry File Format Maximum Size bmp jpg gif png 320 X 240 Pixels 230 Kbyte TIP For details on character entry method se...

Страница 86: ...e backed up file STEP 2 Display the Menu screen select Setting STEP 3 Select Data Backup Restore Select an item by one of the following operations Highlight an item by using and press or OK Press STEP...

Страница 87: ...item by using and press or OK Press STEP 8 Select User ID Select an item by one of the following operations Highlight an item by using and press or OK Press STEP 9 Enter a Used ID Enter a User ID by u...

Страница 88: ...ress or OK STEP 12 The display returns to the FTP Settings screen Select Folder Select an item by one of the following operations Highlight an item by using and press or OK Press TIP For details on ch...

Страница 89: ...ss or OK Press STEP 16 Enter an IP Address of the destination FTP TFTP server For example to set the IP address of 10 41 208 205 enter 10 41 208 205 separate with an asterisk After entering an IP Addr...

Страница 90: ...displays Upload Complete If the data backup failed LCD displays Upload Failed STEP 20 After the data backup completes the display changes to the following STEP 21 The display returns to the Backup Re...

Страница 91: ...tory of TFTP server and specify it as the directory for downloading STEP 2 Display the Menu screen select Setting STEP 3 Select Data Backup Restore Select an item by one of the following operations Hi...

Страница 92: ...If TFTP is selected proceed to STEP 15 STEP 7 Select FTP Settings Select an item by one of the following operations Highlight an item by using and press or OK Press STEP 8 Select User ID Select an it...

Страница 93: ...t keys and press or OK STEP 12 The display returns to the FTP Settings screen Select Folder Select an item by one of the following operations Highlight an item by using and press or OK Press TIP For d...

Страница 94: ...ress STEP 16 Enter an IP Address of the FTP TFTP server which stores the backup file For example to set the IP address of 10 41 208 205 enter 10 41 208 205 separate with an asterisk After entering an...

Страница 95: ...the telephone While downloading the backup data the LCD displays Downloading first and Saving Note Do not power OFF the DT730G while Saving is displayed on the LCD STEP 20 After the download process c...

Страница 96: ...88 1 This page is for your notes...

Страница 97: ...ed display changes to normal idle status To Logout STEP 1 Press Down Arrow on the terminal then press Prog STEP 2 Press Down Arrow three times then press LOGOFF STEP 3 LOGOFF THE SYSTEM is displayed o...

Страница 98: ...e an Internal Call When dialed station number is registered in Personal Directory the corresponding name information will be displayed on LCD while you are hearing a ringback tone or are engaged in a...

Страница 99: ...ged in a Two party call STEP 2 Press to hold the call in progress STEP 3 The person on the other end hears the music on hold STEP 4 Replace the handset To Retrieve STEP 1 Press the ICM key if it is an...

Страница 100: ...call is automatically made STEP 3 Lift the handset lamp goes off To Set STEP 1 Press STEP 2 Dial 751 STEP 3 Press the desired One Touch Speed Calling key STEP 4 Dial 01 the desired telephone number or...

Страница 101: ...ress Redial The last number dialed is displayed STEP 2 Press the Volume Up or Down key until a desired number is displayed Up to 4 previously dialed numbers are available TIP One Touch Speed Calling k...

Страница 102: ...es using Redial key are not available For details contact the System Administrator To Delete a Call Record from the Outgoing Call History STEP 1 Press Redial The last number dialed is displayed STEP 2...

Страница 103: ...ials a desired Station Number Station C STEP 3 After Station C answers the transferred call Station A presses ADD softkey STEP 4 Station A presses the Begin softkey STEP 5 Three Party call is now esta...

Страница 104: ...ook STEP 2 Press DND STEP 3 Press Set STEP 4 Choose DND type To Cancel STEP 1 Press Down Arrow then Prog STEP 2 Press DND STEP 3 Press Cncl ICM Prog 3 18 TUE 8 30AM STA 101 101 PGM Save Menu Cfwd DND...

Страница 105: ...Character Entry Mode When entering characters from the telephone set the following three modes are available uppercase alphabetical character lowercase alphabetical character and numeric character Th...

Страница 106: ...etween uppercase alphabetical lowercase alphabetical and numeric character Word case Switch between uppercase and lowercase Word width Not used Delete Delete a single character Copy Copy the specified...

Страница 107: ...99 1 Character Code List Character Code for English 1 2...

Страница 108: ...100 1 Character Code for English 2 2...

Страница 109: ...101 1 Character Code for Russian...

Страница 110: ...102 1 Character Code for Turkish...

Страница 111: ...103 1 Character Code for European Languages Other Than English...

Страница 112: ...104 1 Number Code...

Страница 113: ...se to lowercase STEP 3 Press Enter or OK on the SubMenu to go back to the text input screen STEP 4 Enter en by using digit keys Press twice to enter e Press twice to enter n STEP 5 Press once to enter...

Страница 114: ...reen STEP 8 Press twice to enter K STEP 9 Press HELP or Option to display SubMenu screen and select Word case to switch the text input mode from lowercase to uppercase OK Back Name Input a name Option...

Страница 115: ...to enter s STEP 12 Press Enter or OK To Overwrite Characters STEP 1 Place the cursor at the left of the characters to be overwritten STEP 2 Press HELP or Option 1 2 Word width SubMenu 3 4 5 6 7 8 Past...

Страница 116: ...TEP 1 While characters which you want to copy are displayed press HELP or Option STEP 2 On the SubMenu screen press Enter or OK while Copy is highlighted or press 10 9 10 SubMenu Return OK Cancel Over...

Страница 117: ...5 Place the cursor at position where you want to paste the copied characters and press HELP or Option STEP 6 On the SubMenu screen select Paste and press Enter Right cursor or OK or press Back Copy I...

Страница 118: ...ontact the System Administrator Note After a third attempt if uncorrected password is entered three times consecutively the telephone locks up and any key operation will be disabled for 10 minutes Not...

Страница 119: ...he following operations Press any key while the screen saver is activated Press Security while the screen saver is activated STEP 2 Enter the password and press Enter or OK Security Lamp goes off and...

Страница 120: ...mes consecutively the following error message is issued Press or OK The telephone locks up and any key operation will be disabled for 10 minutes Wait for 10 minutes make a retry Please note emergency...

Страница 121: ...System Phonebook is used on a system basis The data entry is made by the Telephony Server Administrator Available Characters in Local Phonebook The following tables show the characters available in th...

Страница 122: ...114 1 Lowercase Character...

Страница 123: ...me or telephone number to be registered in the directory using the dial pad STEP 6 After entering the name or telephone press the key STEP 7 The following list appears Select a desired group by enteri...

Страница 124: ...M and MEM are selected as a search Menu 2 2 2 1 REGIST 2 SEARCH 3 SETTING 4 DeleteAll 1 2 3 4 TLBK1 SEARCH NAME NUM A MENU SEARCH MENU NAME GRP NUM MEM KEY DESCRIPTION Name Search data from the name l...

Страница 125: ...an example of dial by name STEP 5 Lift the Handset press the key or press the Dial softkey while displaying the detailed data for target party on LCD Note If multiple telephone numbers are assigned i...

Страница 126: ...ss Enter Right cursor or press key STEP 4 Select Talk then press Enter Right cursor or press key STEP 5 Select Prefix then press Enter Right cursor or press key STEP 6 Select Prefix then press Enter R...

Страница 127: ...y The menu screen is displayed STEP 2 Select Directory then press Enter or press key STEP 3 Select DeleteAll then press Enter or press key The following is a sample display of a deleted number STEP 4...

Страница 128: ...o be deleted e g Group 01 STEP 7 Select 1 NEC STEP 8 Press the DEL softkey to delete the appropriate directory data STEP 9 After the appropriate directory data is deleted the following display appears...

Страница 129: ...d to Phonebook both System Phonebook and Local Phonebook controlled by the system Note On the Menu screen use or softkey to move the cursor up down a line To View Call History STEP 1 Press the key The...

Страница 130: ...ore in a Speed Dial bin or select SPD to store in a System Speed Dial bin Select TELBK to store in a Telephone Book To Delete Call History Data STEP 1 Press the key The menu screen is displayed STEP 2...

Страница 131: ...en display TIP For details of how to use the Photo Frame application through XML server contact the System Administrator TIP To use the Photo Frame application configuration setting by System Administ...

Страница 132: ...to the USB memory the image files must be stored in a folder created the folder name must be named as PhotoFrame directly beneath the USB memory How to Launch the Photo Frame Application STEP 1 Insert...

Страница 133: ...or OK Press Photo Frame application has been launched TIP Be sure to confirm the USB Connection icon is displayed on the LCD STA 101 List Dir VMsg 101 3 18 TUE 8 30AM 3 31313 16 41 THU 14 JUN 2012 MIC...

Страница 134: ...Name Select an item by one of the following operations Highlight an item by using and press or OK Press and press or OK To Set Slide Show STEP 1 Press Soft Key 4 the soft key on the far right while t...

Страница 135: ...Enable Disable the Slide Show Mode Select an item by one of the following operations Highlight an item by using and press or OK Press or and press or OK STEP 5 Choose Interval s Select an item by one...

Страница 136: ...le the Photo Frame application is activated STEP 2 On the Photo Frame Setting screen select Peripherals Select an item by one of the following operations Highlight an item by using and press or OK Pre...

Страница 137: ...Select an item by one of the following operations Highlight an item by using press or OK Press STEP 5 Press or OK STEP 6 Press or OK STEP 7 Confirm that the USB icon has disappeared from the screen an...

Страница 138: ...ote Be sure to confirm that the USB icon has disappeared from the screen Note When you turn off the power of terminal be sure to remove the USB memory beforehand STA 101 List Dir VMsg 101 3 18 TUE 8 3...

Страница 139: ...types of directory features Personal Directory Phonebook and Corporate Directory This chapter explains the menu list for Personal Directory feature Service Select this option to display the screen of...

Страница 140: ...tic Red 6 Headset Ring Volume Not used 2 Talk Select this option to set up for telephone conversation 1 RTP Alarm Select this option to specify whether to use the RTP alarm Automatic 2 DTMF Tone Selec...

Страница 141: ...Shortcut Icon Not used 3 Font Color Select this option to specify the font color for the Time Display Feature Information Display area You can check the color by selecting each color number Color 1 C...

Страница 142: ...le for ringer tone Download 2 Melody2 wav 3 Download 3 Select this option to download a file for ringer tone Download 3 Melody3 wav 3 Directory Select this option to download the directory files Direc...

Страница 143: ...backup via FTP server 3 Folder Select this option to specify the destination directory of FTP server Menu Item Description Default Value 1 Sorting File Name Select this option to view the image files...

Страница 144: ...s of directory features Personal Directory Phonebook and Corporate Directory This chapter explains the menu list for Personal Directory feature Service Select this option to display the screen of XML...

Страница 145: ...Type 1 5 Illumination Select this option to set the illumination pattern for External Call and Internal Call Automatic Disable Red Green Blue Yellow Purple Light Blue White Rotation Automatic Red 6 H...

Страница 146: ...1 Standard 2 Small 6 Language Select this option to select a language to be displayed on an LCD Automatic 7 Advanced Select this option to set up for the following additional data 5 Backlight Fade Co...

Страница 147: ...FTP Settings Select this option to set necessary data when using FTP service 1 User ID Select this option to enter a user ID for downloading via FTP server 2 Password Select this option to enter a pa...

Страница 148: ...140 1 This page is for your notes...

Страница 149: ...is available while DT730G is logged into the system PC Requirements for Web Programming To Login Follow the steps below to open the Web Programming STEP 1 Start up Internet browser on the PC STEP 2 E...

Страница 150: ...he default password Note For IP address of the DT730G contact the System Administrator Note If the login screen does not appear check the LAN connection status and entered IP address If the problem pe...

Страница 151: ...143 1 To Logout Follow the steps below to exit the Web Programming STEP 1 Click button at the lower left of the screen Logout...

Страница 152: ...eration after log in to Web Programming the user is forcibly logged out from the Web Programming How to Operate The following explains how to change the ringer tone for external call Web Programming i...

Страница 153: ...145 1 STEP 4 A confirmation dialog appears Click button on the dialog OK...

Страница 154: ...146 1 This page is for your notes...

Страница 155: ......

Страница 156: ...NEC Corporation of America April 2014 DT730G User Guide...

Отзывы: