background image

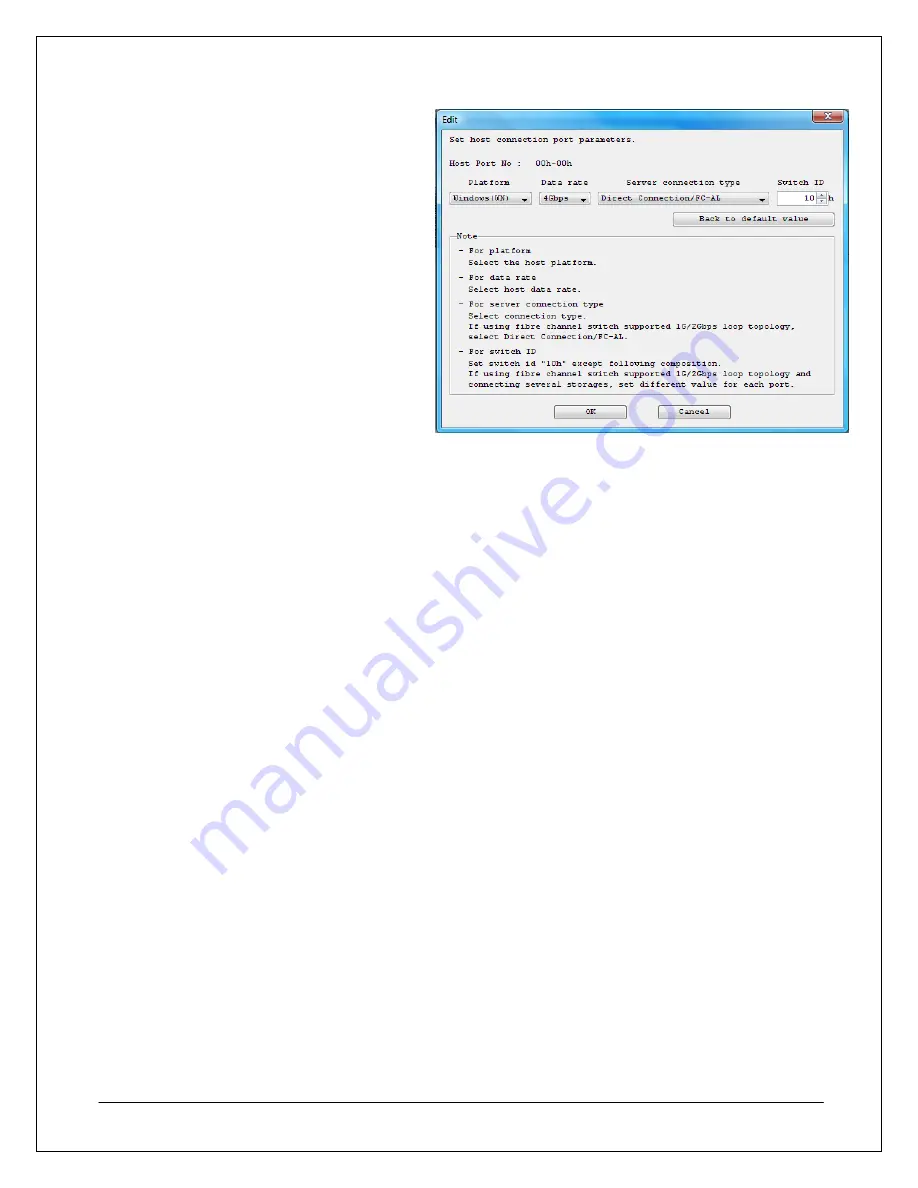
14.  If any ports needed to be edited in the 

previous step, this port editing window 
will appear. The settings available to edit 
include the following: 


Platform

 – Select the operating 

system environment of the 
servers that any given port will 
connect with. If the array will be 
used in an FC switch fabric with 
both Linux and Windows, select 
Windows (WN). 


Data Rate

 – Select the speed at 

which the port will communicate. 


Server Connection Type

 – 

Choose between Direct 
Connection/FC-AL for DAS and 
Loop topologies, or choose FC 
Switch Connection for switch 
fabric topologies. 


Switch ID

 – If multiple arrays 

are being configured in an FC-
AL topology, this value must be 
unique for each array. 
Otherwise, leave this value at 
the default 10h setting. 

When you are finished editing port 
settings, click 

OK

 to return to the 

previous Set Host Connection Port 
Parameters window. 

ing port 

settings, click 

OK

 to return to the 

previous Set Host Connection Port 
Parameters window. 

NEC D3/D4 Quick Start Guide


27 

Содержание D1-10

Страница 1: ... NEC Corporation of America Technical Support at any phase of the integration for assistance NEC Corporation of America Technical Support can be reached by the following methods Web http support necam com Email support necam com Phone 1 877 632 0064 toll free Support contact information for other regions of the world is available at http www nec com global support contact index html 456 01812 001 ...

Страница 2: ...s 11 Power On Power Off Procedures 11 Power On Procedure When Auto Power On Mode Is Not Enabled 11 Power Off Procedure 12 STEP 3 Software Installation 13 Management Server Installation 13 Installing Storage Manager 13 Application Server Installation 16 iSM Volume List Command Installation 17 Host Information Collection 18 Storage Manager Client Installation 20 Storage Manager Client Installation a...

Страница 3: ...ackup unit BBU are not currently being installed with this array Throughout this document the term base unit refers to the enclosure containing the array controller modules and the term array refers to the base unit and any attached disk enclosures collectively To read about information not covered in this documentation please refer to the additional documentation contained on the CD media that co...

Страница 4: ...t least one Ethernet cable will be required to connect the array to an Ethernet switch or hub that is used by the server designated to manage the array However it is highly recommended to use two Ethernet cables for redundancy If the management server will be connected directly to the array at least one crossover Ethernet cable will be required instead IP Addresses There is a management port on ea...

Страница 5: ...ware cannot determine the WWPN and requires manual input instead Unpacking the Array While unpacking instructions are illustrated on the array packaging materials the following tips should be kept in mind when unpacking the base unit To prevent component damage caused by condensation due to rapid temperature and humidity changes please allow the base unit to sufficiently acclimate to the ambient r...

Страница 6: ...ding on controller LED status which is located at the rear of the unit this can indicate that a power on sequence online download sequence or automatic download sequence is in progress ON ON 5 Seconds OFF 7 Seconds Indicates that a condition may exist that requires immediate technical support from NEC Blinking OFF Cache flushed okay to power down if desired OFF OFF Powered off Table 2 Power LED an...

Страница 7: ...ndition exists in the power supply s fan Table 4 Power Supply LED Status Conditions Controller SAS Port The SAS ports are used to connect the base unit to additional disk enclosures and have two Status LEDs a green Link LED on the left and an Orange Fault LED on the right Fibre Channel Host Ports The ports labeled HP and HPE on the base unit controllers are Fibre Channel Host Ports FC Ports that a...

Страница 8: ...wing signal combinations to indicate controller status Ready LED Fault LED Status Blinking OFF Normal operating condition ON OFF Startup sequence in progress Rapid Blinking OFF Shutdown sequence in progress Asynchronous Blinking Online automatic download sequence in progress Synchronized Blinking In download mode ON ON Fault condition exists ON Blinking Waiting for disk enclosure power on Blinking...

Страница 9: ...stalled into a rack containing other equipment the heaviest rack units should be mounted as close to the bottom as possible while lighter units can be placed near the top For the purpose of determining the proper positioning in the rack a fully loaded base unit may weigh in excess of 68 lbs and a fully configured disk enclosure may weigh in excess of 63 lbs Figure 5 Mounting the Array The rack mou...

Страница 10: ...em drive stripe set and must remain mounted and remain in their original positions for proper array operation If disk drives in positions 00 01 or 02 must be replaced only remove one drive at any given time When installing more than one drive while the system is powered on only install one drive at a time Wait until each drive reaches a ready state before installing the next drive When replacing f...

Страница 11: ...king This is the simplest method for configuring an array to connect with multiple application servers through a switch fabric and is managed on the array through the use of Access Control in the Storage Manager software on the management server While it allows multiple application servers to access array resources it does not offer any fault tolerance unless used with multipathing Multipathing Th...

Страница 12: ...ay must be connected to a management server where the Storage Manager software will be installed to configure the array Use the management port on Controller 0 the controller on the right when viewed from the back of the unit if only one Ethernet connection will be used for the array Each management port one on controller 0 and one on controller 1 should have its own IP address reserved on any DHC...

Страница 13: ...l the clamp is fixed securely to the base of the AC cable plug as shown and then tighten Figure 10 Using Power Cable Management Straps Power On Power Off Procedures The array power buttons are located on each controller module at the back of the base unit as shown in Figure 11 below Figure 11 Power Button Location on Array Controller Power On Procedure When Auto Power On Mode Is Not Enabled If the...

Страница 14: ...ould be followed when an array is to be shut down 1 Turn off or disconnect application servers using the prescribed shut down process for that server s applications and operating system 2 Turn off the array by depressing the power button until the Ready LED starts blinks at a faster rate then release the power button The power button is located on the array controller at the rear of the base unit ...

Страница 15: ...anager software generates a large number of files and constantly updates files during normal operation Therefore it is recommended that the installation path for the Storage Manager software be excluded from any real time virus scanning routine Also while a single management server can monitor several arrays simultaneously an array should not be managed by more than one management server Installin...

Страница 16: ... click Next 7 At this point the Storage Manager installation will attempt to install Java Click Accept to begin installing Java Note Storage Manager requires the use of a specific version of Java that comes with the installation software Ensure that Java is installed during this step even if another version of Java has already been installed on this server to avoid any compatibility issues NEC D3 ...

Страница 17: ...d then click OK 10 At this point you can create more user accounts and grant each account the appropriate access rights to Storage Manager settings as follows Standard L1 Authorized for disk monitoring state display and other read only tasks Operator L2 Authorized for changing optimization settings and starting snapshot or replication tasks Administrator L3 Authorized for any management tasks To a...

Страница 18: ... application servers need to be prepared to connect to the array by installing an auto discovery host agent on the application servers The auto discovery host agent allows you to perform an auto discovery of hosts during the array initialization process when binding logical drives This host agent can either be installed as part of iSM Volume List Command or Command Control The iSM Volume List inst...

Страница 19: ... account that has administrative privileges 2 Insert the Storage Manager setup CD and run ISMSETUP EXE from the Autorun prompt or from the CD Drive StorageManager Install Windows directory 3 From the Select Setup Method window select Setup an application server under Quick Install and then click Next 4 From the License Agreement window select Accept and then click Next NEC D3 D4 Quick Start Guide ...

Страница 20: ... a more convenient time Host Information Collection Normally host information is gathered automatically during the array initialization and configuration process but if an application server is not connected during the initial array configuration process or if the automatic host information collection process does not work the following procedure can be performed to generate a host information fil...

Страница 21: ... completed successfully message will be displayed and the host information file will be created in the root directory of the drive where the command was launched You can then copy the generated file named after the server name entered in Step 3 from the application server to the management server via a network share or portable storage media for use during the logical disk binding process ...

Страница 22: ...nternet Explorer for the Storage Manager client 1 Open the Start Menu select Control Panel Internet Options and then select the Security Tab 2 Highlight Trusted sites and then click the Sites button 3 In the Trusted Sites window type the URL or IP Address of the management server and then click the Add button Note If the management client is running on the same machine as the storage manager serve...

Страница 23: ... that address in the browser window If the server is only identified by an IP address navigate to that address and follow the prompts to install the client software At this point the software installation process has been completed and you can manage the array with the iSM client by navigating to the management server address within the Web browser Everything should be ready for the array to be in...

Страница 24: ...t with any application servers for the host information gathering process Ensure that all application servers are operational and connected to the switch and or array before beginning the initialization process 1 Start Internet Explorer and navigate to the management server s network address and port default port 8070 If the server has an associated DNS entry navigate to that address in the browse...

Страница 25: ...op toolbar then click Initialization Wizard from the drop down menu 4 At the Initialization Wizard start screen ensure that the prerequisite steps have been performed as listed and then click Next when everything is ready for initialization NEC D3 D4 Quick Start Guide 23 ...

Страница 26: ...rray and then restart the initialization process for subsequent arrays until all selected arrays have been initialized 6 After selecting the array a confirmation window will appear Confirm that the correct array was selected and click Yes to continue Otherwise click No to go back and then select the correct array 7 The Disk Array Connection State Confirmation window displays an example of how an a...

Страница 27: ...ured have not been configured for use with an array previously and as long as the Volume List Command or ControlCommand software has been installed on the desired application server s If these conditions have not been met the host information will have to be gathered and typed in manually during the initialization process After selecting or clearing the Automatic collection field as appropriate cl...

Страница 28: ...he network information for the array a confirmation window will appear Verify that the information entered was correct and then click Set to continue If the information is not correct click Back and type the information again before continuing 13 At the Set Host Connection Port Parameters window review the port parameters for the array If any parameters need to be changed highlight the port to be ...

Страница 29: ...port will communicate Server Connection Type Choose between Direct Connection FC AL for DAS and Loop topologies or choose FC Switch Connection for switch fabric topologies Switch ID If multiple arrays are being configured in an FC AL topology this value must be unique for each array Otherwise leave this value at the default 10h setting When you are finished editing port settings click OK to return...

Страница 30: ...C Storage software license code provided on the Program Product License Sheet that was shipped with the array Click Enter after the code has been typed in the License Key field When the code has been typed click Next to continue Note at this time do not enter in other license codes More specifically if you enter the Access Control license key you will need to set up Access Control or servers will ...

Страница 31: ... Type Choose the RAID type and the physical disk type if both SAS and SATA disks are in the array LD Capacity Set the capacity of the logical disks Number of LDs Set the number of logical disks to create Select Hosts Assign up to two application servers to access the logical disks or create the logical disk without assigning it to any hosts LD Set Name Assign a name to the logical disk set LD Name...

Страница 32: ... logical disks and confirming that all settings are correct the array will begin setting the configuration and building any logical disks that may have been configured When the initialization process is complete an Initialization Complete window will appear At this point click Finish to complete the initialization and then confirm that all configured logical drives and application servers are conn...

Страница 33: ...ical disk mappings that were not completed during the initialization process Confirming Array Connections 1 Open Internet Explorer and navigate to the management server s network address and port number default port 8070 2 Log in to the Storage Manager client with an account that has administrative privileges 3 Expand the menu under the array that needs to be confirmed and then select Connected Ho...

Страница 34: ... well as the name of the array that the application server is connected to At this point the connections have been confirmed on the array and the application server s connection to the array and any bound logical drives can be confirmed as shown below NEC D3 D4 Quick Start Guide 32 ...

Страница 35: ...Administrative Tools and then Computer Management or by right clicking Computer and then clicking Manage 3 At the Computer Management window select Device Manager and then click Disk Drives on the right to ensure that any logical disks are visible from the application server 4 In the Computer Management window select Disk Management If the logical drives that were bound to this application server ...

Страница 36: ...on server and formatted as needed If the logical drives do not appear on the application server check all physical connections and restart the application server If they still do not appear or were not created during the array initialization process attempt to create and bind logical drives through the Storage Manager client as shown in the Configuring Logical Disks and Pools section below NEC D3 ...

Страница 37: ...ntation that accompanied your array 1 Navigate to the Storage Manager network address in an Internet Explorer window and then log in to the client with an account that has administrative privileges 2 Select the array where logical disks and pools need to be created click File highlight Configuration Settings References and then click Configuration Setting 3 A window will appear warning you that ar...

Страница 38: ...5 At the LD Individual Bind Unbind window select Pool Binding under the Binding Wizard section at the bottom 6 At the Welcome window for the Pool Binding Wizard click Next NEC D3 D4 Quick Start Guide 36 ...

Страница 39: ... Disk Type window select the desired physical disk type to be used in this pool and then click Next 8 At the Select Pool Type window select either a dynamic or basic pool type and then click Next NEC D3 D4 Quick Start Guide 37 ...

Страница 40: ...e is dynamic or basic as chosen in the previous screen After the appropriate RAID type has been selected click Next to continue 10 At the Select Physical Drive window select each physical drive to be added to the logical disk pool and then click Add for each one highlighted until the requisite number of drives for that pool type have been added NEC D3 D4 Quick Start Guide 38 ...

Страница 41: ...firm Pool Binding Parameters window review the settings listed and if they are correct click Next If changes need to be made click Back to change the settings made in previous steps or click Cancel to exit the pool binding wizard 13 At the Pool Binding Wizard confirmation pop up click Yes to continue or No to quit NEC D3 D4 Quick Start Guide 39 ...

Страница 42: ... Pool Binding Complete window appears click Finish to complete the new pool binding process The pool is now ready for logical drives to be configured and bound to application servers NEC D3 D4 Quick Start Guide 40 ...

Страница 43: ...ical disks need to be created click File highlight Configuration Settings References and then click Configuration Setting 3 A window will appear warning you that the array monitoring will be stopped while configuration settings are being adjusted Click Yes to continue or click No to cancel the configuration process 4 At the Configuration Setting menu you can view basic array information and config...

Страница 44: ...5 At the LD Individual Bind Unbind window select LD Binding under the Binding Wizard section at the bottom NEC D3 D4 Quick Start Guide 42 6 At the LD Binding Wizard Welcome window click Next to continue ...

Страница 45: ... Select LD Usage window you can choose between creating logical disks for general usage or disks that will be array managed for control volumes or system volumes To store application data select General usage Specify how the logical disks will be used and then click Next to continue NEC D3 D4 Quick Start Guide 43 ...

Страница 46: ...umber of LDs and LD capacity The number of logical drives will be determined manually but cannot exceed the unassigned capacity of the selected pool After the appropriate option has been selected click Next to continue 10 Depending on which option was chosen at the Select LD Binding Method window in step 9 the window displayed next will prompt for the number of logical disks the logical disk capac...

Страница 47: ...r the logical disks will be bound to Set to WN for Windows operating systems Name Changes the name of the logical disks Starting LD Number Changes the starting logical disk number Format Time Changes the maximum amount of time it will take to bind or rebuild the logical disks under normal load conditions After the appropriate changes have been made click OK to return to the Set Detailed Parameters...

Страница 48: ... warning screen to start the logical disk binding process or click No to cancel the logical disk binding process 15 After the logical disks have been bound the LD Binding Complete message will appear Click Finish to close the logical disk binding wizard and configure the application server to use the assigned logical disks NEC D3 D4 Quick Start Guide 46 ...

Страница 49: ...NEC D3 D4 Quick Start Guide 47 Your storage array is now ready for use Thank you for selecting NEC ...

Страница 50: ...er loop or fabric configuration and a clustered server configuration to eliminate the need for failover to be configured on the cluster nodes Installing PathManager This section describes the installation process for PathManager on a Microsoft Windows Server 2003 or Microsoft Windows Server 2008 system For information about installing PathManager in other environments please refer to the PathManag...

Страница 51: ...ement and then click Next to continue 5 At the Setup Type window either select the Standard Setup which installs all files to the default installation path or select Choose the folder which allows you to configure the installation path where all PathManager files will be installed After selecting the appropriate option and configuring the installation path if needed click Next to continue NEC D3 D...

Страница 52: ...evious steps 7 At this point the PathManager installation can take several minutes to complete The installation process may launch several different windows and command prompts during this process so do not close any windows launched or interrupt the process until the InstallShield Wizard Complete message appears NEC D3 D4 Quick Start Guide 50 ...

Страница 53: ...any additional PathManager configuration activities can be performed on the server if needed At this point the PathManager software installation is complete and PathManager should recognize any disk subsystems and paths to the array needed to operate normally To learn how to monitor PathManager functionality or perform any additional multipath configuration tasks please refer to the Storage PathMa...

Отзывы: