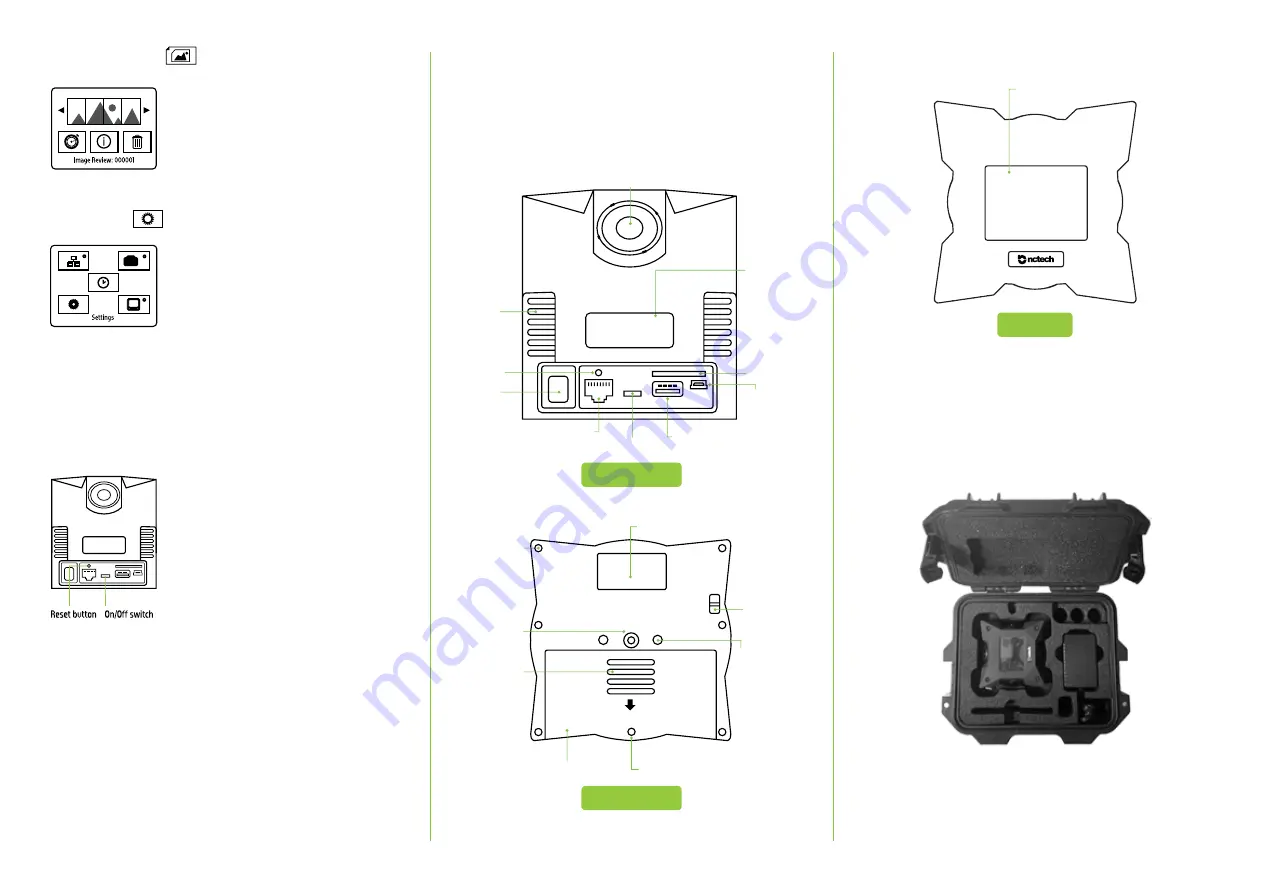
Ethernet
On/Off switch
USB port
12vDC in
Reset button
Hand grips
SD card slot
WiFI signal
vent
Lens
Mini USB B
Serial number
3/8” thread
tripod mount
M4 locating
screw holes
Grip area
Battery cover
Slide to open
Battery cover screw
Safety
strap pin
Quick release
plate pin holes
LCD touchscreen
x
Side port view
Top view
Underside view
07 / Image review
08 / Settings
To view a captured image, press the icon from the
start menu to navigate to the Image Review screen.
The image number is displayed at the bottom of the
screen. The forward and back arrows can be used to
cycle through the saved images. To view an image,
press the icon. This will display an immersive view of
the image. Use your finger to rotate the image.
From the start menu, press the settings icon to
navigate to the Settings menu.
From the Settings menu you can access:
1.
Network Settings
– Ethernet/WiFi
2.
Image Settings
– ISO/Exposure/Colour balance
3.
General Settings
4.
Capture Settings
– Number of exposures/
Delay capture timer
5.
Display Settings
– Backlight timeout/Power off delay
6.
Date and Time Settings
09 / Troubleshooting
10 / Support portal
For technical support please visit our support portal:
support.nctechimaging.com
At the portal you can download the full iSTAR manual and access iSTAR FAQs.
If you experience problems your camera will be equipped
with either an On/Off switch or Reset button to shutdown
the camera.
Using the On/Off switch
1. Locate the On/Off switch on the rear of the camera
behind the rubber port panel.
2. To switch off, slide the switch and wait for 2 seconds
before switching the unit back on.
3. Tap the 4 corners of the touch screen to start up the
camera.
Using the Reset button
1. Locate the Reset button on the rear of the camera behind the rubber port panel.
2. Press a pointed object through the hole until you hear a long audible beep.
On hearing the beep, release the button.
3. You will hear a 2nd audible beep and the iSTAR logo will flash on screen confirming
the camera has shut down successfully.
4. Tap the 4 corners of the touch screen to start up the camera.
5. If the reset does not solve the issue then disconnect and reconnect the battery.
IMPORTANT:
Do not put the camera in its protective case when switched on. This will
create excessive heat as the foam acts as an insulator. Damage from misuse in this
way may not be covered by warranty.
Sideport view
11 / Nomenclature
11 / Nomenclature
(cont.)
Ethernet
On/Off switch
USB port
12vDC in
Reset button
Hand grips
SD card slot
WiFI signal
vent
Lens
Mini USB B
Serial number
3/8” thread
tripod mount
M4 locating
screw holes
Grip area
Battery cover
Slide to open
Battery cover screw
Safety
strap pin
Quick release
plate pin holes
LCD touchscreen
x
Side port view
Top view
Underside view
Underside view
Top view
Ethernet
On/Off switch
USB port
12vDC in
Reset button
Hand grips
SD card slot
WiFI signal
vent
Lens
Mini USB B
Serial number
3/8” thread
tripod mount
M4 locating
screw holes
Grip area
Battery cover
Slide to open
Battery cover screw
Safety
strap pin
Quick release
plate pin holes
LCD touchscreen
x
Side port view
Top view
Underside view
12 / Equipment
iSTAR is shipped with the following equipment:
1. AC Power supply
2. Battery
3. Lens cleaning cloth
4. iSTAR quick start manual
5. Warranty card
If you have purchased iSTAR for RGB overlay for LiDAR scanning, your iSTAR will ship
with the required adaptor spacer rods.
Recommended optional equipment: Carry Case / Tripod / Quick Release for convenient
mounting of iSTAR / Spare battery / External battery.
Содержание iSTAR Series
Страница 1: ...iSTAR QUICK START GUIDE Version 1 2 ...


