background image

ii

The product described in this document is a licensed product of NCR Corporation.

NCR is a registered trademark of NCR Corporation. Product names mentioned in this publication may be
trademarks or registered trademarks of their respective companies and are hereby acknowledged.

Where creation of derivative works, modifications or copies of this NCR copyrighted documentation is
permitted under the terms and conditions of an agreement you have with NCR, NCR's copyright notice
must be included.

It is the policy of NCR Corporation (NCR) to improve products as new technology, components, software,
and firmware become available. NCR, therefore, reserves the right to change specifications without prior
notice.

All features, functions, and operations described herein may not be marketed by NCR in all parts of the
world. In some instances, photographs are of equipment prototypes. Therefore, before using this document,
consult with your NCR representative or NCR office for information that is applicable and current.

To maintain the quality of our publications, we need your comments on the accuracy, clarity, organization,
and value of this book. Please use the link below to send your comments.

EMail:

[email protected]

Copyright © 2021
By NCR Corporation
Global Headquarters
864 Spring St NW
Atlanta, GA 30308
U.S.A.
All Rights Reserved

Revision Record

Issue

Date

Remarks

A

Aug 2021

First Issue

Содержание POS XR8

Страница 1: ...Serial Cables Dual NCR POS XR8 7607 7607 K495 Issue A...

Страница 2: ...tware and firmware become available NCR therefore reserves the right to change specifications without prior notice All features functions and operations described herein may not be marketed by NCR in...

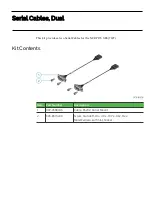
Страница 3: ...his kit provides a two Serial Cables for the NCR POS XR8 7607 Kit Contents Item Part Number Description 1 497 0508746 Cable RS232 Panel Mount 2 006 8613209 Screw Standoff 4 40 x 187 x 462 Hex Male Fem...

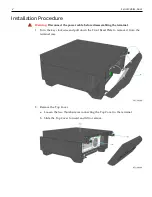
Страница 4: ...le before disassembling the terminal 1 Turn the key clockwise and pull down the Front Bezel Plate to remove it from the terminal case 2 Remove the Top Cover a Loosen the two thumbscrews connecting the...

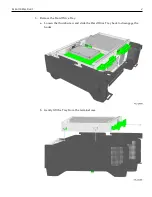
Страница 5: ...Serial Cables Dual 3 3 Remove the Hard Drive Tray a Loosen the thumbscrew and slide the Hard Drive Tray back to disengage the hooks b Gently lift the Tray from the terminal case...

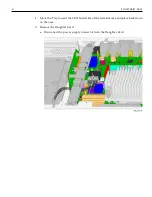
Страница 6: ...erial Cables Dual 4 Move the Tray toward the LED board side of the terminal case and place back down on the case 5 Remove the Daughter Card a Disconnect the power supply connector from the Daughter Ca...

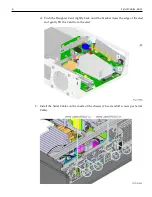
Страница 7: ...Serial Cables Dual 5 b Unscrew the Daughter Card from the sled on the ports side of the sled c Slide the Daughter Card sideways from the riser card until it detaches...

Страница 8: ...d Push the Daughter Card slightly back until the bracket clears the edge of the sled and gently lift the Card from the sled 6 Install the Serial Cables on the inside of the chassis 2 hex standoff scr...

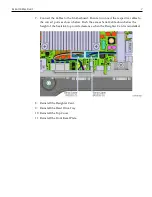
Страница 9: ...cables to the correct ports as shown below Push the excess Serial Cable down below the height of the heatsink to provide clearance when the Daughter Card is reinstalled 8 Reinstall the Daughter Card...

Отзывы: