6
2x20 Adjustable High Mount without Display
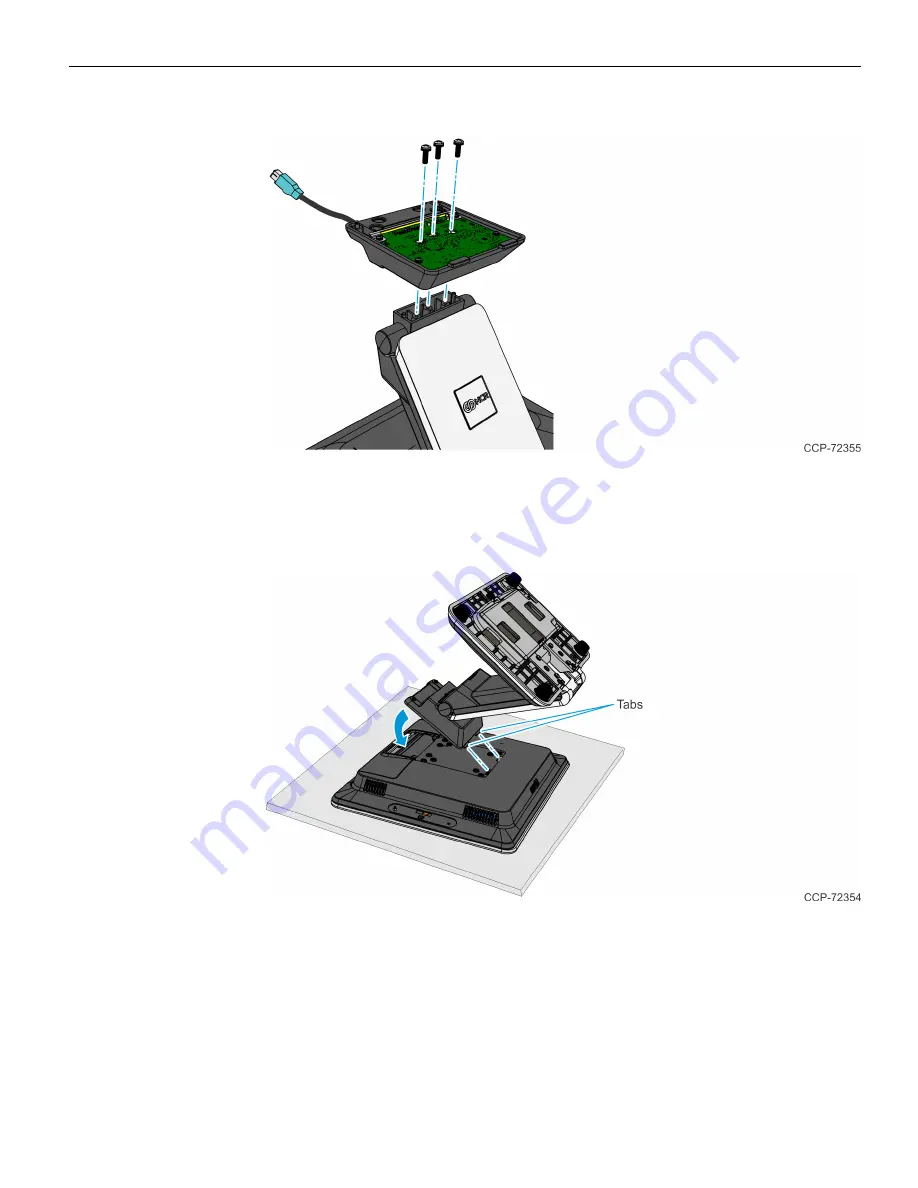
d. Install the Serial Expansion Module to the Stand (3 screws).
4. Reinstall the Stand.
a. Insert the Serial Expansion Housing Tabs into the openings in the Back Housing
and rotate the Stand downward.
Страница 1: ...Kit Instructions 2x20 Adjustable High Mount without Display 7703 K390 K490 Issue B...
Страница 2: ...ight notice must be included It is the policy of NCR Corporation NCR to improve products as new technology components software and firmware become available NCR therefore reserves the right to change...
Страница 3: ...R XR7 POS 7702 on an X Series Stand 7702 K031 or P Series Stand 7701 K032 NCR XR7 Plus POS 7703 on an X Series Stand 7702 K031 Kit Contents Item Part Number Description 7703 K390 2x20 Adjustable High...
Страница 4: ...Steel 7703 K490 2x20 Adjustable High Mount without Display 1 445 0744459 Cable Management Bracket 2x20 2 497 0519729 Bracket High Mount Base 3 497 0519730 Bracket Display Mount Swivel 4 006 8626618 H...
Страница 5: ...rminal face down on a flat surface Caution Always use a soft material cloth foam to protect the display screen when placing the terminal face down b Remove the two 2 captive screws that secure the Sta...
Страница 6: ...xisting Serial Expansion Housing a Remove the Serial Expansion Module from the Stand 3 screws b Remove the four 4 screws securing the Serial Expansion Board to the Serial Expansion Housing c Remove th...
Страница 7: ...ng of the new Serial Expansion Housing 497 0521275 included in 7703 K390 497 0514376 included in 7703 K490 b Mount the Serial Expansion Board on the Serial Expansion Housing Ensure the Cable Grommet i...
Страница 8: ...igh Mount without Display d Install the Serial Expansion Module to the Stand 3 screws 4 Reinstall the Stand a Insert the Serial Expansion Housing Tabs into the openings in the Back Housing and rotate...
Страница 9: ...igh Mount without Display 7 b Secure the stand to the terminal using two 2 captive screws 5 Install the Customer Display on the Mounting Bracket Assembly a Mount the Cable Strain Relief to the Cable M...
Страница 10: ...splay b Connect the USB Cable to the Customer Display Note the cable routing Cable Management Bracket removed for clarity c Insert the tab on the edge of the Cable Management Bracket into the slot in...
Страница 11: ...x20 Adjustable High Mount without Display 9 d Pivot the Cable Management Bracket until it snaps into position e Route the Cable between the Display Mount Swivel Bracket and the High Mount Base Bracket...
Страница 12: ...justable High Mount without Display f Attach the Customer Display on the Display Mount Swivel Bracket using three 3 screws 6 Install the Customer Display and Mounting Bracket Assembly a Route the Cabl...
Страница 13: ...thout Display 11 b Slide the Customer Display and Mounting Bracket Assembly over the Serial Expansion Housing of the terminal c Secure the Assembly to the terminal using four 4 screws d Pivot the term...
Страница 14: ...12 2x20 Adjustable High Mount without Display e Connect the USB Cable to any available 12V USB Port on the terminal...