background image

6

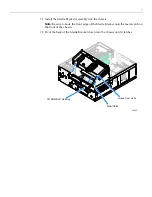
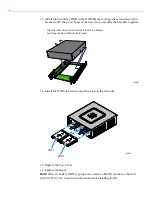
8. Secure


the


cables


in


the


tie


wrap


located


in


the


bottom


of


the


chassis.

9. Install


the


new


SATA


Backplane


Board


on


the


Media


Bracket


(2


screws).

10. Connect


the


HDD


power


and


data


harnesses


to


the


SATA


Board.


24417

SATA Backplane Board

24418

CDROM/DVD Data

(Blue, no metal latch)

CDROM/DVD Power

HDD0 Data (Red)

HDD0 Power

HDD1 Power

HDD1 Data (Red)

Содержание 7606-K261

Страница 1: ...7606 K261 2nd Hard Disk Drive 250 GB Kit Instructions Issue A...

Страница 2: ...Revision Record Issue Date Remarks A May 2012 First Issue...

Страница 3: ...GB s hard disk drive HDD brackets SATA Backplane Board and SATA Harness to add a second HDD to the 7606 terminal Kit Contents 31250a SATA HDD 006 8616862 250 GB HDD Bracket 497 0465040 SATA Backplane...

Страница 4: ...oid any contact with internal parts and handle cards only by their external edges 1 Turn Off the power to the terminal and disconnect any peripheral devices 2 Unplug the terminal s power cord 3 Remove...

Страница 5: ...cover toward the rear of the terminal to remove it 4 Remove the primary HDD Squeeze the Release Tabs on the Hard Drive Bracket and then slide the HDD assembly out of the chassis 31260 31261 Primary HD...

Страница 6: ...a Press on the Media Bracket Tab on the side of the chassis b Lift the assembly partially out of the terminal guiding the CDROM DVD Drive out of the opening in the front of the chassis 30636 Media Br...

Страница 7: ...iver into the slot and pry the it up and down to break the knockout loose 7 Connect the Secondary SATA Harness to the SATA1 connector on the Motherboard 31262 Knockout 30638 SATA5 Not Used SATA4 CDROM...

Страница 8: ...ssis 9 Install the new SATA Backplane Board on the Media Bracket 2 screws 10 Connect the HDD power and data harnesses to the SATA Board 24417 SATA Backplane Board 24418 CDROM DVD Data Blue no metal la...

Страница 9: ...e chassis Note Be sure to hook the front edge of the Media Bracket onto the metal catch on the front of the chassis 12 Pivot the back of the Media Bracket down into the chassis until it latches 24422...

Страница 10: ...Install the HDDs into their respective slots in the terminal 15 Replace the Top Cover 16 Replace the Bezel Note If the secondary HDD is going to be used as a RAID volume see the NCR RealPOS 82xrt User...

Отзывы: