background image

4

PIN Pad Mount (Verifone VX820)

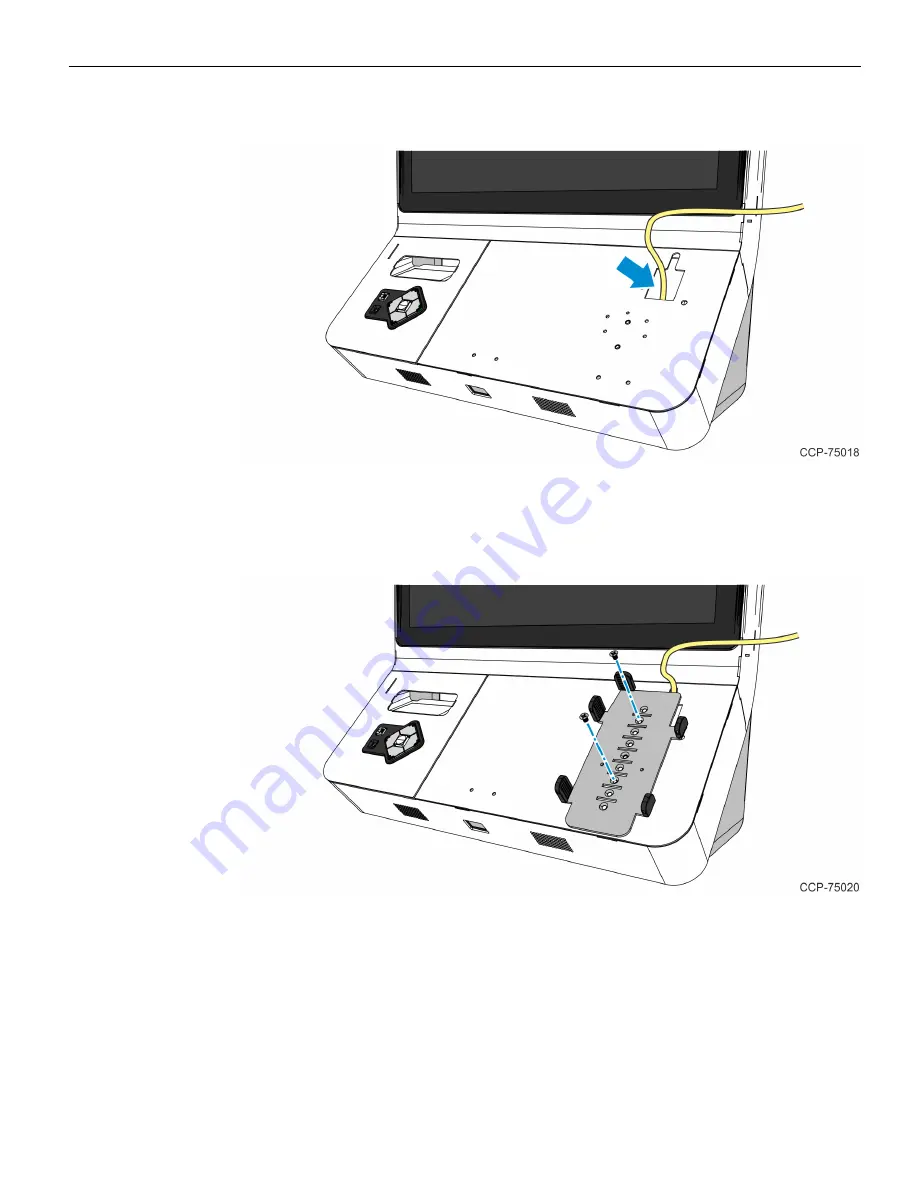
3. Slowly drop the PIN pad cable through the cable access hole on the Fascia Panel.

4. Insert the cable into the slot on top of the access hole and then mount and secure the

PIN Pad plate on the panel using two screws. Use the second and seventh mounting
holes to secure the plate to the panel.

Содержание 2247

Страница 1: ...Kit Instructions 2247 PIN Pad Mount Verifone VX820 Kit 2247 K070 Issue A...

Страница 2: ...notice must be included It is the policy of NCR Corporation NCR to improve products as new technology components software and firmware become available NCR therefore reserves the right to change speci...

Страница 3: ...iii Revision Record Issue Date Remarks A Apr 2019 First Issue...

Страница 4: ...iv...

Страница 5: ...PIN Pad Mount Verifone VX820 This publication provides procedures for installing the PIN Pad Mount Kit to NCR SelfServ XK32 2247...

Страница 6: ...ole Verifone VX820 2 497 0520425 1 Label Set Hole Cover NCR Dark White 12 7mm Diameter 3 006 8626390 2 Screw Flatheard Phillips Black Oxide M4 X 6 4 006 8626871 2 Screw M2 X 0 40 12 mm length Pan head...

Страница 7: ...3 Installation Procedure To install the Verifone VX820 PIN Pad Mount Kit follow these steps 1 Mount the PIN Pad panel to the kiosk hooking its feet over the door panel 2 Secure the PIN Pad Panel to t...

Страница 8: ...le through the cable access hole on the Fascia Panel 4 Insert the cable into the slot on top of the access hole and then mount and secure the PIN Pad plate on the panel using two screws Use the second...

Страница 9: ...the plate 6 Inside the Door Cabinet secure the PIN pad using two screws 7 Route and connect the PIN pad cable to the EBox see Routing the PIN Pad Cable on the next page Note For installation procedure...

Страница 10: ...6 PIN Pad Mount Verifone VX820 Routing the PIN Pad Cable 1 Route and secure the cable through the cable clamps on the left hand side of the Door Cabinet...

Страница 11: ...ble upward through the cable access hole in the Main Frame and route the cable through the right hand side of the frame towards the EBox 3 Connect the cable to the USB C port of the EBox IO Panel 4 Se...

Страница 12: ...8...

Отзывы: