ST-IP
4
FTD QUICK START GUIDE
8
1
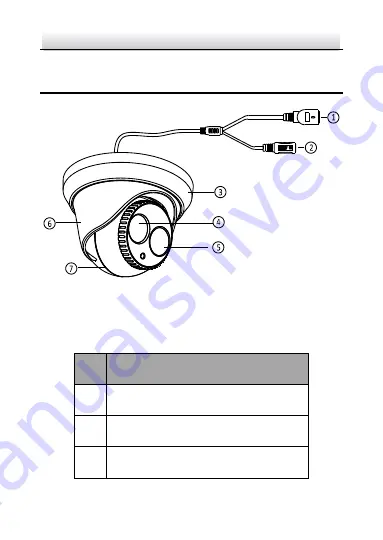
Appearance Description
Figure 1-1
Overview
Table 1-1
Description
NO.
10M/100M self-adaptive Ethernet interface
2
Power Cable
3
Trim Ring
Страница 1: ...ST IP4FTD QUICK START GUIDE www securitytronix com www nacebrands com...
Страница 2: ...he products or procedures described in the manual DISCLAIMER STATEMENT Underwriters Laboratories Inc UL has not tested the performance or reliability of the security or signaling aspects of this produ...
Страница 3: ...tions Operation of this equipment in a residential area is likely to cause harmful interference in which case the user will be required to correct the interference at their own expense FCC Conditions...
Страница 4: ...ion points For more information see www recyclethis info 2006 66 EC battery directive This product contains a battery that cannot be disposed of as unsorted municipal waste in the European Union See t...
Страница 5: ...e neglected Warnings While using this product you must be in strict compliance with the electrical safety regulations of the nation and region Please refer to technical specifications for detailed inf...
Страница 6: ...voltage is correct before using the camera Do not drop the camera or subject it to physical shock Do not touch sensor modules with fingers If cleaning is necessary use a clean cloth with a bit of eth...
Страница 7: ...ar part replacement a few parts e g electrolytic capacitor of the equipment shall be replaced regularly according to their average life span The average time varies because of differences between oper...
Страница 8: ...ST IP4FTD QUICK START GUIDE 7 Table of Contents 1 Appearance Description 8 2 Installation 10 3 Setting the Network Camera over the LAN 16 4 Accessing via Web Browser 21...
Страница 9: ...ST IP4FTD QUICK START GUIDE 8 1 Appearance Description Figure 1 1 Overview Table 1 1 Description NO Description 1 10M 100M self adaptive Ethernet interface 2 Power Cable 3 Trim Ring...
Страница 10: ...DE 9 NO Description 4 Lens 5 IR LED 6 Enclosure 7 Dome Drive Please make sure that the power adapter is compatible with the camera This series of camera supports Power over Ethernet PoE and the standa...
Страница 11: ...product does not function properly please contact your dealer or technical support Do not disassemble the camera for repair or maintenance by yourself Make sure that the wall is strong enough to with...
Страница 12: ...oor image quality The foam ring around the lens must be seated flush against the inner surface of the bubble to isolate the lens from the IR LEDS Fasten the dome cover to camera body so that the foam...
Страница 13: ...le hole on the ceiling according to the drill template Figure 2 2 The Drill Template There are two cable outlet methods One is to route the cables through the cable hole and the other is to route the...
Страница 14: ...Use a plier to remove the plastic tab and route the cables through the hole 3 Connect the corresponding power network cable 4 Fix the camera to the ceiling with the supplied expansion screws Figure 2...
Страница 15: ...ST IP4FTD QUICK START GUIDE 14 3 Tighten the lock screw to fix the optimum surveillance angle Figure 2 5 Lock Screw Figure 2 6 Adjust the Lens Lock Screw...
Страница 16: ...ST IP4FTD QUICK START GUIDE 15 6 Attach the trim ring to the camera and rotate the trim ring clockwise to get it secured Figure 2 7 Install the Trim Ring Figure 2 8 Complete the Installation...
Страница 17: ...nd change the IP of the network camera The following figure shows the cable connection of network camera to PC Figure 3 1 Wiring over LAN Set the IP address of the camera for accessing via LAN Steps 1...
Страница 18: ...roductions to set IP address with SADP software Search active devices online Search online devices automatically After launching the SADP software it automatically searches the online devices every 15...
Страница 19: ...ick to refresh the online device list manually The newly searched devices will be added to the list You can click or on each column heading to order the information you can click to show the device ta...
Страница 20: ...arameters panel on the right side as shown in Figure 3 4 Edit the modifiable network parameters e g IP address and port number Enter the password of the admin account of the device in the Password fie...
Страница 21: ...f the network camera in the address field of the web browser to view the live video The default IP address is 192 0 0 64 The default user name is admin and password is 12345 For accessing the network...
Страница 22: ...r higher Display 1024 768 resolution or higher Web Browser Internet Explorer 6 0 and above version Apple Safari 5 02 and above version Mozilla Firefox 3 5 and above version and Google Chrome8 and abov...
Страница 23: ...4 1 Login Interface 5 Install the plug in before viewing the live video and managing the camera Please follow the installation prompts to install the plug in You may have to close the web browser to f...
Страница 24: ...ST IP4FTD QUICK START GUIDE 23 Figure 4 2 Download Plug in Figure 4 3 Install Plug in 1...
Страница 25: ...browser after the installation of the plug in and repeat steps 2 4 to login For detailed instructions of further configuration please refer to the user manual of the network camera If there are any q...
Страница 26: ...ardware war invasion act of foreign enemies hostilities regardless of whether war is declared civil war rebellion revolution insurrection military or usurped power or confiscation terrorist activities...