background image

Ajustes del Menú del Sistema   

Características Avanzadas


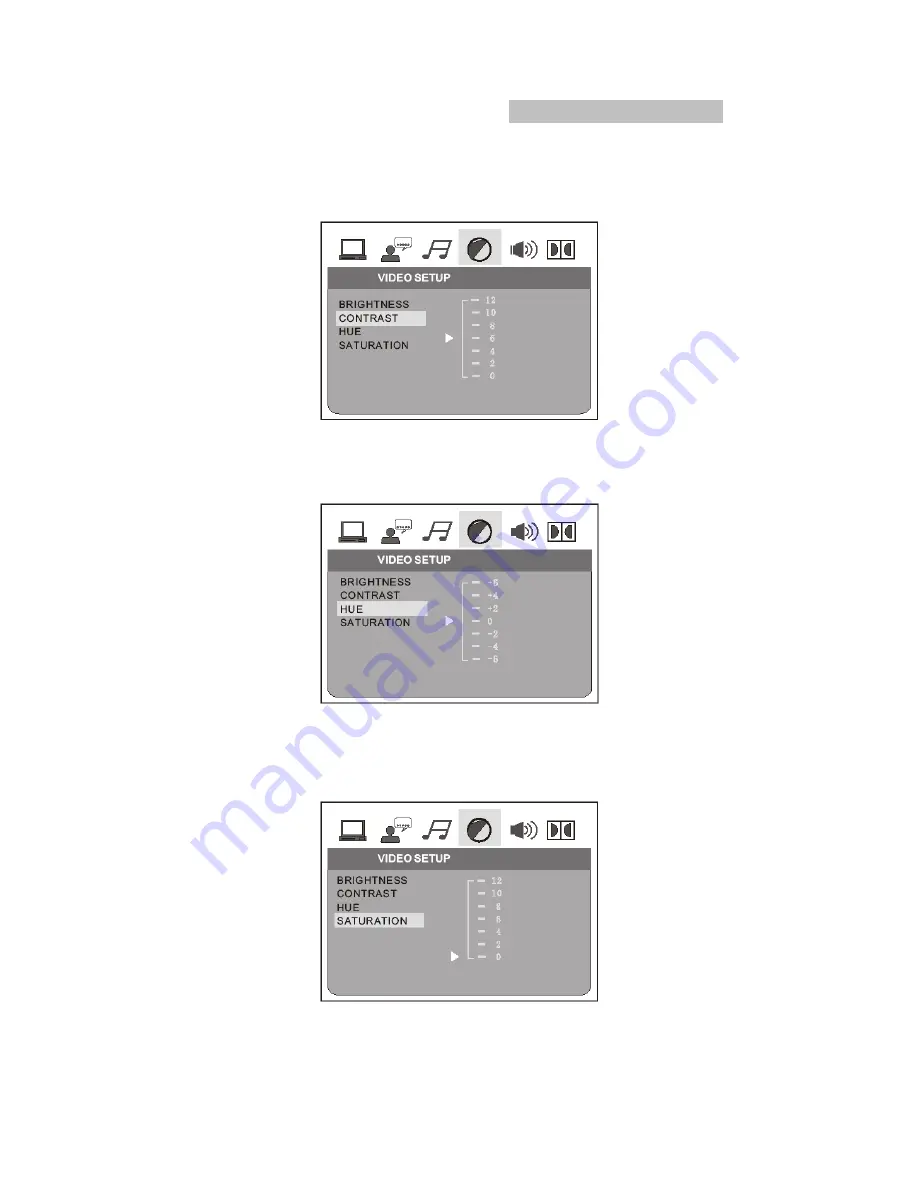
2.4.2 CONTRASTE “CONTRAST” 

Remarcar el submenú de contraste "CONTRAST", presionar "  ó  " para ajustar el nivel del 
contraste. 


2.4.3 COLOR “HUE” 

Remarcar el submenú de color "HUE", presionar "  ó  " para ajustar el nivel del color. 


2.4.4 SATURACION “SATURATION” 

Remarcar el submenú de saturación "SATURATION", presionar "  ó  " para ajustar el nivel 
de saturación del color. 


Содержание NX-836

Страница 1: ...NX 836 PROGRESSIVE SCAN IMPORTANT READ THESE INSTRUCTIONS BEFORE USE AND RETAIN FOR FUTURE REFERENCE INSTRUCTION MANUAL P O R T USB ...

Страница 2: ...l Introduction 2 3 5 6 7 8 TV set Connecting Digital Audio Connecting Connections 9 10 Advanced Features 24 Others 30 Troubleshooting 33 Specifications 11 Content Mode and Features Setup Remote Control Operation USB CARD KARAOKE score 31 Remote Control Preparation MPEG4 MP3 Playback 1 Kodak Picture CD Playback 32 29 28 ...

Страница 3: ...2 ...

Страница 4: ...3 ...

Страница 5: ...4 ...

Страница 6: ...5 ...

Страница 7: ... owned by Macrovision Corporation and other rights owners Use of this copyright protection technology must be authorized by Macrovision Corporation and is intendedfor home and other limited viewing uses only unless otherwise authorized by Macrovision Corporation Reverse engineering or disassembly is prohibited The product complies with the KODAK Picture CD format and will display KODAK Picture CDs...

Страница 8: ...3 DISC TRAY 2 3 4 5 6 2 1 Y Pb Cb Pr Cr output jack 2 VIDEO output jack 3 2 CH output jack L R 5 S VIDEO output jack 1 7 PREV NEXT 8 9 10 5 MIC IN 2 3 4 5 6 1 7 4 Digital signal COAXIAL output jack 7 5 1 CH output jack 6 Digital signal OPTICAL output jack 11 L R MIC VOL 12 13 14 15 OPEN CLOSE PLAY 6 9 8 7 PAUSE 10 STOP SENSOR CARD IN 11 14 13 12 USB IN 10 SCREEN ...

Страница 9: ...L R MUTE A B KARAOKE OSD TITLE OPEN CLOSE AUDIO SUBTITLE ZOOM STOP PBC N P NX 836 VIDEO NUMBER KEYS OSD A B REPEAT REPEAT ENTER ZOOM MUTE VOL VOL PLAY PAUSE STOP SLOW MOVE AUDIO STANDBY SUBTITLE KARAOKE SETUP PROG MENU SOURCE REV PREV NEXT OPEN CLOSE ANGLE GOTO FWD 1 2 3 4 5 6 7 8 9 10 11 12 13 15 16 17 18 19 20 21 22 23 24 25 26 27 28 29 30 31 33 L R STEP PBC 14 32 N P TITLE ...

Страница 10: ...O IN VIDEO IN VIDEO S VIDEO YELLOW BLACK Component video for progressive scan VIDEO IN P P Y b r Digital out SL CE FL 5 1 CH Audio out SR SW FR BASS TREBLE ECHO DOWN UP VOLUME INPUT SELECTOR MUTE KARAOKE CHANNEL TEST MODE 3 STEREO PRO LOGIC BYPASS EXCITE POWER MIC 2 1 1 MIC VOL 2 MIC Amplifier ...

Страница 11: ...need to switch to the AVI Please refer to the TV set connecting 3 The Amplifier will output voice after audio receive Coaxial signal It requires the Amplifier to select the Coaxial input VIDEO S VIDEO L Pb Cb Y R Pr Cr COAXIAL Audio out Digital out Video out Digital out SL CE FL 5 1 CH Audio out SR SW FR BASS TREBLE ECHO DOWN UP VOLUME INPUT SELECTOR MUTE KARAOKE CHANNEL TEST MODE 3 STEREO PRO LOG...

Страница 12: ... to highlight the video icon the video page will be displayed on the screen C Press the Down arrow button to highlight the desired option Press Enter or press Right to select The choices of that option appear on the right For example press the Down arrow button to highlight the BRIGHTNESS option the press Enter to select the brightness choices appear on the right SYSTEM SETUP SYSTEM SETUP TV SYSTE...

Страница 13: ...ttons to highlight the Exit Setup option then press Enter or Setup again to exit Setup Menu According to the Color System of the TV you can choose the TV System 2 1 1 TV SYSTEM VIDEO SETUP VIDEO SETUP BRIGHTNESS CONTRAST HUE SATURATION SYSTEM SETUP SYSTEM SETUP TV SYSTEM SCREEN SAVER VIDEO TV TYPE PASSWORD RATING DEFAULT PAL AUTO NTSC ...

Страница 14: ... 2 1 3 VIDEO The SCREEN SAVER function is automatically and always on when the player is in STOP after few minutes in Open or No disc state it will appear a DVD logo moving around the screen 2 1 2 SCREEN SAVER 13 SYSTEM SETUP SYSTEM SETUP TV SYSTEM SCREEN SAVER VIDEO TV TYPE PASSWORD RATING DEFAULT OFF ON SYSTEM SETUP SYSTEM SETUP TV SYSTEM SCREEN SAVER VIDEO TV TYPE PASSWORD RATING DEFAULT S VIDE...

Страница 15: ...sword In order to set the Ratings feature to work the password mode must be turned on If you want to set the ratings limit you will need to enter the default password which is 0000 then press Enter to confirm To change the password you will be prompted for the old password then be prompted for a new one Enter a 4 digit number this is you password Press remember your PASSWORD as the DEFAULT setting...

Страница 16: ...s that your family watches When your unit does not work properly It may probably result from some wrong settings Please try the Restore Factory Setting function to see if the unit can restore to its normal working status 15 SYSTEM SETUP SYSTEM SETUP TV SYSTEM SCREEN SAVER VIDEO TV TYPE PASSWORD RATING DEFAULT 1 KID SAFE 2 G 3 PG 4 PG13 5 PG R 6 R 7 NC 17 8 ADULT SYSTEM SETUP SYSTEM SETUP TV SYSTEM...

Страница 17: ...firm then the language will be set as OSD language The language setup options are illustrated as below Highlight the SUBTITLE LANG option and press the Arrow buttons to choose the subtitle language you prefer Press Enter to confirm If the disc you are playing has that language it will display subtitles in that language 2 2 3 SUBTITLE LANG 16 LANGUAGE SETUP LANGUAGE SETUP ENGLISH SPANISH FRENCH GER...

Страница 18: ...guage you prefer Press Enter to confirm If the disc you are playing has that Language it will display the menu in the language 17 LANGUAGE SETUP LANGUAGE SETUP OSD LANGUAGE AUDIO LANG SUBTITLE LANG MENU LANG CHINESE ITALIAN FRENCH SPANISH PORTUGUESE GERMAN OFF ENGLISH LANGUAGE SETUP LANGUAGE SETUP OSD LANGUAGE AUDIO LANG SUBTITLE LANG MENU LANG CHINESE ITALIAN FRENCH SPANISH PORTUGUESE GERMAN LATI...

Страница 19: ...f SPDIF RAW When the player is connecte d to an amplifier through the coaxial cable SPDIF PCM When the player is connected to a 2 channels digital stereo amplifier 2 3 1 AUDIO SETUP 18 AUDIO SETUP AUDIO SETUP SPDIF OFF SPDIF PCM SPDIF RAW AUDIO OUT MIC SETUP ECHO MIC VOL 2 3 2 MIC SETUP Highlight the MIC SETUP option select MIC Auto and off via LEFT RIGHT direction keys and ENTER key AUDIO SETUP A...

Страница 20: ...UP VIDEO SETUP BRIGHTNESS CONTRAST HUE SATURATION AUDIO SETUP AUDIO SETUP AUDIO OUT MIC SETUP ECHO MIC VOL 2 3 4 MIC VOL Highlight the MIC VOL option adjust MIC Volume via UP DOWN direction keys AUDIO SETUP AUDIO SETUP AUDIO OUT MIC SETUP ECHO MIC VOL 2 3 3 ECHO Highlight the ECHO option adjust echo via UP DOWN direction keys ...

Страница 21: ...EO SETUP BRIGHTNESS CONTRAST HUE SATURATION 2 4 2 CONTRAST Use the Up and Down arrow buttons to move the scroll and adjust the contrast VIDEO SETUP VIDEO SETUP BRIGHTNESS CONTRAST HUE SATURATION 2 4 3 HUE Use the Up and Down arrow butto ns to move the scroll and adjust the hue VIDEO SETUP VIDEO SETUP BRIGHTNESS CONTRAST HUE SATURATION ...

Страница 22: ...llustrated as below 2 5 1 DOWNMIX A LT RT Choose this setting when the DVD player are connected to a 2 Channel Analog Audio Input B STEREO Choose this setting when the DVD player is connected to a TV or therefore modulator C VSS Choose this setting to listen to the soundtrack effects recorded on disc formatted in 5 1 Channel Surround Sound D 5 1CH Choose this setting when the DVD player is connect...

Страница 23: ...GE SMALL 2 5 4 REAR DELAY You can adjust the Center and the Rear delay by using the Up and Down buttons to move the scroll bar 2 5 3 CENTER DELAY You can adjust the center and the rear delay by using the Up and Down buttons to move the scroll bar SPEAKER SETUP SPEAKER SETUP DOWNMIX SUBWOOFER CENTER DELAY REAR DELAY FRONT SPEAKER SETUP SPEAKER SETUP DOWNMIX SUBWOOFER CENTER DELAY REAR DELAY FRONT ...

Страница 24: ...ustrated as below 2 6 1 OP MODE LINE OUT Choose this setting to line out the input signal It will be more suitable for playing in the night time for the output volume is low RF REMOD It will be more suitable to choose this setting for playing in the day time for theoutput volume is high 23 DIGITAL SETUP DIGITAL SETUP OP MODE DYNAMIC RANGE DUAL MONO DIGITAL SETUP DIGITAL SETUP OP MODE DYNAMIC RANGE...

Страница 25: ...u During playback press OSD to show the current time counter position Play time of the current title OSD Current title Disc type Current Chapter During playback press GOTO show the current time counter position Enter number to choose the title Enter number to choose the Play time Total Chapter Enter number to choose the Chapter GOTO 24 ...

Страница 26: ...ack Press NEXT toskip to the next chapter or track Press STOP once during playback to stop and hold playback Press PLAYto resume playback from the point you pressed STOP Press STOP twice to stop playback completely A B A B During playback press A B to select point A Press it again to select point B The player will repeat the section from A to B automatically Press A B third time to cancel A B repe...

Страница 27: ...st title Note This function is subject to the disc Press REPEAT to select Repeat Title Repeat chapter Repeat off during DVD playback Press REPEAT to select Repeat Single Repaet all and Repeat off CD or Other Press PLAY PAUSE from stop mode to start lpay ZOOM2 QOFF Press Volume VOL button to increase Volume Press VOL button to reduce Volume till to no volume output Press MUTE to mute the Audio outp...

Страница 28: ...ers you have input During DVD playback Press AUDIO repeatedly to select from up to 8 Audio language formats Note This functionis for disc PROG 1__ __ 5__ __ 9__ __ 13__ __ 2__ __ 6__ __ 10__ __ 14__ __ 3__ __ 7__ __ 11__ __ 15__ __ T C T C T C T C PLAY CLEAR PROG 1____ 5____ 9____ 13____ 2____ 6____ 10____ 14____ 3____ 7____ 11____ 15____ PLAY CLEAR 27 4____ 8____ 12____ 16____ 4__ __ 8__ __ 12__ ...

Страница 29: ...3 06 01MP3 07 01MP3 08 01MP3 09 01MP3 01 01MP3 02 01 03 01 01 01 04 01 05 01 06 01 07 01 08 01 09 01 0 1 M P 3 0 6 M P 3 Current directory name The playing file is a Mp3 audio file Current MP3 JPEG file name If a JPEG file is playing the name should have a JPEG extension File Switch Region Displays the file type of the playing and the switching The playing file is a JPEG picture file 01 01 0001 0 ...

Страница 30: ...RCE you can see the following page to choose to enter DISC USB or CARD READER as the screen will display as followings When play a VCD Karaoke disk you can open the KARAOKE and SCORE functio When you finish singing one song the SCORE will be displyed on the screen as below SCORE FUNCTION DISC USB CARD 29 ...

Страница 31: ...Advanced Features IMAGE ROTATION Press the DIRECTION button to rotation the image as you prefer 30 ZOOM2 QOFF ZOOM3 ZOOM4 ZOOM1 2 ZOOM1 3 ZOOM1 4 ...

Страница 32: ...Make sure the Main unit s POWER button is on 31 ...

Страница 33: ...o not spill water or put anything wet on the remote control Remote Control Preparation Other Notes Using the remote O PEN O PEN 32 STANDBY 10 9 6 5 4 3 2 1 0 7 8 ANGLE PROG MENU ENTER SETUP REV FWD PREV NEXT SOURCE REPEAT STEP GOTO SLOW VIDEO VOL VOL PLAY PAUSE L R MUTE A B KARAOKE OSD TITLE OPEN CLOSE AUDIO SUBTITLE ZOOM STOP PBC N P NX 836 2 POWER POWER MIC MIC VOL VOL 1 1 2 N X 8 3 6 USB CARD P...

Страница 34: ...C signal output connector Y output 1 0V p p 75 sync negative polarity C output 0 286V p p 75 Audio output 2 0 channel output RCA pin jack L R x 2 Coaxial output 0 5V p p 75 RCA pin Jack x l Frequency response 20Hz to 20kHz S N ratio 90dB Total harmonic distortion 0 0025 Accessories Video Audio cable x 1 Remote Control x 1 User s Manual x 1 Specifications are subject to change without notice Weight...

Страница 35: ...REPRODUCTOR DE DISCO VERSATIL DIGITAL ESCANEO PROGRESIVO MANUAL DE OPERACIÓN FAVOR DE LEER EL MANUAL COMPLETAMENTE ANTES DE INSTALAR Y OPERAR ESTE PRODUCTO CONSERVAR EL MANUAL PARA FUTURAS REFERENCIAS ...

Страница 36: ...xiones Conectando a una TV 9 Conectando a un sistema de Audio Digital 10 Características avanzadas Ajustes del Menú del Sistema 11 Operación del control remoto 24 Reproducción de discos MPEG4 MP3 28 Cuenta USB CARD KARAOKE 29 Reproducción de discos de imágenes Kodak 30 Otros Guía para solución de problemas 31 Preparación del control remoto 32 Especificaciones 33 ...

Страница 37: ...U CASO REFERIRSE AL CENTRO DE SERVICIO O CON PERSONAL CALIFICADO ADVERTENCIA CUALQUIER CAMBIO O MODIFICACIÓN REALIZADA A ESTE PRODUCTO NO EXPRESAMENTE APROBADA POR EL FABRICANTE O LAS PARTES AUTORIZADAS PUEDE ANULAR LA AUTORIDAD DEL USUARIO PARA OPERAR ESTE PRODUCTO EL SÍMBOLO DEL RELÁMPAGO CON PUNTA DE FLECHA DENTRO DE UN TRIANGULO ES DISEÑADO PARA ADVERTIR AL USUARIO DE VOLTAJES PELIGROSOS NO AI...

Страница 38: ...do Las paradas repentinas fuerza excesiva y las superficies desniveladas pueden generar que el aparato y el carrito se vuelquen 9 VENTILACIÓN Las ranuras y aberturas en el gabinete son provistas para la ventilación y asegurar la buena operación del aparato y para proteger lo del sobrecalentamiento No deben bloquearse o taparse estas aberturas colocando el aparato sobre una cama sofá alfombra u otr...

Страница 39: ...lación del aparato 18 SERVICIO No intentar dar servicio usted mismo a este aparato abriendo o removiendo las cubiertas puede exponerse a voltajes peligrosos u otros riesgos Referir todo servicio a un centro de servicio autorizado o con personal calificado 19 DAÑOS QUE REQUIEREN SERVICIO Desconectar el aparato del tomacorriente de pared y acudir a un centro de servicio autorizado o con personal cal...

Страница 40: ... trasero empiece a calentarse después de que el reproductor es operado por un periodo largo de tiempo No mover este producto durante la reproducción Hacerlo puede dañar el rayo láser y o el disco Presionar ABRIR CERRAR OPEN CLOSE en el panel frontal o en el control remoto para abrir o cerrar la bandeja del disco No presionar o tocar la bandeja cuando se esta abriendo o cerrando ...

Страница 41: ...chos El uso de esta propiedad tecnológica debe ser autorizado por Macrovision Corporation Esta prohibida la reingeniería o el desensamble de este producto Control de Padres Sistema Dolby Digital Discos de imágenes Kodak Discos de video DVD Múltiples Ángulos Opciones de Subtítulos Opciones de Audio Modos de rango de la TV Este producto cumple con el formato de los discos de imágenes KODAK y puede r...

Страница 42: ...SA 11 ABRIR CERRAR BADEJA 12 SENSOR INFRARROJO 13 PANTALLA 14 ENTRADA PARA TARJETA 15 ENTRADA PARA USB Panel Posterior 1 CONECTOR DE SALIDA Y PB CB PR CR 2 CONECTOR DE SALIDA DE VIDEO 3 CONECTOR DE SALIDA DE 2 CANALES IZQUIERDO DERECHO 4 CONECTOR DE SALIDA DE SEÑAL DIGITAL COAXIAL 5 CONECTOR DE SALIDA DE S VIDEO 6 CONECTOR DE SALIDA DE SEÑAL DIGITAL ÓPTICA 7 CONECTOR DE SALIDA DE 5 1 CANALES ...

Страница 43: ...SPIEGUE EN PANTALLA 5 BOTONES DE DIRECCIÓN 6 FUENTE 7 KARAOKE 8 SIGUIENTE 9 PREVIO 10 IR 11 PASOS 12 SILENCIO 13 REPETIR A B 14 REPRODUCIR PAUSAR 15 VOL VOL 16 CONTROL DE REPRODUCCION NOTAS La descripción de la función de los botones en el control remoto se veran mas adelante En el manual son usados para representar los botones de navegación en el control remoto Para poder activar cualquier funció...

Страница 44: ...ideo del reproductor a la TV 1 Cable de S Video y cables de audio Izquierdo Derecho L R Ajustar el tipo de video a S Video 2 Cable de video compuesto y cables de audio Izquierdo Derecho L R 3 Cable de video componente y cables de audio Izquierdo Derecho L R ajustar el tipo de video a Y Pb Pr ...

Страница 45: ...te 2 Después de conectar la señal de video a la TV puede ver la imagen seleccionando los canales de entrada de video Si lo conecta a la entrada de A V necesita seleccionar en la TV el modo de A V ver detalles mas adelante 3 El amplificador tendrá la salida de audio después de recibir la señal de audio coaxial Esto requiere seleccionar en el amplificador la entrada coaxial ...

Страница 46: ...Por ejemplo si desea ajustar el menú de video presionar para seleccionar el icono de video entonces el submenú de video se despliega en la pantalla C Presionar para remarcar la opción deseada del submenú Presionar ENTER ó para ingresar a la selección Las opciones de esta selección se despliegan a la derecha Por ejemplo presionar para remarcar la opción de brillo Brightness entonces presionar ENTER...

Страница 47: ... presionar ENTER o SETUP para salir de este submenú de ajuste 2 INTRODUCCIÓN A LOS AJUSTES 2 1 AJUSTE DEL SISTEMA SYSTEM SETUP Las opciones de ajuste del sistema se explican a continuación 2 1 1 AJUSTE DE SISTEMA DE TV TV SYSTEM De acuerdo al sistema de color de la TV debe seleccionar el tipo de sistema Para México el sistema es NTSC ...

Страница 48: ...gen esta congelada por algunos segundos el protector de pantalla se despliega Esta característica protege la pantalla de daños Si la función del protector de pantalla esta desactivada OFF esta función no opera 2 1 3 VIDEO VIDEO De acuerdo a los conectores de video de la TV puede seleccionar YUV P SCAN S VIDEO Seleccionar P Scan Y Pb Pr solo cuando el reproductor es conectado a una TV con escaneo p...

Страница 49: ...r de la pantalla 2 1 5 CONTRASEÑA PASSWORD La acción de contraseña es iniciada en activada y no puede ajustar los limites de los rangos Para que las características de los rangos operen la contraseña debe ser activada Si desea ajustar los límites de los rangos debe ingresar la contraseña predefinida la cual es 0000 y presionar ENTER para confirmarla Para cambiar la contraseña debe ingresar la cont...

Страница 50: ...n rango Esto ayuda a controlar los tipos de discos DVD que la familia puede ver 2 1 7 PREDEFINIDO DEFAULT La opción de predefinido restablece todos los ajustes preestablecidos de fabrica Cuando el reproductor no opera adecuadamente esto puede resultar probablemente debido a algunos ajustes incorrectos favor intente restablecer los ajustes de fabrica usando ets función para ver si el reproductor op...

Страница 51: ...2 2 IDIOMA DE AUDIO AUDIO LANG Remarcar el submenú AUDIO LANG y presionar ó para seleccionar el idioma de audio preferido presionar ENTER para confirmar la selección Si el disco que esta en reproducción tiene diferentes idiomas disponibles la salida será en el idioma seleccionado 2 2 3 IDIOMA DEL SUBTITULO SUBTITULE LANG Remarcar el submenú SUBTITULE LANG y presionar ó para seleccionar el idioma d...

Страница 52: ...NÚ LANG y presionar ó para seleccionar el idioma del menú preferido presionar ENTER para confirmar la selección Si el disco que esta en reproducción tiene diferentes idiomas disponibles el menú se despliega en el idioma Nota Si selecciona un idioma no disponible en el disco el idioma predefinido es desplegado ...

Страница 53: ...F SPDIF RAW y SPDIF PCM SPDIF OFF Salida de audio digital desactivada SPDIF RAW Seleccionar esta opción cuando el reproductor es conectado a un amplificador a través de un cable coaxial SPDIF PCM Seleccionar esta opción cuando el reproductor es conectado a un amplificador estereo digital de 2 canales 2 3 2 AJUSTE DE MICROFONO MIC SETUP Remarcar el submenú de salida de ajuste de micrófono MIC SETUP...

Страница 54: ...eco ECHO presionar ó para ajustar el nivel del eco 2 3 4 VOLUMEN DEL MICROFONO MIC VOL Remarcar el submenú de volumen del micrófono MIC VOL presionar ó para ajustar el nivel del volumen 2 4 1 BRILLO BRIGHTNESS Remarcar el submenú de brillo BRIGHTNES presionar ó para ajustar el nivel del brillo ...

Страница 55: ...enú de contraste CONTRAST presionar ó para ajustar el nivel del contraste 2 4 3 COLOR HUE Remarcar el submenú de color HUE presionar ó para ajustar el nivel del color 2 4 4 SATURACION SATURATION Remarcar el submenú de saturación SATURATION presionar ó para ajustar el nivel de saturación del color ...

Страница 56: ...eccionar esta opción cuando el reproductor es conectado a una TV o a un modulador de RF C VSS Seleccionar esta opción para escuchar el efecto de las pistas de audio grabadas en el disco en formato de 5 1 canales D 5 1 CANALES Seleccionar esta opción cuando el reproductor es conectado a sistema de 5 1 canales 2 5 2 SUBWOOFER Existen dos opciones en esta opción Activado ON o desactivado OFF Cuando s...

Страница 57: ... RETARDO CENTRAL CENTER DELAY Presionar ó para ajustar el retardo central y posterior 2 5 4 RETARDO POSTERIOR REAR DELAY Presionar ó para ajustar el retardo central y posterior 2 5 5 FRONTAL FRONT Presionar ó para ajustar el frontal en largo LARGE y corto SMALL ...

Страница 58: ... lograr diferentes efectos 2 6 3 DUAL MONO IZQUIERDO DERECHO Selecciona los ajustes del modo de salida de audio Hay cuatro modos de salida de audio ESTEREO MONO IZQUIERDO MONO L MONO DERECHO MONO R Y MEZCLA MIX MONO NOTAS 1 Para proteger el reproductor el intervalo entre el encendido y apagado de la unidad a través del interruptor de poder debe ser mayor a 30 segundos 2 Si no va usar el reproducto...

Страница 59: ...rante la reproducción presionar OSD para desplegar la información de reproducción del disco actual Presionar DISPLAY para desplegar los mensajes de menú de Audio y Subtitulo Durante la reproducción presionar GOTO para desplegar el menú de búsqueda del tiempo ...

Страница 60: ...rar la bandeja del disco Estos botones son usados para ingresar el Tiempo así como el numero de Titulo Capitulo y Pista Cuando un articulo numérico es desplegado en la pantalla presionar 0 9 para seleccionar la entrada deseada y entonces presionar ENTER para confirmar Durante la reproducción de un CD o DVD presionar y sostener para avanzar rápidamente el disco El reproductor avanzara en 2 4 8 y 20...

Страница 61: ...ecta la pantalla permanece en negro Presionar V MODE para volver a la conexión correcta Presionar REPEAT para seleccionar repetir una Capitulo Titulo o Desactivar la función de repetir durante la reproducción de un disco DVD Presionar REPËAT para seleccionar repetir Una pista Todas las pistas o desactivar la función de repetir durante la reproducción de un disco CD u otros Presionar VOL para aumen...

Страница 62: ...leccionar CLEAR y presionar ENTER para borrar todas las pistas programadas Ingresar el numero del titulo y del capitulo en el orden que desea sean reproducidos Cuando ha finalizado seleccionar PLAY y presionar ENTER para iniciar la reproducción de las capitulos en el orden programado Seleccionar CLEAR y presionar ENTER para borrar todas las pistas programadas Al reproducir un disco SVCD o VCD la p...

Страница 63: ...chivos Presionar SELECT para reproducir el archivo actual seleccionado por el cursor Presionar ó para cambiar entre la ventana de directorios y la ventana de archivos NOTAS El reproductor puede no identificar o reproducir discos con formato MP3 bajo las siguientes condiciones 1 El disco esta rallado dañado o sucio 2 El disco no fue finalizado adecuadamente al ser grabado 3 El formato de grabación ...

Страница 64: ...SD presionar SOURCE para ver la siguiente pagina para seleccionar entre Disco USB o Tarjeta como se muestra a continuación FUNCIÓN DE CUENTA SCORE Al reproducir un disco VCD con karaoke puede abrir la función de karaoke y cuenta Al finalizar de cantar una canción la cuenta será desplegada en la pantalla como sigue ...

Страница 65: ...mágenes en diferentes modos Ahora puede reproducir un disco de imágenes Kodak en este reproductor y ver sus maravillosas fotografías en su TV en la comodidad de la sala Cuando un disco de imágenes Kodak es introducido en el reproductor un desplazamiento de imagen es mostrado automáticamente Cada imagen en el disco será desplazada consecutivamente y puede escalarse la imagen para verla en la pantal...

Страница 66: ...justes de video del reproductor están correctos IMAGEN Y SONIDO POBRES Asegurarse que los conectores o las terminales de A V no estén dañados Asegurarse que los ajustes de audio del reproductor están correctos Asegurarse que el disco no esta rallado manchado o sucio LA PANTALLA DESPLIEGA BAD DISC Asegurarse que el disco no esta ondulado dañado o deformado Asegurarse que el disco no esta manchado o...

Страница 67: ...CONTROL REMOTO NOTAS Apuntar directamente el control remoto al sensor remoto del reproductor Verificar que no haya obstáculos entre el sensor remoto y el control remoto El control remoto debe tener un ángulo de 30º con respecto al sensor remoto del reproductor y a una distancia máxima de 5 metros No exponer el control remoto a altas temperaturas y humedad No derramar o colocar objetos con agua o h...

Страница 68: ...1 conector RCA Respuesta de frecuencia 20 Hz a 20 kHz Rango S N 90 db Distorsión armónica total 0 0025 ACCESORIOS 1 Cable de Audio Video A V 1 Control Remoto 1 Manual de usuario Las especificaciones y el diseño de este producto están sujetos a cambios sin previo aviso para mejoras del producto El peso y las dimensiones son aproximados Este símbolo en el producto o en la instrucciones significa que...

Отзывы: