


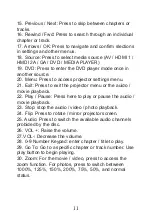


8
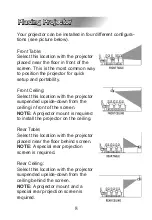
Placing Projector
Your projector can be installed in four different configura
-
tions (see picture below).
Front Table:
Select this location with the projector
placed near the floor in front of the
screen. This is the most common way
to position the projector for quick
setup and portability.
Front Ceiling:
Select this location with the projector
suspended upside-down from the
ceiling in front of the screen.
NOTE:
A projector mount is required
to install the projector on the ceiling.
Rear Table:
Select this location with the projector
placed near the floor behind screen.
NOTE:
A special rear projection
screen is required.
Rear Ceiling:
Select this location with the projector
suspended upside-down from the
ceiling behind the screen.
NOTE:
A projector mount and a
special rear projection screen is
required.
Содержание NVP-2501C
Страница 6: ...6 Package Contents Projector Remote control User manual AC Power Adapter 100 screen Carrying Bag...
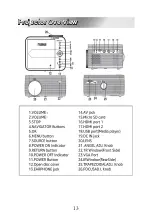
Страница 13: ...13 Projector Overview...
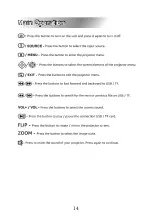
Страница 14: ...14 Main Operation...


