background image

5

1

2

3

4
5

6
7
8

9

10
11

12

13

14

15

16

17
18
19

20

21

22
23

24

25
26

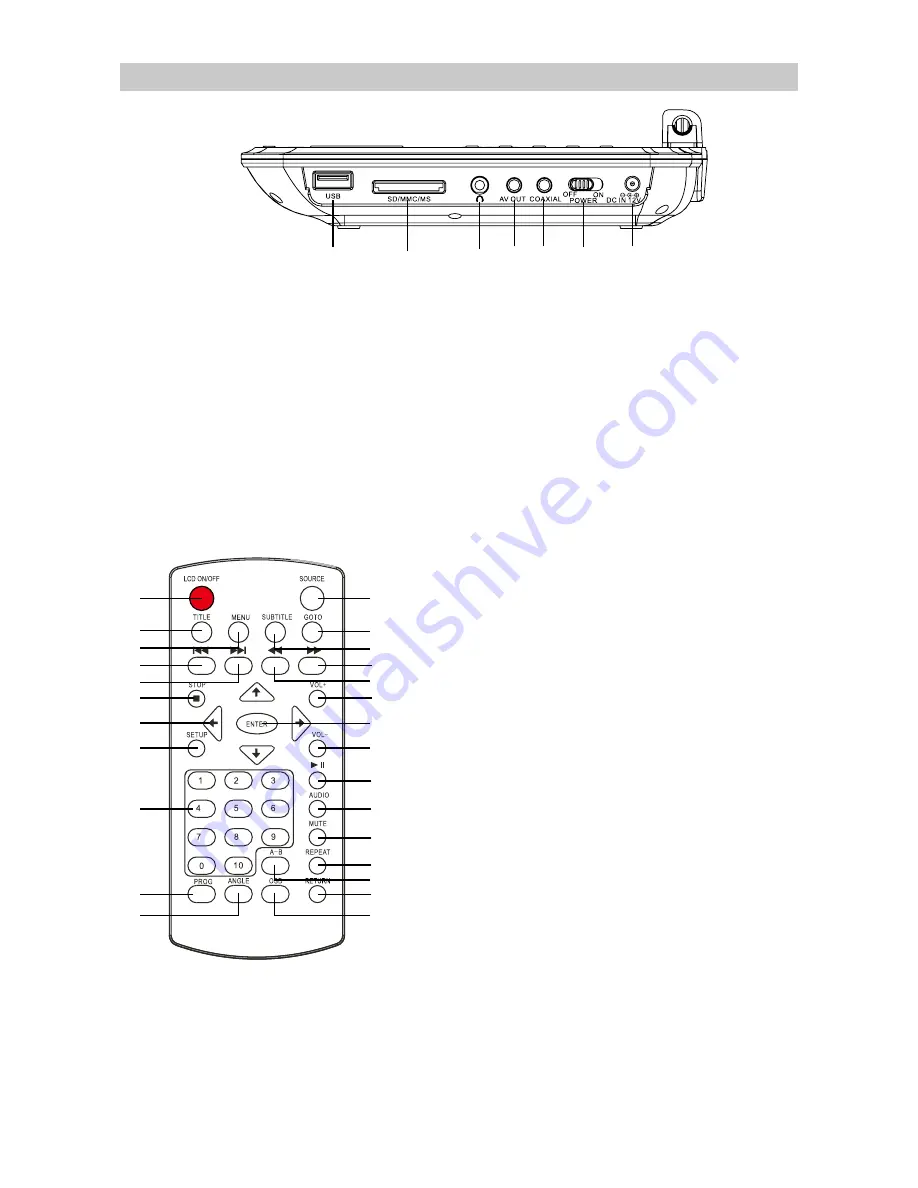
Remote Controller Button 

Introduction

16. USB : 

USB jack.

17. CARD: 

SD/MMC/MS jack.

18. EARPHONE:

 earphone jack.

19. AV OUT: 

Audio/video output.

20. COAXIAL:

 Digital audio output.

21. POWER:

 switch on/ off power

22. DC IN: 

DC input jack.

1. LCD ON/ OFF:

 To turn on / off main unit LCD display.

2. TITLE : 

To access the disc title menu.

3. MENU : 

To access disc menu.

4. PREV : 

To skip to the previous / title / chapter / track.

5. NEXT : 

To skip to the next title / chapter / track.

6. STOP : 

To stop the playback.

7. Direction Keys:

 To move up, down, left and right in

Setup Menu.

8. SETUP : 

To access or exit the SETUP menu.

9. Number keys:

 0,1,2…9,10 : Number entry.

10. Program :

 To play the contents of disc in the order 

you  want by programming the track to be played.

11. ANGLE : 

To access the camera angle function for 

DVD disc.

12. SOURCE:

 DVD/CARD/USB source.

13. GOTO: 

To search for a desired title,chapter,Time or 

TracK.

14. SUBTITLE :

 To change the subtitle setting.

15. F.FWD Button : 

To perform fast forward playback.

16. F.RWD Button : 

To perform fast reverse playback.

17. VOL+ Button :

 To increase volume.

18. ENTER: 

To confirm the selection during menu 

navigation

19. VOL- Button : 

To decrease volume.

20. Play/Pause :

 To start and pause the playback.

21. AUDIO : 

To change the audio setting.

22. MUTE : 

To mute or restore sound.

23. REPEAT : 

To repeat playback.

24. A-B Button : 

To repeat the playback from point A to 

point B on a disc.

25. RETURN : 

To return to the previous menu.

26. OSD :

 To show status information on the screen.

Location of controls

16

17

18

19 20

21

22

Содержание NPD-952

Страница 1: ......

Страница 2: ...e Controller Button Introduction Battery Installation Battery precautions Handling Discs Basic Connection Basic Operation For DVD Program About Discs Settings Menu Ordinary Problem Troubleshooting Tec...

Страница 3: ...tem in the DVD mechanism designed with built in safeguards Do not attempt to disassemble refer to qualified service personnel Exposure to this invisible laser light beam may be harmful to the human ey...

Страница 4: ...mark the disc TO OBTAIN A CLEAR PICTURE The DVD Player is a high technology precision driven device If the optical pick up lens and disc drive parts are dirty or worn down the picture quality becomes...

Страница 5: ...ss this button to shift the modes of DVD CARD USB 6 F FWD Button To perform fast forward playback 7 OK or Enter Key 8 PLAY PAUSE play pause button 9 NEXT Button I To skip to the next title chapter tra...

Страница 6: ...ntry 10 Program To play the contents of disc in the order you want by programming the track to be played 11 ANGLE To access the camera angle function for DVD disc 12 SOURCE DVD CARD USB source 13 GOTO...

Страница 7: ...s have been inserted in the correct polarities matching to the symbols marked in the battery compartment Close the battery compartment cover When replacing batteries replace both batteries Do not mix...

Страница 8: ...TV through AV out Jacks Video input jack yellow Audio left channel input jack white Audio right channel input jack red Connection to the external audio amplifier with build in digital audio decoder B...

Страница 9: ...T button during playing will skip the current chapter and play the next one REPEAT Press to repeat a specified title chapter track or to repeat the entire disc A B Repeat a section between points A an...

Страница 10: ......

Страница 11: ......

Страница 12: ......

Страница 13: ...dance 75 Audio Output 1 8V RMS Impedance 10K Audio Power AMP 1 0 W RMS X 2 Use temperature 0 40 C Play time Lithium battery inside About 120 min Disc Compatibility DVD R WDVD R W DVD CD R CD RW PHOTO...

Отзывы: