background image


Page-1 

Basic Introduction                                                                   


CPU: Boxchip A13 Cortex A8 1.0Ghz 


LCD Screen:7 " 800 * 480 TFT LCD 


Camera: Build-in 

0

.3/0.3M pixel camera   


Operating System: Google Android 4.1 


Network Connection: Built-in 802.11b/g/n wireless 


Audio format: MP3,WMA,MP2,OGG,AAC,M4A ,FLAC,APE, WAV 


Video format: max 2160p full HD video 

AVI

,

3GP,MP4,MPG,RM,RMVB,MOV,FLV,WMV,MKV)   


TOUCH PANEL: Multi-touch Capacitive screen 


Language: supporting multiple languages 


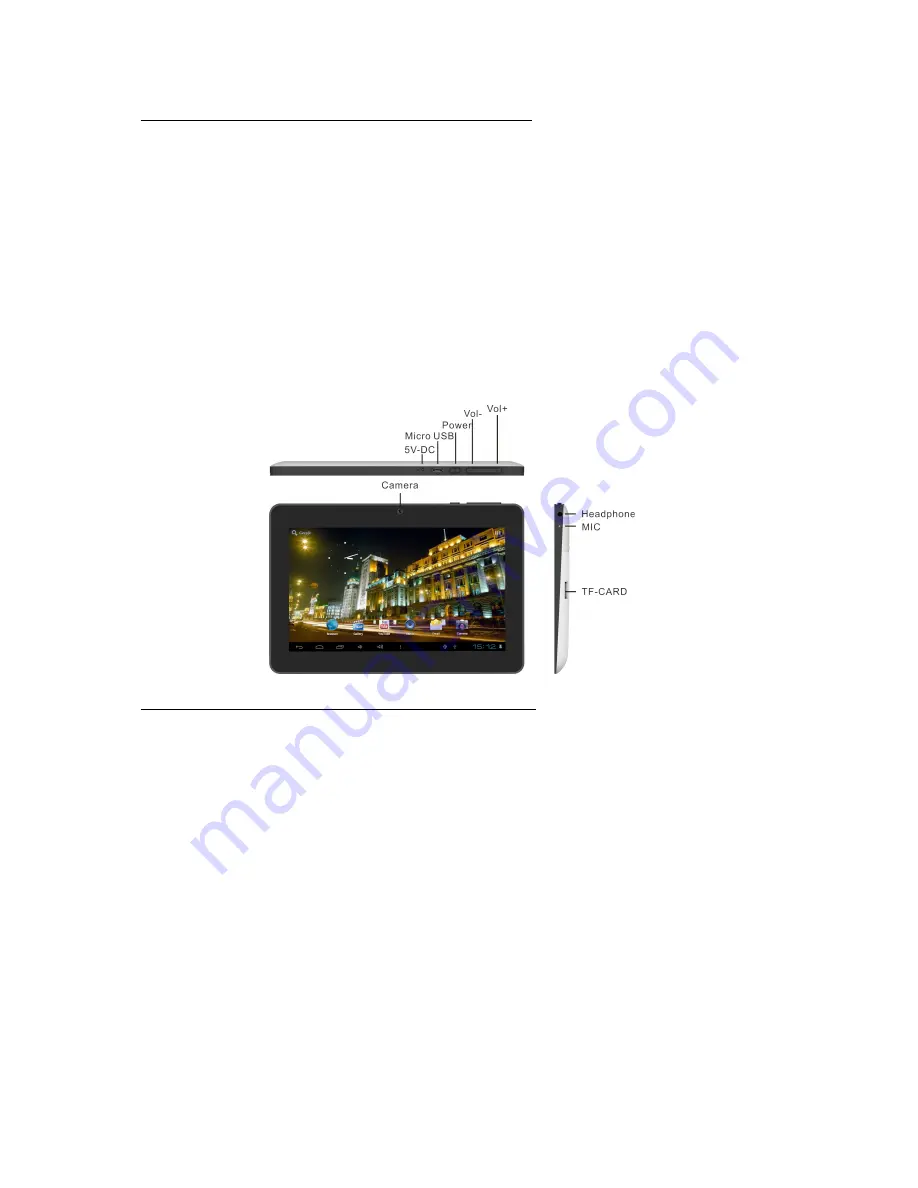
Ports: mini USB*1(OTG) , Earphone * 1, TF card slot * 1,DC IN*1,MIC*1 


Buttons: Power /Vol+/Vol- 


Quick Start                                                                               


Battery management and charging 

Before using this device, please charge it fully. Put the charger adapter into the DC jack, the device will start to charge.   

TIPS

:   


This device adopts built-in polymer battery. Only the specified charger should be used. 

When it is charging, the icon of battery will be rolling. 

When the charging finishes, the battery icon will turn green and stop rolling. 


If you do not use this device for a long time, please charge/release it once one month to avoid deep discharge. 


When it is power off because of low battery, connect to the charger, the device will indicate “low power” or “charging”, please wait for a 

second until the machine can turn to the main interface once the power is enough. 


The built-in polymer battery should be charged regularly. The damage caused by battery over-consuming is not included in the warranty. 


Boot and Shutdown 

Boot:

 Press and hold the power button, the system will enter the boot process. 


Содержание NID-7006A

Страница 1: ......

Страница 2: ...face 3 The HOME Screen Menu 3 Desktop 3 Basic Operation 3 Date and Time Settings 4 Display Settings 4 Wireless Connection 5 Install and Uninstall Applications 5 Browser 6 Video Player 6 Music Player 6...

Страница 3: ...to the DC jack the device will start to charge TIPS This device adopts built in polymer battery Only the specified charger should be used When it is charging the icon of battery will be rolling When t...

Страница 4: ...safely shut down Connect with PC You can connect with PC by mini USB OTG cable attached with the device USB Data transferring is available You can operate the files through the PC When your device is...

Страница 5: ...status E Menu Home Back virtual buttons The HOME Screen menu Press the menu icon on the device it will display a home screen menu as following Wallpaper Users can replace the wallpaper with their wish...

Страница 6: ...zone set the time time format date format and other information For example choose to set the date as follows Display settings In the setting interface choose Display to enter the display settings in...

Страница 7: ...ck the searched AP the settings will pop up please follow the prompts to complete the WIFI network links Some encrypted network need to enter a valid key As shown below Install and Uninstall Applicati...

Страница 8: ...en the web browser and enter the URL you can quickly browse the web or through the main desktop search bar Enter the URL and open the web page Video Player Online video The product supports HTML5 onli...

Страница 9: ...Photo Browser Click to get into Photo Browser directly There will be the list of all the picture files and video files as shown below Select a picture file enter the picture playback interface as show...

Страница 10: ...nter the Sound Recorder interface as shown below Note Select Record button to record when it is completed select Stop button At this point you can find the recordings folder in the file browser which...

Страница 11: ...I 3GP MP4 MPG RM RMVB MOV FLV WMV MKV max 2160p full HD video Q Can I play YouTube videos on my device A Yes You can tap the YouTube application icon to quickly access the videos Wi Fi Q Do I need a W...

Отзывы: