background image

AUDIO & VIDEO SETUP interface

GENERAL SETUP

RADIO interface

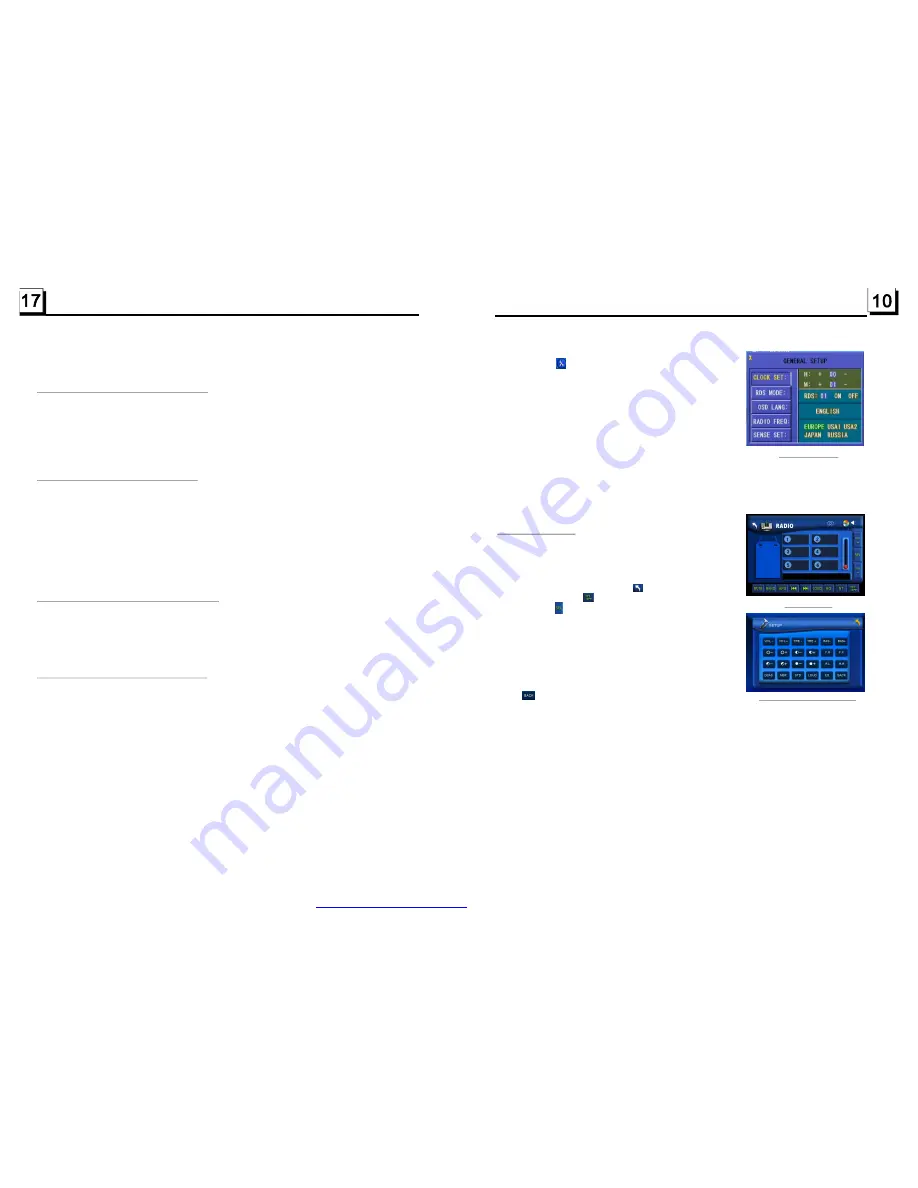
10.To do general setup

To do general setup, first pop up Mode Menu

,

then t ap the

icon in the Mode M enu to pop up GENERAL

SETUP interface as right.
In the interface, select one of CLOC K SET, RDS MODE ,
OSD LANG, RADIO FREQ and SENSE SET on the left side
by tapping them, then set them by tapping some icons on
the right side accordingly.

* SENSE SET is used to set the sensitivity of stopping auto

searching for an available radio station. When you tap it,
it will ask you to input a password. The password is 19,
after inputting it, you can set the item.

11.To do calibration

To pop up Calibration interface during media playback, first
press t he STOP button , then press the ZOOM button, finally press the ^ and v buttons in turn.
In the interface, you can have calibration by accurately tapping the cross cursor.

1. Enter RADIO mode

When you use M ODE button or Mode Menu to enter RADIO
mode, it will display RADIO interface as right.

In RADIO interface, tapping the

icon can enter Mode

Menu; tapping the

icon can turn on or off TFT display;

tapping the

icon can pop up AUDIO & VIDEO SETUP

interface as right; the other icons are same as ones in the
unit panel or in the Remote Control.

In the AUDIO & VIDEO SETUP interface, you ca n adjust
VOLUM E, TREBLE, BASS, BALANCE, FADER, BRI GHT-
NESS, CONTRAST, COLOR, HUE; you can also t urn on
or off DBAS, MBP, LOUD; you can still select your desired
transparency mode(by STD) and EQ mode(by EQ); tapping
the

icon can return back to the previous status.

2. BAND BUTTON

In RADIO mode, press the BAND button on the remote controller or on the front panel to
select your desired radio band of

and AM2, and the word means which

band is selected will be displayed on the sm all monitor of the front panel.

3. TUNE/SEEK UP/DOWN BUTTONS

In RADIO mode:

1) Long press the >>|/ |<< button to automatically search up/down for a available station from

the current frequency.

2) Briefly press the >>| / |<< button to manually search up or down w ith step by step for your

desired station from the current frequency.

4. APS BUTTON

In RADIO mode:

1) When long pressing the APS button, the radio searches from the lowest frequency and checks

the signal strength level until 1 cycle search is finished. And then the 6 strongest stations are
preset to the corresponding preset number memory bank. The AS operation is implemented
in the each bank of the selected band. When the AS operation is finished, it will scan each
preset station for 5 seconds in FM or AM band from M1 as briefly pressing APS button. After

3. Radio Operation

FM1, FM2, FM3, AM1

as in item 3

ZOOMx2,ZOOMx3,ZOOMx4,ZOOMx1/2,ZOOMx1/3,ZOOMx1/4,ZOOM OFF.
Press one of the ^/v/>/< buttons to select the area you want to enlarge.

In the state of DVD playing, press the SUBTITLE button repeatedly to
select the language of the caption or turn off the caption.(depend on the
media used.)
In the state of VCD/MP3/WMA/CD playing, the button is not available.

1. In the state of DVD playing, press the AUDIO button repeatedly

on the IR remote control to select the desired language type.
(depend on the media used)

2. In the state of VCD playing, press the AUDIO button repeatedly to

select the sound mode of the MONO L, MONO R, MIX MONO and Stereo,
no language function.

3. In the state of CD/WMA/MP3 playing, the AUDIO button is disabled.

During playback of DVD/VCD , press the BAND(P/N) button on the front
panel or on the remote control repeatedly to change the VIDEO SIGNAL
SYSTEM mode .

time of the playing chapter,

the remained time of the playing chapter, the elapsed
the remained time of the playing title,

2. In the state of VCD/CD playing, press the OSD button repeatedly on the

remote control to turn on/off the playback status. When it is on, it will
display the information such as: the serial number of the playing track, the
elapsed time of the playing track, the remained time of the playing track, the
elapsted time of the disc, the remained time of the disc.

3. In the state of MP3/WMA playing, press the OSD button repeatedly on

the remote control to turn on/off the playback status. When it is on, it will
display the information such as: the serial number of the playing track, the
elapsed time of the playing track, the remained time of the playing track.

4.16 Change the Caption Language

4.17 Change the Audio Language

4.18 Change the Video Signal System

4.19 Look over the Playback Status

1. In the state of DVD playing, press the OSD button repeatedly on the

remote control to turn on/off the playback status. When it is on, it will
display the information such as: the serial number of the playing title, the
serial number of the playing chapter, the elapsed

time of the playing title,

etc.

PDF created with FinePrint pdfFactory trial version 

http://www.pdffactory.com

Содержание NCD-701

Страница 1: ...and can radiate radio frequency energy and if not installed and used in accordance with the instructions may cause harmful interference to radio elevation reception which can be determined by turning the equipment off and on The user is encouraged to try to correct the interference by one or more of the following measures Reorient or relocate the receiving antenna Increase the separation between t...

Страница 2: ... the rear panel of the unit indicate this player is a class laser product only use weak laser and no hazardous radiation outside of the unit 1 Read through this instruction manual before installation and use 2 Before removing the unit remove the disc from the unit first 3 Do not open the cover or touch any of the components exposed out of the unit only for qualified technicians 4 Do not expose the...

Страница 3: ... the Caption Language 17 4 17 Change the Audio Language 17 4 18 Change the Video Signal System 17 4 19 Look over the Playback Status 17 4 20 Program Playback 18 4 21 Playback IMAGE files 18 4 22 Playback MP4 files 19 4 23 ESP and Function 19 4 24 DVD System Menu Setup Operation 19 Region Code 23 5 Trouble Shooting 24 6 Specification 25 Contents ID3 6 Specification General Specification Power Suppl...

Страница 4: ...power switch is on Ensure that the power cord is not damaged or the fuse is not blown Ensure that the power plug is connected to the inlet tightly NO SOUND BUT HAVE PICTURE Ensure that the player s audio output has a good connection with amplifier s audio input Check whether the audio connector is damaged Check whether you have turned down the volume Ensure that you have set the right AUDIO setup ...

Страница 5: ...ty side upward See fig 3 4 Insert the battery holder to the original position in remote control See fig 3 1 Lithium battery CR 2025 3V 2 Battery Life 6 months with normal use in normal room temperature 3 Improper use of battery may cause overheating or explosion so that Result in injury or fire 4 Battery leakage may cause damage to the remote control 5 Do not short the battery 6 Do not throw the b...

Страница 6: ...peaker and sub woofer There are 3 mode LT RT STEREO VSS LT RT When playing a disc with PRO LOGIC Dolby stereo effect choose the item so it will output audio signal with vivid theatre effect STEREO If you choose this item when outputting audio signal with 5 1 channels it will output the left and right channels of signal when outputting audio signal with 2 channels it will output the common 2 channe...

Страница 7: ...mpt interface displayed during playback This item is for selecting a audio language This item is for selecting a subtitle language This item is for selecting a disc menu language There is only ANALOG mode i e SPDIF OFF not optional It is for selecting your desired basic music tone from low to high 4 24 2 LANGUAGE SETUP OSD LANGUAGE AUDIO LANG SUBTITLE LANG MENU LANG 4 24 3 AUDIO SETUP AUDIO OUT KE...

Страница 8: ...ot make contact with any ground connection GREY YELLOW YELLOW VIDEO RCA OUT PARKING LINE GREEN REAR VIEW CAMERA BLACK YELLOW REVERSAL LINE WHITE Fixing Screw Bolt Wiring Connecting Socket 1 Wiring Connecting Socket 2 Radio Antenna jack Black Black WIRING CONNECTING SOCKET 2 WIRING CONNECTING PLUG 2 BROWN AUDIO RCAAUX IN RED R WHITE L YELLOW VIDEO FRONT RCA LINE OUT BLACK REAR RCA LINE GREY WHITE L...

Страница 9: ...aying and return to the root menu 2 When displaying the root menu press the direction buttons to select your desired FOLDER file or icon then press the OK or PLAY button to open or play the selected file When displaying the root menu you can also use the number buttons to select the serial number of the file to play the file The ANGLE PROG RDM INT and TITLE PBC button are not valid The other funct...

Страница 10: ...lows you to enter the order in which you want some chapters tracks in DVD VCD MP3 WMA CD to play 1 During playback press the PROG button to enter a program interface as follows for DVD for VCD MP3 WMA CD 2 Use the direction buttons to move cursor onto the desired place for inputting the sequence number 3 Use the number button to input desired sequence number of title chapter track with desired seq...

Страница 11: ...set to the corresponding preset number memory bank The AS operation is implemented in the each bank of the selected band When the AS operation is finished it will scan each preset station for 5 seconds in FM or AM band from M1 as briefly pressing APS button After 3 Radio Operation FM1 FM2 FM3 AM1 as in item 3 ZOOMx2 ZOOMx3 ZOOMx4 ZOOMx1 2 ZOOMx1 3 ZOOMx1 4 ZOOM OFF Press one of the v buttons to se...

Страница 12: ...ed chapter track or a specified time 4 13 Playback in Random 4 14 Playback in Different View Angle 4 15 Playback in Zoom Mode 1 In the state of VCD PBC OFF CD playing press the INT button to play the previous seconds part of each track on the disc Press the INT button again to resume normal playback 2 In the state of DVD MP3 WMA playing the INT button is not available 1 In the state of DVD playing...

Страница 13: ... and then pull it out of the Card Slot If the disc USB or SD MMC card includes folder for MP3 WMA MP4 JPEG files after loading it will display a root as the right image On the bottom side of the root the icon is for audio files the icon is for image files the icon is for Video files The cursor will not move to the right if there are not files of that format to be selected During playback tapping t...

Страница 14: ... 4 8 Playback with Slow Speed 4 2 Pause Playback 4 3 Stop Playback 4 4 Select Chapter Track with the or Button 4 5 Select Chapter Track with the Number Buttons 4 6 Select Chapter Track with the Root PBC Menu If the disc includes the root PBC menu In the state of DVD playing In the state of DVD VCD CD MP3 WMA playing press the PAUSE button on IR remote control to pause the playback press the PLAY b...

Отзывы: