background image


56 

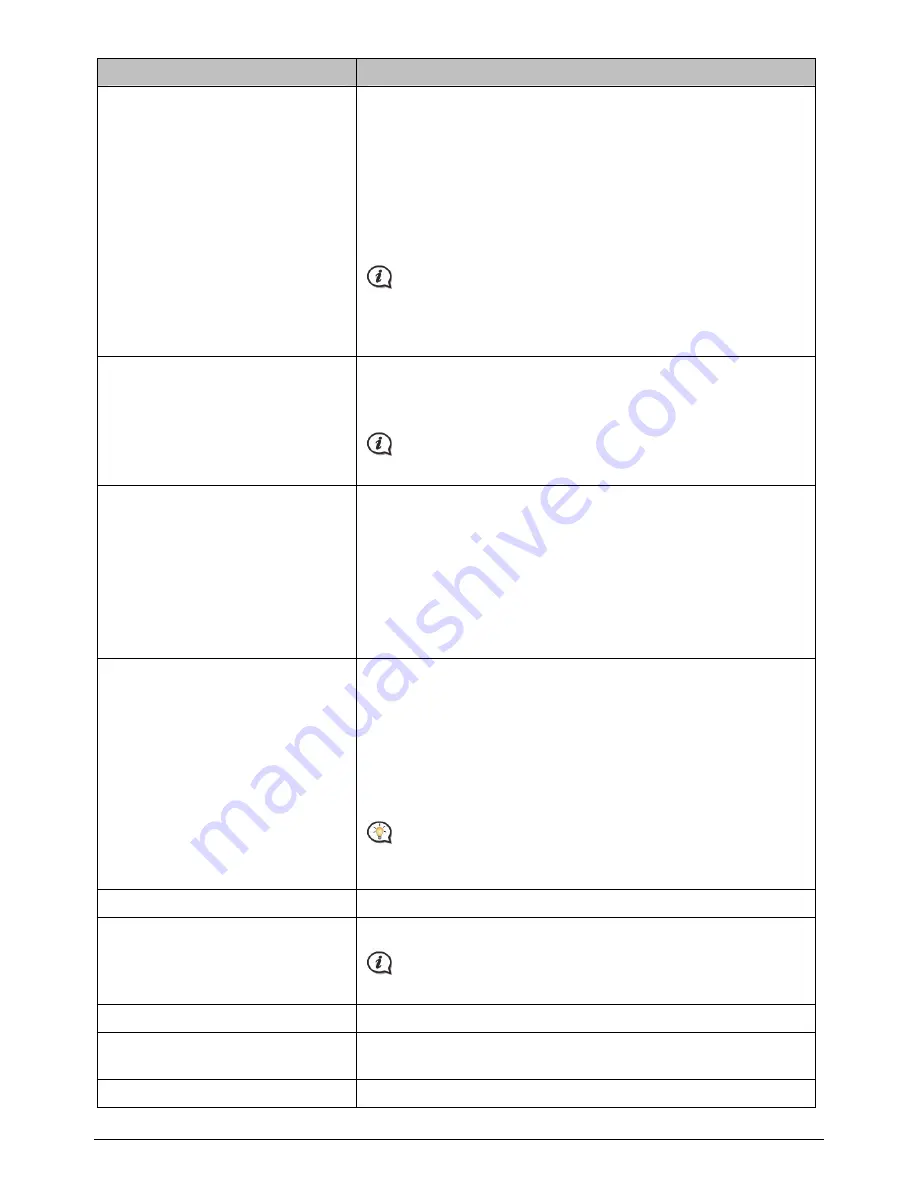
If you want to … 

Then … 

set route type options for your 
route, 

tap Route type to select your route type preference from the list:


ƒ


Fastest – The route that should be the fastest when 
navigating.


ƒ


Easiest – The simplest route with the least number of turns 
and favours motorways where appropriate.


ƒ


Economical – The route with least number of stops, turns and 
urban areas which should save on fuel usage. 

ƒ


Shortest – The route with the shortest physical length.


If you do not select the preferred route type, Choose on map 

is set as default for this option. All of the four route types will be 
calculated after your search. Then, you have to select one route 
type on the map to start navigating.


set types of road options for your 
route, 

tap Types of road.  

ƒ


The 

Types of road

 screen will display. 

ƒ


Select your road preference from the list. 

  Avoiding ferry routes may prevent you from navigating 

between certain countries, even when a bridge or tunnel exists. 

set the routing preference, 

tap Advanced routing to turn the Smart Route / My Drive 
functions on or off. 

ƒ


Use historic traffic speed date: enable/disable the Smart 
Route function. 

ƒ


Use learned driver behaviour: enable/disable the My Drive 
function. 

ƒ


Driving speed records: display the information of your driving 
speed in Motorway / Highway / Major road / Minor road. 

set the avoidance manually, 

tap Custom Avoidance. 

ƒ


Tap Add Avoid Road and then follow the on screen 
instructions to select the avoid road from the map view screen.   

ƒ


Tap Add Avoid Area and then follow the on screen 
instructions to select the avoid area from the map view screen. 

Once the avoidance has been set, it will not be added to your route 
while you are planning the trip. 


To edit the assigned avoidance, tap the item from the 

Custom 

Avoidance

 screen and then select Enabled/Disabled, Rename, or 

Delete.


display the installed custom POI, 

tap Custom POI alerts. 

give spoken navigation by landmark 
or other descriptive reference, 

tap Natural guidance to turn it on or off.   


Natural guidance is not available on all models and is only 

available in selected countries.


display landmarks on your route, 

tap Landmark guidance to turn it on or off.   

record mileage for your route to 
generate expense reports, 

tap Mileage recorder to turn it on or off.   

record your journey, 

tap Capture Journey to turn it on or off.   


Содержание MY ESCAPE II

Страница 1: ...MY Series MY ESCAPE II MY TRUCK Hardware User Manual...

Страница 2: ...familiarise yourself with your device and its operation On main roads the distance to an exit calculated by your Navman may be further than the distance shown on road signs Road signs show the distan...

Страница 3: ...ay burst or explode if mishandled releasing hazardous chemicals To reduce the risk of fire or burns do not disassemble crush or puncture the battery Recycle or dispose of the battery safely and proper...

Страница 4: ...with Please check the marking labels on your Navman and refer to the corresponding statements in this chapter Some notices apply to specific models only The user needs to switch off the Navman when ex...

Страница 5: ...the power switch 10 How do I charge the battery 11 How do I charge the battery in a vehicle 11 How do I charge the battery via my computer 11 How do I charge the battery at home or work 11 How do I in...

Страница 6: ...scribe user actions Term Description Press Press and release a button quickly Tap Press and release an item displayed on the touch screen Select Tap an item in a list or tap a command from a menu Disc...

Страница 7: ...reception In this instance please mount your Navman where there is a clear area usually just beneath the rear view mirror To protect your Navman against sudden surges in current connect the in car ch...

Страница 8: ...ion via the in car charger which is used as an antenna Please ensure your car charger is connected to your Navman and power source to receive TMC live traffic information Please note that you will not...

Страница 9: ...on n Power button o Slot for microSD memory card p Cradle slot q Screw holes for securing the cradle r Speaker s Touch screen t Microphone not on all models u Connector for in car charger USB cable ho...

Страница 10: ...hen tap Sleep Your Navman will enter a suspended state When you next turn it on your Navman will return to the last screen that you used To lock the screen press the Power button briefly and then tap...

Страница 11: ...vehicle To charge your Navman in a vehicle plug the in car charger into on the attached cradle and the other end into the vehicle power socket How do I charge the battery via my computer 1 Turn on yo...

Страница 12: ...card slot 2 Hold the microSD card by the edges and gently insert it into the slot as shown in the above diagram of your Navman Do not apply pressure to the centre of the memory card 3 To remove a car...

Страница 13: ...e computer Computer Your Navman will be recognised as an external mass storage device named by the model name A USB Connection screen appears to prevent you from using your Navman 4 When you select th...

Страница 14: ...Navman with your mobile phone If your Navman isn t paired with your mobile phone then the Bluetooth screen will display Not all phones with Bluetooth wireless technology are compatible with your Navma...

Страница 15: ...n or snow may have a negative effect on your reception To obtain a faster GPS fix ensure car is stationary and battery is fully charged once per month Caring for your Navman Taking good care of your N...

Страница 16: ...te to the sky If this fails to resolve the issue please reset the GPS chip through the Settings menu of your unit If the fault is still not resolved please visit our self help site see the information...

Страница 17: ...MY ESCAPE II MY TRUCK Software User Manual MY Series...

Страница 18: ...he route configuration 17 How do I view my route statistics 18 How do I adjust the volume 18 How do I zoom in out the map 19 How do I view the traffic status on my route 19 Advanced Routing Functions...

Страница 19: ...do I play videos on my Navman via AV IN 42 How do I make a hands free call 43 How do I pair my Navman with a Bluetooth device 43 How do I make a phone call 45 How do I view my call history 47 What is...

Страница 20: ...hoto Album 72 Image Search 76 Application Gallery 77 Unlock Features 78 My Places 78 TRIP PLANNER 80 MY NAVMAN 82 CONNECT 86 For more information 88 Online support 88 Navman Customer Support 88 Speed...

Страница 21: ...Next To view the previous screen tap To skip the Tutorial screen tap Skip To prevent the Tutorial from displaying on each start up tap the Show tutorial on start up option to deselect it To enable th...

Страница 22: ...gating on the screen To operate your Navman touch the screen with your fingertip You can perform the following actions Tap Press and release an item displayed on the touch screen Select Tap an item in...

Страница 23: ...n simulation mode Record GPS co ordinates of a location or a journey Set your Navman to avoid the Four wheel tracks or not and to display hide the POIs along the Four wheel tracks on map Select your n...

Страница 24: ...menu screen which allow you to navigate through the menu screens easily You can Return to the previous screen by tapping the BACK button Return to the Main Menu by tapping the MAIN MENU button In some...

Страница 25: ...oard screen can display with various layouts depending on the information you need to enter including alphabet number alternate characters and combinations of these How do I enter characters numbers T...

Страница 26: ...nu tap to display the FIND screen FIND screen display and the order of the options may differ from the below depending on your region maps installed or model of Navman 2 Complete the following If you...

Страница 27: ...lan your route by searching the address 1 On the Main Menu tap Complete the following to navigate to a street address that you know using the FIND address wizard 2 On the Destination screen complete t...

Страница 28: ...een you can Tap the button to zoom in out the map View the information of your destination that is shown at the top of the Map screen Tap on a street area POI to display the related information of the...

Страница 29: ...ply select the Here button so that you do not need to select a departure point Otherwise use the FIND address wizard Explore map My Places Recent places menu or Home to set the departure point if you...

Страница 30: ...llows you to navigate to your destination using roads and paths appropriate for a pedestrian including road where driving may be prohibited like pedestrian zones for example When in Pedestrian mode yo...

Страница 31: ...5 meters maximum truck height 4 6 meters You must complete the details of the truck settings before you can use Professional Truck mode to plan your route limit the route planning while shipping hazar...

Страница 32: ...can select one and tap to start navigating For more information about setting the preferred route type refer to the Route Options section in What can I customise The driving map When you select a rou...

Страница 33: ...Arrival Time Depending on your driving route you may see some icons that provide different information on your Map screen Please note that these icons will not be always displayed during your journey...

Страница 34: ...ce travelled time taken for trip stationary time TTD DTG ETA for the journey Traffic delay Depending on the route calculated you may see more information on the screen such as the estimated time dista...

Страница 35: ...e zoom buttons will be displayed on the Map screen in translucent mode 3 Complete the following If you want to Then zoom in the map tap and hold zoom out the map tap and hold The zoom buttons will aut...

Страница 36: ...more personalised route and accurate time of arrival the next time you plan a trip For more information about Smart Route and My Drive settings refer to the Route Options section in What can I custom...

Страница 37: ...ions menu or Here Return to start to set the waypoint 4 When your search is done tap The waypoint is added and the Edit screen will display 5 Complete the following If you want to Then add another way...

Страница 38: ...er screen will display 2 Tap the trip to edit 3 Tap a waypoint in the trip The Preview screen will display 4 Complete the following If you want to Then delete a waypoint tap Delete then select OK chan...

Страница 39: ...es Tap Save as Car will save the current car location in My Places How do I capture a journey To enable capturing of journeys you must first enable Capture Journey from Main Menu Route options For mor...

Страница 40: ...nt location The Map screen will display How do I navigate to the saved car location 1 On the Main Menu tap The MY PLACES screen will display 2 Tap Find My Car The Find My Car screen will display 3 Tap...

Страница 41: ...as Home tap The location has been set as Home How do I navigate to a location I have saved 1 On the Main Menu tap The My Places screen will display Tap the Sort by button on the top of the scrolling...

Страница 42: ...ddress easier your Navman will automatically save all your start locations and destinations in a list of recent places 1 On the Main Menu tap The My Places screen will display 2 Tap The Recent Locatio...

Страница 43: ...more information about importing the NavPix to your Navman refer to the Photo Album section in What is the NavDesk 1 On the Main Menu tap The My Places screen will display 2 Tap NavPix 3 From the list...

Страница 44: ...te open the Map screen and start navigating How do I edit the NavPix 1 From the Album screen tap the thumbnail of the NavPix The NavPix will appear in full screen 2 Tap The NavPix Details screen will...

Страница 45: ...tap The Explore screen will display 2 On the Explore map you can View the information of the selected POI that is shown at the top of the screen Tap and drag the map to explore your desired local area...

Страница 46: ...ave the location as a favourite tap The location will be saved in My Places immediately explore the map tap place a phone call to the POI tap This feature is not available on all models How do I set m...

Страница 47: ...de on the Map screen repeat until all required categories are selected return to the Explore map tap Your preferences are automatically saved How do I find the nearest POIs using the POI category butt...

Страница 48: ...y Places immediately explore the map tap place a phone call to the POI tap This feature is not available on all models How do I search for a POI by type 1 On the Main Menu tap 2 Tap The Find a POI scr...

Страница 49: ...ore POI types tap The POI Type List screen will display Select a POI type search for hotels and motels tap search for banks and ATMs tap search for emergency services tap 5 The POI List screen will di...

Страница 50: ...vigate to a POI or the street address that you find by keyword 1 On the Main Menu tap 2 Tap Enter the keyword of the POI or Street Address that you want to search Example 1 searching for a POI Inn by...

Страница 51: ...ate the route and start navigating tap The Map screen will display save the location as a favourite tap The location will be saved in My Places immediately explore the map tap place a phone call to th...

Страница 52: ...nsmit TMC data on a cycle of several minutes with hundreds of events able to be broadcast to TMC receivers You have to pay for TMC service in other countries How will I know when a Traffic Event occur...

Страница 53: ...the Traffic Accessory Kit may be sold separately On the Main Menu tap Item Description Tap to return to the previous screen Current position Your current position is marked with Event icon Displays i...

Страница 54: ...ents screen tap the event you want to view The Event Details screen will display Item Description Tap to return to the previous screen Event icon and description Displays details of the Event includin...

Страница 55: ...A specific location for the Event cannot be identified This Event does not affect your route This clearance does not affect your route The Event is not on the current leg of your journey or is behind...

Страница 56: ...tation from the list You can select Automatic to receive the traffic signal automatically Accept recommended detours automatically When the Accept recommended detours is selected your route will be re...

Страница 57: ...e data contained within this database either expressed or implied How do I search for a POI in a city I am visiting using travel guides 1 On the Main Menu tap the travel book you want to browse 2 The...

Страница 58: ...reversing camera as well as portable DVD player sold separately The AV IN function supports NTSC PAL interlace formats 1 Before you use the AV IN function connect your Navman to an AV external source...

Страница 59: ...t the Bluetooth on your Navman will be turned on automatically To save power Bluetooth is set to OFF by default A list of compatible mobile phones is listed at www navman com au Australia or www navma...

Страница 60: ...nternet settings screen will display 3 Complete the following If you want to Then configure the Internet settings by mobile phone s setting tap Automatic copy from phone change the operator for your r...

Страница 61: ...he last digit entered tap To clear the entire number tap and hold The number of the last call will display when you next access the Dial screen The number will be cleared as you start entering a new n...

Страница 62: ...r reject the incoming call by simply saying Answer or Ignore In call options 1 When a call is in progress the in call screen will display as below 2 Complete the following If you want to Then display...

Страница 63: ...history From the Call History screen you can view a list of Incoming Calls Outgoing Calls and Missed Calls The Call History screen lists the calls made during the time your Navman is connected to a m...

Страница 64: ...d by your service provider Please check with your service provider for more information How do I search for a POI using Google Local Search 1 On the Main Menu tap The Google Local Search screen will d...

Страница 65: ...earch for a POI then tap OK search for POI information near your current location tap the Near field to Select My Places to search for a POI information near a My Place location Select Find a Place to...

Страница 66: ...nformation The Weather Information screen for the selected city will display 3 Depending on the city you have selected a range of current and forecast weather and temperature information may be displa...

Страница 67: ...provider for more information 1 On the Main Menu tap 2 Tap Yes to set the home base before using this service 3 Select your home base from the list 4 The Assistance Details screen will display 5 Compl...

Страница 68: ...sound Address Home Intersection My Places Nearby Parking Nearby Food Nearby Hotels Motels Nearby SOS Nearby Cash Nearby Petrol Nearby Airport Library Zoo Increase volume Decrease volume Increase brig...

Страница 69: ...en options and the order of the options may differ depending on your region maps installed or model of Navman While changing the settings the checkbox next to the option indicates the setting status o...

Страница 70: ...en the brightness scale is set high therefore use lower brightness whenever acceptable You can simply tap on the brightness bar so that the screen brightness will be set immediately at the position yo...

Страница 71: ...Railway Crossing Speed Check to select No alerts Visual alert Visual Audible alerts set how you want to receive the driver alerts tap Driver Alert to select Auto default When the driving speed is abo...

Страница 72: ...istoric traffic speed date enable disable the Smart Route function Use learned driver behaviour enable disable the My Drive function Driving speed records display the information of your driving speed...

Страница 73: ...This option is available only when the Map option is set as 2D view mode display no entry icons on no entry roads on the Map screen tap Show no entry road signs to turn it on or off When turned on the...

Страница 74: ...mised by adding deleting the voice file through NavDesk when your Navman is connected to the computer For more information refer to the My Navman section in What is the NavDesk Complete the following...

Страница 75: ...istance units tap Distance Units and then select your preferred distance unit type change the time format tap Time format and then select your preferred time format change the date format tap Date For...

Страница 76: ...e disable Bluetooth on your Navman tap Settings Tap Bluetooth to turn enable disable Bluetooth Tap Auto Connection to enable disable auto connection function connect to a Bluetooth device tap Search N...

Страница 77: ...from your phone will be deleted restore factory default settings tap Restore factory defaults When the warning dialog box displays tap Yes Your Navman will restart The Restore factory defaults option...

Страница 78: ...aving to set a destination You cannot operate your Navman properly in Shop demo mode enable the screen saver feature on your Navman tap Screen Saver Video When your Navman is idle for 10 30 60 minutes...

Страница 79: ...ore you begin ensure that your computer meets the minimum system requirements for NavDesk especially Ensure that Internet Explorer 6 or higher is installed on you computer before you install NavDesk e...

Страница 80: ...B cable supplied directly into a USB port on your computer not a USB hub and plug the small end into the USB Socket on the bottom of your Navman Where possible plug the USB cable into a USB port at th...

Страница 81: ...Main Menu screen of your Navman Unlock Features Allow you to enter the activation key for the service you purchased MY PLACES View and modify all places including addresses Points of Interest NavPix...

Страница 82: ...lect a region A list of available subscriptions will display 3 Select a subscription or offer then click Purchase an activation key from the Navman store The Navman Store website will open 4 Follow th...

Страница 83: ...Maps My Maps allows you to install new maps remove maps from your Navman and purchase new maps NavDesk My Maps Component Description Loadable Maps A list of maps on the DVD or available for purchase...

Страница 84: ...maps already installed on your Navman are green The maps that are unlocked and ready to be installed to your Navman are yellow The maps that require activation before being installed to your Navman ar...

Страница 85: ...from the Navman USB Socket until the installed map or maps have changed colour to green How do I remove maps from my Navman 1 Open NavDesk and then click My Maps 2 From the My Navman section select th...

Страница 86: ...preinstalled POIs custom POIs can be removed from your Navman and can have audio as well as visual alerts associated with them NavDesk Custom POIs Depending on your Navman model some Custom POIs featu...

Страница 87: ...you have located the icon file select it and click Open The icon file must be a bitmap png and bmp graphic with a minimum size of 6x6 pixels and a maximum size of 32x32 pixels If you do not select a c...

Страница 88: ...ailable Component Description Desktop albums Displays a list of all albums stored in the NavPix library on your computer Click an album to display its contents in the Album display area Click View all...

Страница 89: ...ing NavPix name latitude longitude description Rotate left Rotates the selected NavPix 90 to the left Rotate right Rotates the selected NavPix 90 to the right Delete NavPix Click to delete the selecte...

Страница 90: ...to modify Click OK to save the changes delete a picture select the picture from the Album display area Right click and select Delete or click Delete on the toolbar What else can I do with pictures and...

Страница 91: ...Flickr account to upload NavPix To create a Flickr account visit www flickr com save a picture to your computer select the picture from the Album display area Right click and select Export to disk or...

Страница 92: ...deleting a NavPix from my library checkbox create a new folder every time you import new photos select the Import photos to a new album checkbox view NavPix when on a route select the Show NavPix on m...

Страница 93: ...ery Application Gallery is not available on all models How do I rearrange Main Menu applications on my Navman Main Menu 1 Select any application from the Device Main Menu screen section 2 Drag the app...

Страница 94: ...vation key will be sent to you by email or printed on the inside cover of the box if you purchase the map update DVD You can click the link on the screen to purchase an activation key online NavDesk U...

Страница 95: ...rted file format for importing includes KML and KMZ export a location from your Navman to the computer from the My Places panel select a location and then click Export The Save as dialog box will open...

Страница 96: ...click Yes to delete the location You can delete all locations in My Places by clicking Delete on the My Places panel Export the location click The Save as dialog box will open Enter a descriptive name...

Страница 97: ...e Route option settings will only apply to the route you are editing arrange the destinations in the most efficient order while two or more waypoints are included in the planned trip click Waypoint Op...

Страница 98: ...1 Click Language 2 Select your preferred language How do I install or remove a voice file for my Navman My Voices is a NavDesk application that allows you to install or remove voice files on your Navm...

Страница 99: ...IN must be between four and eight numerical digits 6 Click OK The PIN for your Navman has been set The Enter your PIN screen will now display on your Navman when you turn your Navman on 7 When you wan...

Страница 100: ...kup your Navman click Create new backup Select the data you would like to backup Click OK The backup will be saved to your computer The backup will be listed on the Backup Restore window restore a bac...

Страница 101: ...stop pause the download during the download click to stop the download click to pause the download when paused click to resume downloading change the download folder click Change Path 3 When completed...

Страница 102: ...change the NavPix library location click Photo Album and then click Change Select a folder for the NavPix library The downloaded NavPix is moved to the new location For more information about configu...

Страница 103: ...rch Follow the prompts to select your Country Region State Place name and then select your preference Use the last known location on your Navman to search if your Navman stores the navigation data 2 C...

Страница 104: ...data is in compliance with local laws and or regulations Usage is at your own risk Safety Camera POIs Navman products are designed to be used as an aid to safer driving You can receive messages to ale...

Страница 105: ...l Fire Brigade Golf course Government office Grocery store Guest house Higher education Hospital Polyclinic Hotel Ice skating Important tourist attraction Information Tourist information office Librar...

Страница 106: ...ries and the order may differ depending on your region maps installed or model of Navman Branded Points of Interest Branded Points of Interest are available on some maps These include well known resta...

Страница 107: ...ugh to be considered a dangerous situation for example a minor accident has taken place Forecast An event is expected to occur on a route Restrictions There is a restricted flow of traffic on a route...

Страница 108: ...which SUNA Products and or Services are installed and active remain at all times responsible for observing all relevant laws and codes of safe driving In particular you agree to only actively operate...

Страница 109: ...tocopying recording or otherwise without the prior written permission of Navman Microsoft Windows Windows Vista Windows 7 and Internet Explorer are either registered trademarks or trademarks of Micros...

Отзывы: