background image

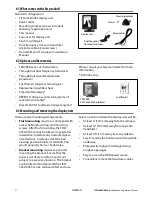
6-1 What comes with this product?

Standard configuration:

• 

FISH 4432/4433 display unit

• 

Power cable

• 

Mounting bracket (screws included)

• 

Warranty registration card

• 

This manual

• 

Sun cover for display unit

• 

Flush mounting kit

• 

Dual frequency transom transducer 
(includes cable kit and screws)

• 

Transom Mount Transducer Installation 
Manual.

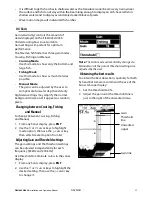
6-3 Mounting and removing the display unit

• 

TRACKER series of chartplotters

• 

Through hull dual frequency transducer

• 

Through hull speed/temperature 
transducer

• 

Fuel flow kit (single or twin engine)

• 

Replacement paddle wheel

• 

SmartCraft Gateway*

• 

REPEAT 3100 (see section 6-6 Systems of 
several instruments)*

• 

Diesel 3200 for fuel flow on diesel engines*

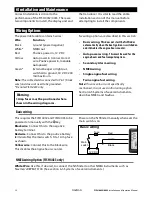
There are two mounting arrangements:

• 

Flush mounting

 requires a solid panel with 

access behind for wiring and mounting 
screws. After flush mounting, the FISH 
4432/4433 cannot be tilted or moved after 
installation to reduce any unwanted glare 
or reflections. Carefully select the best 
viewing position before installation. This 
would generally be in a shaded area.

• 

Bracket mounting

 requires a panel for 

mounting the bracket. Ensure that the 
panel is not likely to deform and is not 
subject to excessive vibration. The bracket 
can be tilted and rotated and the FISH 
4432/4433 can be removed after each use.

TRACKER 
5430 or 5380 chartplotter 

Fuel flow kit

6-2 Options and Accessories

Select a position where the display unit will be:

• 

At least 4” (100 mm) away from the compass.

• 

At least 12” (300 mm) away from any radio 
transmitter.

• 

At least 4 ft. (1.2 m) away from any antenna.

• 

Easy to read by the helmsman and crew while 
underway.

• 

Protected from physical damage during 


rough sea passages.

• 

Easy to access the 12V DC power source.

• 

Convenient to route the transducer cables.

Display unit

Screws

Power cable

Mounting bracket

Dual frequency 
transom transducer

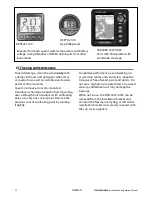
Please consult your Navman dealer for more 
information.

* Fish 4433 only

FISH 4432/4433 

Installation and Operation Manual

31

NAVMAN 

Содержание Fish 4432

Страница 1: ...w w w n a v m a n c o m Pilot 3380 A U T O P I L O T w w w n a v m a n c o m Fish 4432 4433 F I S H F I N D E R S Installation and Operation Manual...

Страница 2: ...1 Interpreting the display 16 4 2 Single and Dual frequency fishfinding 18 4 3 Fish detection and display 20 4 4 Gain 21 4 5 Range 22 5TheDisplays 23 5 1 Sonar display 23 5 2 Sonar Zoom display 24 5...

Страница 3: ...DAMAGE OR THAT MAY VIOLATE THE LAW Governing Language This statement any instruction manuals user guides and other information relating to the product Documentation may be translated to or has been t...

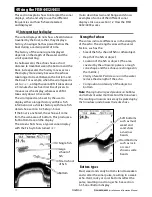
Страница 4: ...efs or wrecks and to help recognize favourite fishing spots from the bottom profile The Navman fishfinder can also assist with navigation by providing depth information to 1 1 Benefits of the FISH 443...

Страница 5: ...disappearing off the display The scroll speed depends upon the water depth and scroll speed setting See section 3 2 Setup Sonar and section 4 1 Interpreting the display for more information The appear...

Страница 6: ...item 3 Press ENT to select the item To change a number word or setting 1 Use the cursor keys to highlight the number word or setting and to make the change s 2 Press ENT to confirm ESC to cancel Power...

Страница 7: ...s Press AUTO to select one of the three following operating modes Cruise mode Use this when on the move The FISH 4432 4433 prominently displays the water depth and automatically adjusts Range and Gain...

Страница 8: ...3 2 Simulate see section 2 Comms see section 3 7 Alarms see section 3 5 Fuel see section 3 3 Logs see section 3 4 Units see section 3 6 Calibrate see section 3 8 System see section 3 1 FISH 4432 4433...

Страница 9: ...lows the sounding rate time between each ultrasonic pulse to a user specified interval from 5 minutes to 2 hours The fishfinder appears to turn off however all alarms operate normally To return to nor...

Страница 10: ...the echo signal to reduce high level spiky interference such as engine noise and makes small fish harder to see Select to add filter Pulse power This can be used to specify the power output of the tr...

Страница 11: ...or four stroke engines may require a larger value This setting affects the Fuel flow and Fuel economy reading on the Fuel display see section 5 6 Fuel display but it does not affect the Fuel used read...

Страница 12: ...ho matches the profile of a fish Temp 1 2 sec Temperature equals the alarm trigger value Temp rate 1 2 sec Rate of change of temperature equals the alarm trigger value Low battery 1 2 sec Battery volt...

Страница 13: ...onditions where there is minimal current best at high or low tide Use the cursor keys to display the speed readout box then increase or decrease the readout to match the independent speed value Speed...

Страница 14: ...ransducer s 3 Run the engine at normal cruising speed until at least 4 gallons 15 litres of fuel has been used per engine 4 Check the actual amount of fuel used per engine by refilling the portable ta...

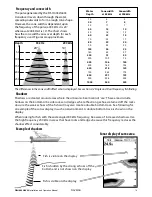
Страница 15: ...ate differences in the strength of the echo The strength varies with several factors such as the Size of the fish school of fish or other object Depth of the fish or object Location of the fish or obj...

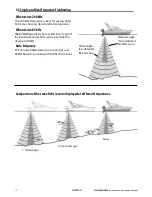
Страница 16: ...ne width The pulse generated by the FISH 4432 4433 transducer travels down through the water spreading outwards to form a rough cone shape However the cone width is dependent upon the frequency of the...

Страница 17: ...ned in detail at 200kHz Auto frequency This shows 200kHz detail on screen but uses 83kHz beam for locating fish further from boat Wide angle less detailed 83 kHz cone Narrow angle more detailed 200 kH...

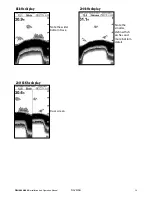
Страница 18: ...Hz display Dual screen 200 kHz display 200 83 Khz display Note the wider bottom trace Note the smaller defined fish arches and more bottom detail FISH 4432 4433 Installation and Operation Manual 20 NA...

Страница 19: ...symbol depth Fish symbols Off For experienced users this always provides the best information as every echo is displayed whether it is surface clutter a thermocline or a fish The picture in section 4...

Страница 20: ...settings The gain settings and the threshold settings can be adjusted independently for each frequency 83kHz and 200 kHz Use threshold to eliminate colors in the sonar display 1 From any Sonar display...

Страница 21: ...he display Changing the Range Mode Press the or key to change to Manual Range mode and to increase or decrease the range to the desired depth Values can be set between 10 ft 3 m to 1000 ft 300 m To ch...

Страница 22: ...ar Tab select Sonar and press ENT This display scrolls from right most recent echoes to left oldest echoes at the selected frequency see section 3 2 Setup Sonar To change items press MENU until the Op...

Страница 23: ...yed in the zoom section regardless of changes in depth If Bottom lock is not selected the bottom will not be displayed in the zoom section when it is outside the range covered by the zoom bar Using th...

Страница 24: ...n the display The zoom bar is fixed in the middle of the display See section 4 5 Range for information about adjusting the Zoom Range and Zoom Offset To change items press MENU until the Options menu...

Страница 25: ...play 4433 only Fish recognition The echo strengths shown on the A scope can be useful in recognising the type of fish Different species of fish have different sizes and shapes of swim bladders The air...

Страница 26: ...press ENT 3 Use the cursor keys to move from data field to data field 4 Press ENT at any data field to show the list of data items that can be displayed there 5 Highlight the required data item and pr...

Страница 27: ...ched on and it disables the engine hours counter Auto power wiring This must be used for the engine hours and fuel computer options Secondary Alarm wiring NMEA wiring Single engine fuel wiring Twin en...

Страница 28: ...l Beeper or Light Red Yellow Black Main switch 12 V DC Ignition switch To ignition system Auto power option Through hull transducers Speed Temperature through hull transducer phono 8 pin Through hull...

Страница 29: ...installation to reduce any unwanted glare or reflections Carefully select the best viewing position before installation This would generally be in a shaded area Bracket mounting requires a panel for...

Страница 30: ...y suited to work with the TRACKER 5430 4 3 greyscale 5380 3 8 color Navman s GPS chartplotters with worldwide coverage There are two ways of connecting instruments together NavBus or NMEA NavBus NavBu...

Страница 31: ...jamming cables and connectors Keep the transducer free of weed paint and debris Do not use a high pressure water blast on a speed sensor paddlewheel as it may damage the bearings When not in use the F...

Страница 32: ...30 m Transomtransducercable length 33ft 10m 26ft 8m Temperaturemeasurement range 32 to 99 9 F 0 to 37 7 C Resolution of 0 1 unit Speedrange 1 to 50 kn 57 5 mph 96 6 kph Communications NMEA 0183 Ver 2...

Страница 33: ...Check that the power cable connector at the back of the display unit is securely plugged in and the collar is locked in place Appendix C Troubleshooting The collar must be secure for watertight connec...

Страница 34: ...n The fishfinder thus eliminates weaker signals such as fish or even the bottom from the display This may be checked by switching off other instruments accessories e g bilge pump and the motor until t...

Страница 35: ...ay be clogged If so remove the transducer from the fuel line and gently blow through it in the opposite direction to the fuel flow A fuel filter between the fuel transducer and the fuel tank must be i...

Страница 36: ...2F 1118 15 Janglim1 Dong Saha Gu Busan Korea Ph 82 51 293 8589 Fax 82 51 265 8984 e mail info kumhomarine com web www kumhomarine com Japan PlusGain Inc 1 A 324 3 Matunoki Tyou Takayama City Gifu Ken...

Страница 37: ...Lon 174 44 535 E Lat 36 48 404 S Made in New Zealand MN000433B FISH 4 432 4 433...

Отзывы: