background image

Navini 

Networks, 

Inc. 

       Ripwave 

Modem 

User 

Guide 

Part #40-00097-00 Rev E v1.0 


Copyright © 2003 Navini Networks, Inc.  All rights reserved.   

           17 

July 30, 2003 

 
Installing a USB Modem, 
Continued 


Step  Action 

Illustration 

7. 


Turn your computer ON 
and log in. 
 
NOTE: For Windows 
2000, you must be 
logged into an account 
having Administrative 
privileges to install the 
Ripwave Modem and its 
software. 


8. Plug-and-Play 

will 

detect the Ripwave 
device now attached to 
the computer, and it will 
launch the Plug-and-
Play application.  
 
If this does not happen, 
the problem may be due 
to one of the following: 

• 

Windows NT and 
Windows 95 do not 
support a USB 
device. 

• 

The Modem is not 
turned on. 

• 

The Modem is not 
connected properly 
to the computer. 


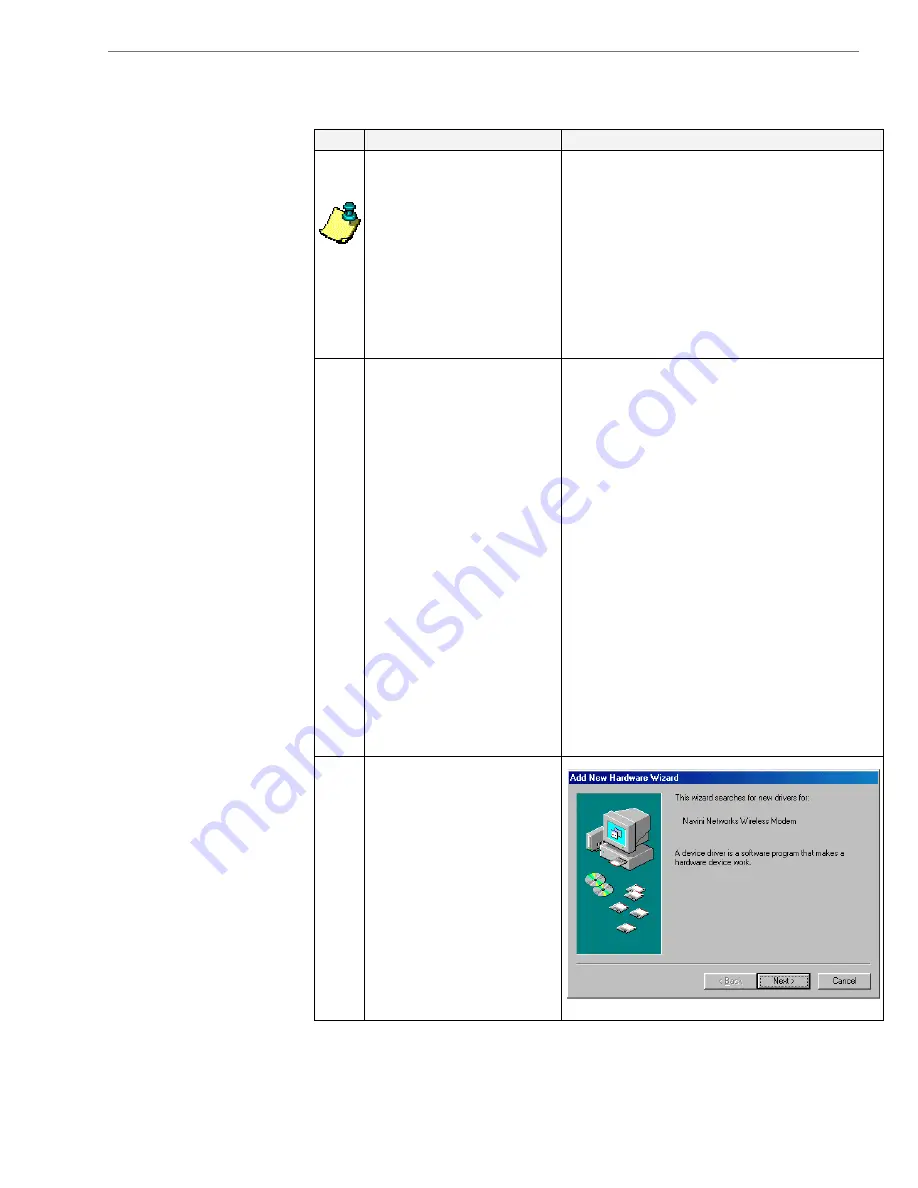
9. 

The Add New Hardware 
Wizard dialog box 
appears. Click 

Next

 to 

continue. 


Содержание Ripwave 40-00097-00

Страница 1: ...ve Modem models Part Number 40 00097 00 Revision E Version 1 0 July 30 2003 Proprietary All information disclosed by this document is the proprietary property of Navini Networks Inc and is protected b...

Страница 2: ...IES 8 COMPUTER CONNECTIONS 8 MINIMUM COMPUTING REQUIREMENTS 9 PHYSICAL CHARACTERISTICS 10 INSTALLING AN ETHERNET MODEM 12 INSTALLING A USB MODEM 15 ACCESSING THE INTERNET 19 TROUBLESHOOTING 20 INDICAT...

Страница 3: ...storage and retrieval systems without the express written permission of Navini Networks Inc Navini Networks the Navini Networks logo Internet at the Speed of Thought Zero Install Ripwave and Unwired...

Страница 4: ...he equipment 5 Power the equipment using only the battery or the AC adapter cable provided and in accordance with the instructions specified in the user manual 6 Do not use a frayed or damaged power c...

Страница 5: ...ovide reasonable protection against harmful interference in a residential installation This equipment generates uses and can radiate radio frequency energy and if not installed or used in accordance w...

Страница 6: ...e the battery The battery contains substances that are toxic corrosive or harmful to humans If battery substances come in contact with the skin seek medical help immediately 4 Do not attempt to rechar...

Страница 7: ...device is moved from room to room location to location or even city to city as long as there is coverage in the area Please verify the contents of your Ripwave Modem package If you do not find all of...

Страница 8: ...5 GHz U 2 50 GHz 2 596 GHz MMDS ITFS USB 2 6 GHz E 2 596 GHz 2 686 GHz MMDS ITFS Ethernet 2 6 GHz U 2 596 GHz 2 686 GHz MMDS ITFS USB The E in the model name stands for Ethernet and the U in the model...

Страница 9: ...are going to upgrade your Operating System after loading the Navini Monitor software you must first uninstall Navini Monitor prior to upgrading the OS Otherwise Navini Monitor will not work See Unins...

Страница 10: ...well the Ethernet connection on any model varies from a USB connection Notice the differences highlighted in the photos below and on the following page 2 4 GHz Ripwave Modem Antenna Indicator Lights...

Страница 11: ...eristics Continued 2 3 2 5 2 6 GHz Ripwave Modems Power Adapter Connection Ethernet Cable Connection USB Cable Connection On Off Switch Antenna Indicator Lights Back of 2 3 2 5 2 6 E Back of 2 3 2 5 2...

Страница 12: ...he installation It is advisable to turn off the computer and the Ripwave Modem before performing the installation Step Action Illustration 1 Connect the Ethernet cable to the Ethernet port on the comp...

Страница 13: ...ny other direction may cause damage to the Ripwave Modem 5 Push the On Off button on the Modem to ON 6 If the Green Power indicator light comes on proceed to Step 7 If not there is a problem with the...

Страница 14: ...Navini Networks Inc All rights reserved Part 40 00097 00 Rev E v1 0 July 30 2003 Installing an Ethernet Modem continued Step Action Illustration 7 Turn your computer on and log in 8 Proceed to the Tr...

Страница 15: ...t is advisable to turn off the computer and the Ripwave Modem before performing the installation Step Action Illustration 1 Connect the USB cable to the USB port on the computer 2 Connect the other en...

Страница 16: ...ction may cause damage to the Modem 5 Push the ON OFF button on the Modem to ON 6 If the Green Power indicator light comes on proceed to Step 7 If not there is a problem with the Modem or the AC Power...

Страница 17: ...ccount having Administrative privileges to install the Ripwave Modem and its software 8 Plug and Play will detect the Ripwave device now attached to the computer and it will launch the Plug and Play a...

Страница 18: ...ion 10 Insert the Ripwave Installation CD into the computer s CD ROM drive 11 Select the Search for the best driver for your device option Click Next to continue 12 Select the CD ROM drive checkbox Cl...

Страница 19: ...dows 98 setup disk If so insert the Windows 98 setup disk into the CD ROM drive at this time and accept the defaults 15 After clicking Finish the System Settings Change window appears asking if you wa...

Страница 20: ...rve the light indicators on the front of the Modem You also may need to install the Navini Monitor software This software is provided on a CD that came in your Modem package The Navini Monitor softwar...

Страница 21: ...rength and quality of the incoming signal and battery strength batteries are optional It can also provide information about the connectivity to the Service Provider s network These displays may be req...

Страница 22: ...ing the Navini Monitor software 2 Insert the Navini Monitor Installation CD into the CD ROM drive 3 At the bottom left hand corner of your screen click Start Run In the Run window enter e setup in the...

Страница 23: ...he I Accept option and click Next to continue NOTE If the License Agreement is not accepted you cannot install the software 7 The Ripwave Positioning screen appears Read the screen for positioning the...

Страница 24: ...uracy Click Install to continue For your installation and computer this screen may have different information than what is shown in the illustration 10 The Installing screen will display as the applic...

Страница 25: ...pop up Notice the bottom right corner of the window shows the Equipment Identification EID for your specific Ripwave Modem If you talk with a Service Technician while troubleshooting you may be asked...

Страница 26: ...Quality bar graphs Position the Modem for maximum signal strength and quality If you make a service call to your Service Provider the Technician may ask you to read the numbers to the right of the si...

Страница 27: ...he Ripwave Modem and the Base Station is down the Advanced button will be disabled grayed out The blue question marks on the right side of the Advanced section indicate that all connections are untest...

Страница 28: ...rocedure below Step Action Illustration 1 On your computer screen lower left corner click on Start Programs Navini Navini Monitor Uninstall Navini Monitor The Install Anywhere Uninstaller screen appea...

Страница 29: ...p Action Illustration 1 Squeeze both tabs to remove or install the battery pack cover Note that the cover is not used when the battery pack is installed in the Modem 2 Install the battery pack into th...

Страница 30: ...s mate and that both sides snap down securely Reinstall the battery pack cover on the Modem 3 To charge the battery connect the AC adapter to the Modem and to an AC power source The battery will begin...

Страница 31: ...ting System after loading the Navini Monitor software you must first uninstall Navini Monitor prior to upgrading the OS Otherwise Navini Monitor will not work See Uninstall instructions in this Guide...

Страница 32: ...the Navini Monitor software the user MUST have Administrative privileges USB Interface The USB Modem allows for a single PC to be connected to the Ripwave Modem via a USB interface or multiple PC s co...

Страница 33: ...or if going through some USB or Ethernet hubs Doing so may cause Navini Monitor software not to operate Battery The Ripwave Modem comes with an optional 1800 mAh Li Ion battery that allows the user t...

Страница 34: ...ni iatool KillMon Status SUCCESSFUL Check Disk Space D Program Files Navini Ripwave Monitor Status SUCCESSFUL Additional Notes NOTE Required Disk Space 23 243 991 Free Disk Space 3 977 043 968 Install...

Страница 35: ...all Uninstaller Ripwave Monitor Install All Uninstaller Components Status SUCCESSFUL Install File D Program Files Navini Ripwave Monitor instpro5 exe Status SUCCESSFUL Install File D Program Files Nav...

Страница 36: ...nal Notes NOTE Directory already existed Install Directory D Documents and Settings All Users Start Menu Programs Startup Status SUCCESSFUL Additional Notes NOTE Directory already existed Create Short...

Страница 37: ...ed along with the SOFTWARE that is associated with a separate end user license agreement is licensed to you under the terms of that license agreement By installing copying downloading accessing or oth...

Страница 38: ...sassembly YOU MAY NOT MODIFY TRANSLATE DISASSEMBLE CREATE DERIVATIVE WORKS OR REVERSE ENGINEER THE SOFTWARE OR ANY COPY IN WHOLE OR IN PART 2 3 Rental You may not rent lease assign or lend the SOFTWAR...

Страница 39: ...d intellectual property rights in and to the SOFTWARE including but not limited to any images photographs animations video audio music text and applets incorporated into the SOFTWARE the accompanying...

Страница 40: ...ND FOR RESULTS OBTAINED YOU HAVE THE SOLE RESPONSIBILITY FOR INSPECTING AND TESTING THE SOFTWARE TO YOUR SATISFACTION BEFORE USING THEM WITH IMPORTANT DATA OR WITH YOUR COMPUTER NAVINI MAKES NO WARRAN...

Страница 41: ...on arising here from will be brought within the state or federal courts located in Dallas county Texas which is agreed by the parties to be a convenient forum The SOFTWARE User acknowledges understand...

Отзывы: