background image

NAVC-525-WIFI               

USER M ANUAL


NAVC-525-WIFI M anual Ver 2.3   06/ 2017 

Opt ional Adhesive M ount   

(Included in package) 

Inst allat ion t he Front  Cam era and GPS Ant enna 

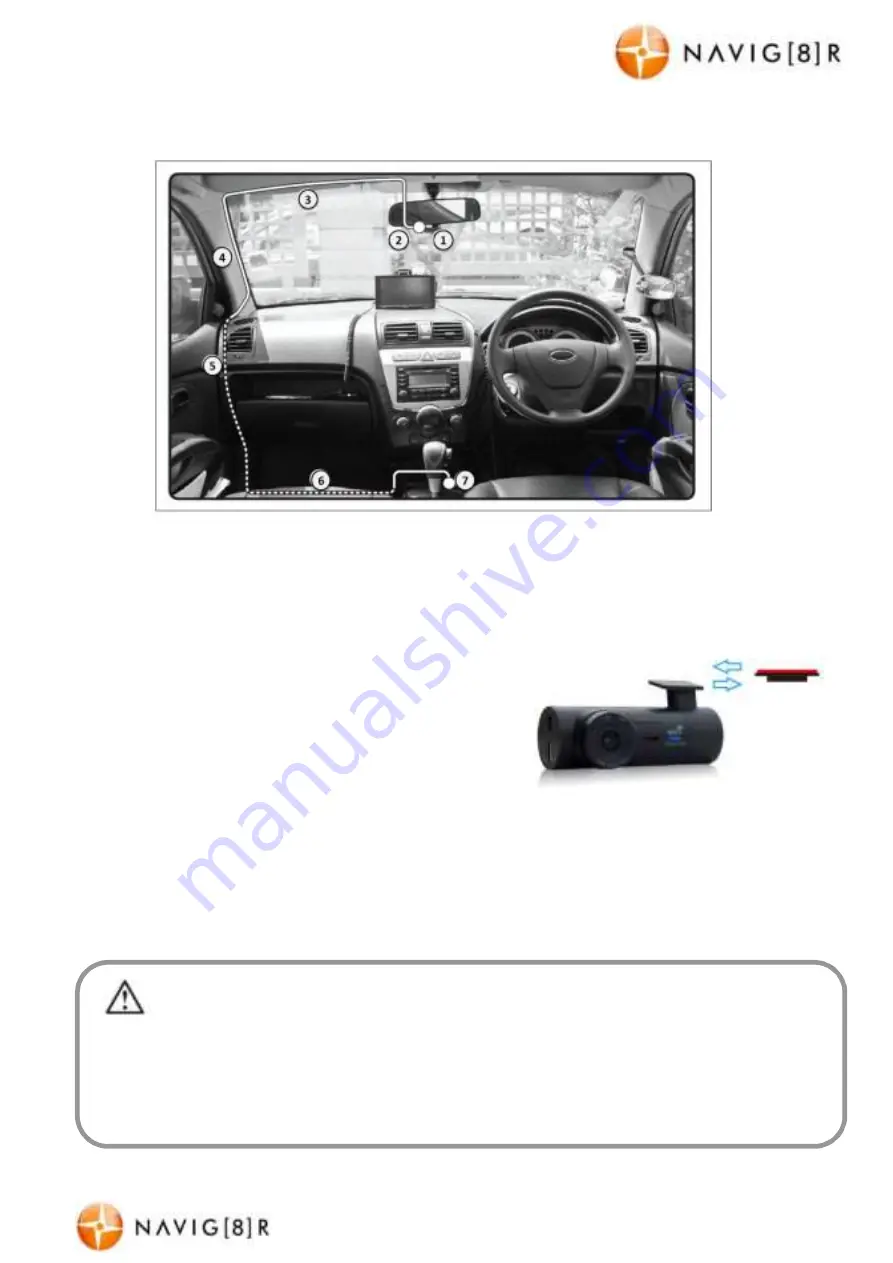
*  Suggested w iring installation (below )


The NAVC-525-WIFI w orks best  w hen mount ed cent rally and high up on t he w indscreen (t ypically 

behind or close t o t he rear vision m irror for t he front  camera). Use t he supplied w indscreen suct ion 

mount  t o affix t he NAVC-525-WIFI t o t he w indscreen and t hen adjust  t he mount  unt il you can see a 

clear view  of t he road ahead on t he M onit or. Not e: Be sure t o remove t he plast ic cover from t he 

silicone suct ion pad and ensure t he glass surfaces are clean, dry and lint  free.    

1) NAVC-525-WIFI device mount ed behind t he rear vision 

mirror. 

2) Car charger cable rout ed behind rear vision mirror.


3) Cable hidden behind roof headlining. 

4) Cable hidden behind “ A”  pillar – bew are of airbag  

equipped cars. 

5) Cable is rout ed beside t he dashboard/ near t he door hinges. 

6) Cable is passed under t he passenger carpet  (or under t he dashboard). 

7) Car charger plug is connect ed t o t he car’s “ cigaret t e socket ” . 

8) Connect  t he GPS module. Posit ion t he module behind one of t he sun visors as t o not  obst ruct  your 

view . Affix t o t he w indscreen using t he adhesive pad at t ached t o t he m odule.  


 Once the w iring and installation of the NAVC-525-W IFI has been completed, please check the follow ing: 

- Wit h t he car’s ignition on (or engine st art ed), t he Blue LED indicat or on the NAVC-525-WIFI will light  up. Recording 

should st art aut om at ically. This w ill indicat e a successful installat ion. 

- When t he car’s ignition is t urned off, t he device should t urn off wit hin 20 seconds. If t his doesn’t  happen t hen 

pow er is still being supplied t o t he car charger socket and t he device will need t o be swit ched off m anually.


Содержание NAVC-525-WIFI

Страница 1: ...NAVC 525 WIFI USER M ANUAL 1 NAVC 525 WIFI M anual Ver 2 3 06 2017 WiFi Crash Camera SHD 1296p with GPSand Wi Fi App Viewer...

Страница 2: ...e Use this product only in the manner described Only use a water dampened soft cloth to clean the surface of this product The following will damage this product any liquid such as water or moisture ex...

Страница 3: ...3 Cable hidden behind roof headlining 4 Cable hidden behind A pillar beware of airbag equipped cars 5 Cable is routed beside the dashboard near the door hinges 6 Cable is passed under the passenger c...

Страница 4: ...10 Record LED indicator 11 Charge LED indicator M emory Card required for operation The NAVC 525 WIFI requires a M icro SD card not included to record video image content See page 11 for a table show...

Страница 5: ...ery will not charge if connected to a PC USB port Recording Turn on your NAVC 525 WIFI and press the REC button unless auto REC on has been set with ignition on When recording commences the LED indica...

Страница 6: ...tore and search for LINKINEYES and install the app IOS DEVICES APPLE For Apple IOSdevices visit the App Store and search for LINKINEYES and install the App Connect your Device and App via WiFi The ste...

Страница 7: ...NAVC 525 WIFI USER M ANUAL 7 NAVC 525 WIFI M anual Ver 2 3 06 2017 On Screen Display INSTALLING THE PC SOFTWARE M ain App Screen Playback M enu File M enu Video Playback Screen...

Страница 8: ...ware View User M anual Note Permission may need to be granted to the FFDSHOW program following installation Note GPSPlayer zip file is also included in the GPSplayer folder of camera micro SD card ext...

Страница 9: ...location to save master file Repair broken file Repair corrupt or damaged file or associated GPSdata Set lock Protect against deletion Removes the delete option for this file Unlock Re instate the de...

Страница 10: ...e Stamp On Off Cancel When the time stamp for video is turned on the time will be overlaid in the video being recorded The Time can be set in the Time Date setting in the main menu Video driver ID sta...

Страница 11: ...menu language English available only Set date and time Default Setting Ok Cancel Allows you to set the time and date setting of the camera It is important to set the correct time and date so the recor...

Страница 12: ...ion of a windscreen which is not glass eg some vehicles may have a coating The captured image is not stored Your M icro SD card might be full or the file may not have been saved before power was turne...

Страница 13: ...30fps 16 9 1280x720 60fps 16 9 1280x720 30fps 16 9 HDR 1280x720 30fps 16 9 1920x1080 45fps Photo Resolution 4M 2688x1512 16 9 9M 4000x2250 16 9 13M 4800x2700 16 9 Default 4M 2688x1512 16 9 Auto Bump R...

Страница 14: ...eplace or fund the product as per their store refund or warranty policy Step 2b If your place of purchase cannot be contacted then you can contact Laser customer service with details of your Laser Pro...

Отзывы: