Nav TV UCT84 F-CAM Скачать руководство пользователя страница 4

BHM 

04/09/15 

NTV-DOC194 


Agreement

End user agrees to use this product in compliance with all State and Federal laws. NAV-TV Corp. would not be held liable for 

misuse of its product.  If you do not agree, please discontinue use immediately and return product to place of purchase. This product is 
intended for off-road use and passenger entertainment only.  

4 | 

P a g e


Installation


1.


Remove the 

radio 

(only) from the dashboard. This requires pulling some panels and 

a series of screws will hold the radio into the sub-dash. 

2.


Disconnect all harness from the radio and set the radio aside. 

3.


Connect the male end of the 

car’s main radio harness

 to the 

female end of the supplied Plug & Play T-Harness. 

4.


Choose an option from the diagrams on page 5 and 6 (FIG 2 
or FIG 3 based on which vehicle you’re installing into) and make all connections. 
When complete, return here to step 6 to finish the installation.


5.


Plug the UCT84 module into the 18-pin connector attached to the plug and play 
harness from step 3. 

6.


Connect the provided 

VSW Board

 to both 8-pin connectors (if you haven’t already). 

7.


Plug the male end of the supplied plug & play T-harnesses to the radio. 

Note: if this 

vehicle possesses an OEM camera, the Camera Harness (see FIG 1 below) will 
already be populated. Connect the F-CAM T-harness in between the radio and the 
factory plug.


8.


Reconnect the remaining plugs to the radio (antennas etc), remount and test for 
proper operation. 


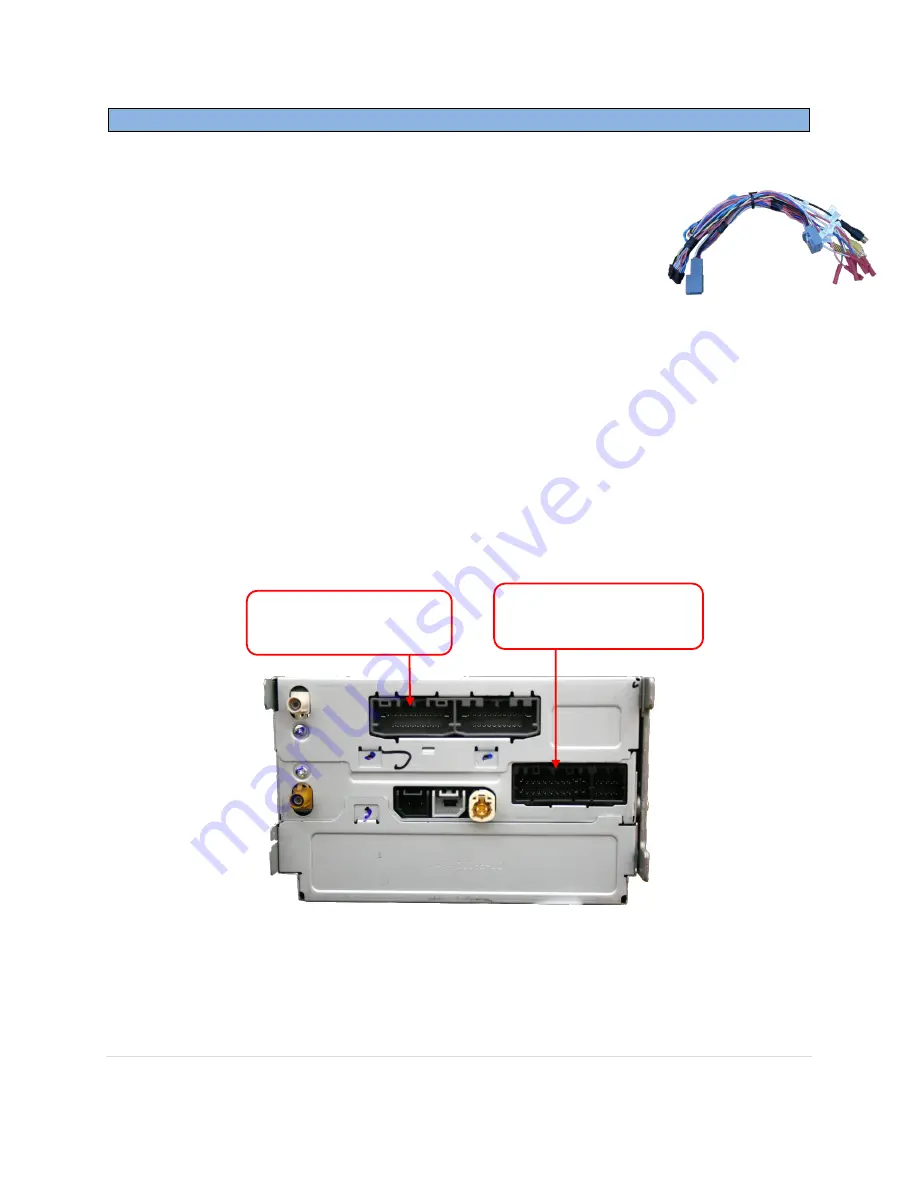
Rear of uConnect radio 

Plug & Play T-Harness 

(with module) 

Camera Harness (F-CAM 

Harness connects here) 

FIG 1 

Содержание UCT84 F-CAM

Страница 1: ...3950 NW 120th Ave Coral Springs FL 33065 TEL 561 955 9770 FAX 561 955 9760 UCT84 F CAM Front Camera Interface for uConnect 8 4 Systems NTV KIT507 BHM 4 9 15 NTV DOC194...

Страница 2: ...deo to be displayed while the vehicle is in motion and interfaces a front camera into select uConnect 8 4 Touch screen equipped vehicles Note this interface is for adding only a front camera not front...

Страница 3: ...te Red 6 Ground Black LED Description A LED When illuminated Video 2 is active A B LEDs When both illuminated Video 1 is active NO LED LEDs When none illuminated factory video pass through PIN Descrip...

Страница 4: ...pplied Plug Play T Harness 4 Choose an option from the diagrams on page 5 and 6 FIG 2 or FIG 3 based on which vehicle you re installing into and make all connections When complete return here to step...

Страница 5: ...ld liable for misuse of its product If you do not agree please discontinue use immediately and return product to place of purchase This product is intended for off road use and passenger entertainment...

Страница 6: ...not be held liable for misuse of its product If you do not agree please discontinue use immediately and return product to place of purchase This product is intended for off road use and passenger ente...

Страница 7: ...oth operation while moving Note Navigation based speed indication will not be available while VIM is active OEM Rear view camera will work normally in reverse Forced Rear Camera is enabled by pressing...

Отзывы: