BHM
10/25/18
NTV-DOC257
Agreement
:
End user agrees to use this product in compliance with all State and Federal laws. NAV-TV Corp. would not be held liable for misuse of its product.
If you do not agree, please discontinue use immediately and return product to place of purchase. This product is intended for off-road use and passenger
entertainment only.
8 |
P a g e
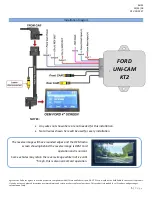
Connecting single camera to screen (expeditors)
•
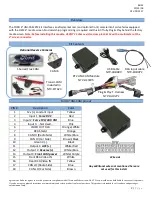
When using the KT2 kit to program multiple vehicles, the install/programming steps remain the same,
but the harness and module (entire kit) must be removed and the video input must be populated to the
screen manually (after being flashed
–
the radio program will remain). This process is outlined below:
1. If wires already exists on
pins 6 & 12 at the screen
, cut wires (in half)
and solder the provided female RCA end
(NTV-CAB071)
onto these wires
(screen side, cut pins off of CAB071) for camera input (ACC power for
camera will need to be found in the vehicle to power the camera
–
cigarette adapter is typically used). Isolate the other side of the pair of cut
wires (vehicle side).
2. For all other vehicles with no wires populated on
pins 6 & 12
at the screen connector
, use the
provided video input cable
NTV-CAB071
and
populate the OEM screen connector as follows:
A.
Cut the zip tie off of the connector
(replace when this section is complete)
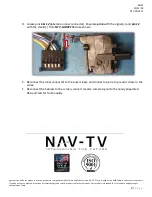
B.
Using pick tools, pry both lock tabs to free
the inner 12-pin connector from the outer
sleeve.
C.
Slide the inner connector
out of the outer cam-lock
connector.
Lock tab


