NAUTIKA Mural PP30382 Скачать руководство пользователя страница 25

Installation instructions and user’s manual for NAUTIKA kitchen hoods

13

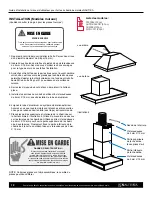
ISLAND INSTALLATION (Island models)


(Please refer to page 6 for parts

)

1.  Find the perfect place to install the hood. Make sure the ceiling joists

provide adequate support for the suspended hood, add support capac-

ity between the joists if necessary to screw the support bracket securely

into wood (see Figure 5 or 6 depending on your model).

CAUTION:

 Installation MUST NEVER be suspended only by the sheet-

rock, the whole installation must be screwed into the solid wooden struc-

ture behind the ceiling gypsum.

2.  Mark and cut a circle 7 1/2” in diameter for the flexible duct in the gyp

-

sum at the center of the square formed by the supporting joists.

3.  Align the upper support plate to the ceiling to the hole made in the step

2. and firmly secure it with supplied wood screws.

4.  Attach the bracket rods to the upper support plate, adjust the rods to

the required length (see page 7) and lock using sixteen (16) Tapping

Screws Phillips head 4mm x 8mm as shown in figure 5 or 6 depending

on your model.

CAUTION:

 Make sure that the support frame is secured solidly before 

releasing !.
5.  Insert the upper and lower parts of the chimney covers over the brack-

ets without fixing them yet (temporarily hold in place with tape to allow

step 6 execution).

6.  Hang the hood by fixing rods brackets to the housing of the hood using

the provided screws.

7.  Join the flexible duct to the outside venting system. Make sure all joints

are tight and well sealed. Duct tape is recommended.

8.  Route the electrical cord along the flexible duct and through the ceiling

opening and complete the electrical connection to the junction box.

CAUTION:

 The electrical connection operations should be carried out by 

a certified electrician who will install correctly, according to the standards 

and thus ensuring the conformity of your installation.
9.  Once the electrical connection is completed, make sure that the hood is

working properly (fan and light) (see page 14).

10.  Slide the top and bottom chimney covers on the support bracket as

shown in Figure 5 or 6 depending on your model. Use four tapping

screws 4 mm x 10 mm to attach the top of the chimney to its hinges.

Finally, attach the bottom of the chimney hood using two tapping

screws 4 mm X 10 mm.

Note:  Some parts are already assembled, therefore the number 

of parts may differ.

HAZARD OF ELECTRICAL SHOCK !

Do not perform service on an electrically live system. 

Disconnect the main electrical supply before servicing  

this device. Touching electrical connectors or other 

exposed electrical circuitry inside this range hood  

when they are energized could result in death,  

serious bodily injury or property damage.

Figure 6

Figure 5

For more détails, please visit “Ventilation” section of nautika.ca site with your model number in hand.

Mounting bracket

Mounting bracket

Wood screws

Wood screws

Upper chimney 

(has venting holes)

Lower chimney

4 mm X 10 mm 

tapping screws

4 mm X 8 mm 

tapping screws

Model:

BVI36782 (36”)

Ceiling sheet-rock

Ceiling sheet-rock

Wooden ceiling joists

Wooden ceiling joists

Upper chimney 

(has venting holes)

Lower chimney

4 mm X 10 mm 

tapping screws

EXCESSIVE WEIGHT

Require three or more persons to move and install 

this range hood. Spinal or other bodily injuries could 

occur if this is not followed.

MISE EN GARDE

Содержание Mural PP30382

Страница 1: ...Guide d installation et d utilisation pour hottes de cuisini re Murales et Il t Liste des mod les Il t BVI36782 36po Liste des mod les muraux PP30382 30po ARCOBALENO 30po SR30482 30po SIROCCO 30po...

Страница 2: ...guide pour r f rence ult rieure Cochez votre mod le de ventilateur sur cette page pour r f rence ult rieure ARCOBALENO 30 po PP30382 30 po SIROCCO 30 po BVI36782 36po Hottes de cuisini re fixation mu...

Страница 3: ...d les Il t 6 Les conditions de ventilation 7 La hauteur et le d gagement 7 Les calculs de la longueur du conduit de ventilation 8 Les m thodes de ventilation 9 Les exigences lectriques 10 Les pr parat...

Страница 4: ...les surfaces o se pose la graisse Pour r duire les risques d incendie et pour vacuer l air convenablement assurez vous que l a ration se fait l ext rieur NE FAITES PAS vacuer l air entre les murs dan...

Страница 5: ...30po SR30482 30po SIROCCO 30po Description Quantit Boulons ailettes 2 pi ces Conduit flexible 1 pi ce Crochets selon le mod le 2 pi ces Ferrures pour la chemin e 1 jeu Guide d installation manuel d ut...

Страница 6: ...82 36po Description Quantit Boulons ailettes 2 pi ces Conduit flexible 1 pi ce Ferrures pour la chemin e selon le mod le 1 jeu Guide d installation manuel d utilisateur 1 livret Vis et rondelles de 5...

Страница 7: ...lus de trois coudes de 90 Si vous utilisez plus d un coude assurez vous de conserver une distance de 24 po 61 cm de conduit droit entre les coudes N INSTALLEZ PAS deux coudes ensemble La longueur du c...

Страница 8: ...31 po 78 8 cm Il est important d installer la hotte distance prescrite Une hotte install e trop basse pourrait tre endommag e par la chaleur et pourrait m me pr senter un danger d incendie alors qu u...

Страница 9: ...installation du conduit dans les murs dans un vide sanitaire dans un plafond dans le grenier ou dans le garage mais toujours l ext rieur N utilisez que des conduits en m tal ou en aluminium Fixez tous...

Страница 10: ...e non m tallique Un serre c ble approuv CSA ou UL doit tre utilis chaque bout du c ble de l alimentation lectrique N utilisez pas de rallonge lectrique ou d adaptateur avec cet appareil La hotte doit...

Страница 11: ...vous assurer que la structure et la charpente du plafond sur lequel il sera fix sont stables et solides 3 Mettez une couverture paisse sur le comptoir et sur la table de cuisson de la cuisini re pour...

Страница 12: ...hemin e sur la hotte comme l illustration 4 Glissez le couvercle du dessus sur les ferrures de la chemin e Utilisez quatre vis taraudeuses de 4 mm X 10 mm pour fixer la partie sup rieure de la chemi n...

Страница 13: ...ible et par l ouverture du plafond et compl tez le branchement lectrique la bo te de jonction ATTENTION L tape du branchement lectrique devrait tre effectu par un lectricien certifi qui fera l install...

Страница 14: ...it obstruer la circulation d air 4 Les lumi res s allument mais le ventilateur ne fonctionne pas du tout ou il est pris ou il fait du bruit Le ventilateur peut tre bloqu ou peut frotter le fond de la...

Страница 15: ...Installation guide and user s manual for kitchen range hoods Mural and Island Island model list BVI36782 36 Mural models list PP30382 30 ARCOBALENO 30 SR30482 30 SIROCCO 30...

Страница 16: ...ner Keep this guide for future reference Put a checkmark next to your hood model on this page for future reference Mural kitchen hoods Your model for future reference Ceiling suspended kitchen hoods I...

Страница 17: ...els 6 Venting requirements 7 Installation height clearance 7 Calculating vent system length 8 Venting methods 9 Electrical requirements 10 Preparations 11 Installation Mural models 12 Installation Isl...

Страница 18: ...ce panel to prevent power from being switched ON accidentally Clean grease laden surfaces frequently To reduce the risk of fire and to disperse air properly make sure to vent outside DO NOT vent exhau...

Страница 19: ...ge hood one amongst models listed hereafter PP30382 ARCOBALENO SR30482 SIROCCO Description Quantity Toggle bolts 2 pieces Duct set 1 piece Body hook vary with model 2 pieces Chimney mounting brackets...

Страница 20: ...6782 36 Description Quantity Toggle bolts 2 pieces Duct set 1 piece Body and Chimney brackets vary with model 2 pieces This installation User guide 1 booklet 5 mm X 16 mm screws with washers 4 sets 4...

Страница 21: ...re there is a minimum of 24 61 cm of straight vent between the elbows if more than one elbow is used DO NOT install two elbows together The length of vent system and number of elbows should be kept to...

Страница 22: ...the proper mounting height A hood mounted too low could result in heat damage and fire hazard while a hood mounted too high will be hard to reach and will loose its performance and efficiency If avail...

Страница 23: ...air or terminate ductwork into spaces between walls crawl spaces ceiling attics or garages All exhaust must be ducted to the outside Use metal aluminum ductwork only Fasten all connections with sheet...

Страница 24: ...od as shown in figure 4 Slide up the upper duct cover to wards the chimney mounting bracket Use four 4 mm X 10 mm tapping screws to secure the upper chimney onto the chimney mounting bracket Finally s...

Страница 25: ...along the flexible duct and through the ceiling opening and complete the electrical connection to the junction box CAUTION The electrical connection operations should be carried out by a certified el...

Страница 26: ...rectly or opening properly A tight mesh on a side wall cap unit might also cause restriction to the airflow 4 The lights work but the blower is not spinning at all is stuck or is rattling The blower m...

Отзывы: