background image

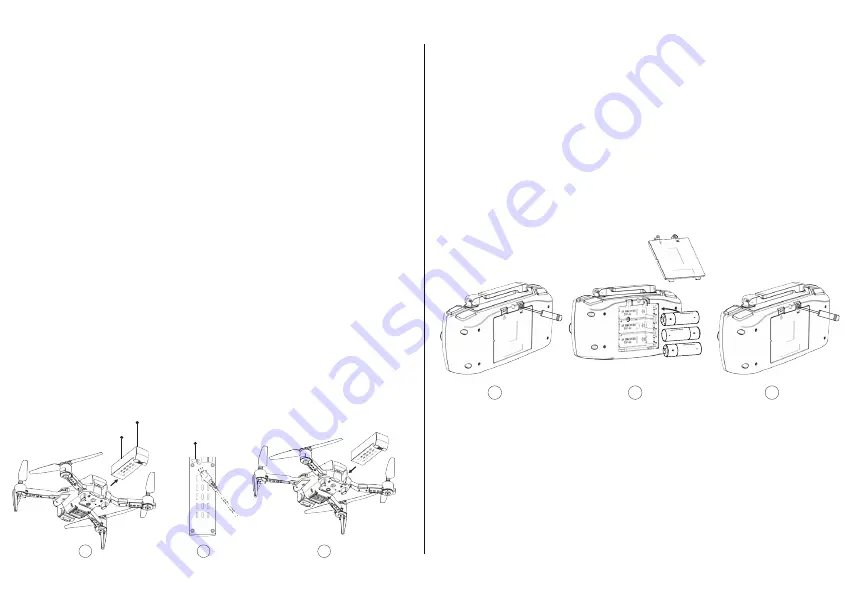
Installing and Recharging the Battery

Your Nautica Aero N100 comes with the battery 

pre-installed and fully charged. When you need to 

recharge the battery, follow the steps below.

1.

 Push the battery latch and pull the battery out of its 

compartment. 

2.

 To recharge the battery, insert one end of the 

included micro USB charging cable to the battery 

and the other end to a 5V adapter or an operating 

computer with a USB charging port. It will take 

approximately 4 hours the battery to be fully 

charged.

3.

 After charging is completed, slide the battery into 

its compartment back as shown in the image, until 

you hear a clicking sound. Ensure that the latch at 

the rear of the battery is completely locked.

Installing the Remote Controller

1.

 Open the battery compartment of the remote 

controller by turning the screw counterclockwise.

2.

 Insert the 3*1.5V alkaline batteries (not included) to 

the battery compartment, as shown in the image. 

Pay attention that the batteries are correctly 

placed according to their positive and negative 

magnetic poles.

3.

 Lastly, close the battery compartment by turning 

the screw clockwise.

Downloading the Application 

Easily download the Nautica AERO application to your 

smartphone for free via scanning the below QR codes. 

Keep in mind that you need a QR code reader 

application on your smartphone to be able to scan the 

codes. Search Google Play or Apple Store for a free QR 

code reader to install if you do not already have one 

installed in your smartphone.

1.

Battery Latch

Battery

Micro USB 

Charging Port

1

2

3

1

2

3

The Nautica AERO application enables you to control 

your drone via your smart device. For more information 

on how to control your drone via the Nautica AERO 

app, please consult the “How to use Nautica AERO 

app” section of this manual. 

9

Содержание AERO N100

Страница 1: ...AERO N100 NTDR01...

Страница 2: ......

Страница 3: ...ity product that s built to combine technology and design for your everyday use Please read the below info carefully to get the most out of your new product This guide is ENGLISH only For other langua...

Страница 4: ...ICA AERO N100 REMOTE CONTROLLER 1 M 3 3 FT MICRO USB TO USB A CHARGING CABLE PROPELLERS X4 WHAT S IN THE BOX PROPELLER GUARDS X4 PROPELLER MOUNTING TOOL REPLACEABLE BATTERY X2 CARRYING BAG USER S MANU...

Страница 5: ...AIRCRAFT DIAGRAM HOW TO USE AERO N100 Camera Motors Front LEDs Propellers Propellers Motors Landing Gears Landing Gears 5...

Страница 6: ...Rear LEDs Battery Latch Battery Power ON OFF Landing Gears Battery Level LED Landing Gears Downward Vision System Vents Wi Antenna 6...

Страница 7: ...ding L2 Button Callback R2 Button Headless mode R1 Button Mode switch Changing speed Automatic Takeoff Landing Trim Left Button Joystick Joystick Trim Right Button Trim Forward Button Emergency Landin...

Страница 8: ...Make sure the new propeller is locked by screwing the apparatus back 1 Place the propeller guards to each wing as shown in the image Installing the Propeller Guards Pay attention to the correct placem...

Страница 9: ...ttery is completely locked Installing the Remote Controller 1 Open the battery compartment of the remote controller by turning the screw counterclockwise 2 Insert the 3 1 5V alkaline batteries not inc...

Страница 10: ...have authorization to pilot the Aero N100 in the area you intend to fly In some areas flying a drone is not permitted such as military bases parks cities and airports Check local regulations prior to...

Страница 11: ...and connected and your drone is calibrated as explained above Also make sure you read all instructions above for flight preparation and other instructions in the Safety and Maintenance section of thi...

Страница 12: ...g Automatic Takeoff and Landing 1 Place Nautica Aero N100 on a flat and dry surface 2 Push the automatic takeoff landing button on the remote control Your drone will takeoff and hover at about 5 ft 1...

Страница 13: ...ward Drone will move forward Right joystick pulled back Drone will move backward Right joystick pushed left or right Drone will move left or right Headless Mode When R2 button is pushed on the remote...

Страница 14: ...aximum of 100 notifying the pilot with a three beep sounds At the maximum speed push R1 button once more to go back to 30 speed level with one beep notification sound R2 Button Headless mode L2 Button...

Страница 15: ...ERO app on your smartphone as explained in the Downloading application section of this manual 1 Turn your drone ON by switching the POWER button 2 Turn on the Wifi connection on your smartphone then s...

Страница 16: ...anding Reverse the camera Control Panel Settings Auto Takeoff Throttle Rotation HSS System Auto Landing Forward Backward Trimming Headless Mode Voice Control Direction Control Emergency Landing Trajec...

Страница 17: ...w to use joysticks for controlling drone movements Photo and Video Shoot With Hand Sense The Hand Sense system of Nautica Aero N100 enables you to take photos and videos with your hand movements durin...

Страница 18: ...Gyro Another way of controlling your drone s movements is activating Gyro by tapping on the related button on the application screen It enables to control drone movement by tilting your smartphone 17...

Страница 19: ...h 5 m s Camera Resolution 2MP Max Transmission Distance Up to 230 ft 70 m Max Video Transmission Distance 65 6 ft 20 m Autopilot Take Off and Landing Yes Emergency Landing Yes Flight Modes 3 modes Pal...

Страница 20: ...more than three months Never store in environments outside the temperature range of 14 to 113 F 10 to 45 C 16 DO NOT put batteries in a microwave oven or in a pressurized container 17 DO NOT place lo...

Страница 21: ...ding cities sporting events exhibitions performances etc 10 Do not fly the drone above the authorized altitude 11 Do not fly near areas with magnetic or radio interference 12 Do not fly the drone in r...

Страница 22: ...to free repair or exchange of goods The product should be returned to Technofashion The warranty does not cover defects caused by third party modifications repairs or replacement parts Punctures scrat...

Страница 23: ...cordance with the instructions may cause harmful interference to radio communications However there is no guarantee that interference will not occur in a particular installation If this device does ca...

Страница 24: ...2021 Technofashion Inc All Rights Reserved Designed in USA Made in China May be patented See technofashion com patents designed manufactured distributed by...

Отзывы: