24
1. Remove the old filter
2. Install new filter, filling filter with oil before re-installing.
Apply oil to the O-ring of the filter prior to installation. Hand
tighten only.
3. Run engine at idle speed with hydrostatic pump in neutral
for five minutes.
4. Check hydraulic oil level and add oil if necessary.
Frequent checks of oil level in the hydraulic tank.
Should the pump run short of oil, immediate and perma
nent damage will result
7.13—DECK BLADE REPLACEMENT
When the deck blades become damaged or too worn to keep
sharp, they must be replaced. Follow the procedure below.
1. See Section 6.13 for instructions to replace deck blades.
7.10—HYDRAULIC OIL
1. The oil level should be checked if any oil leaks are
dicovered. Oil level should be brought to decal mark on
the side of the oil tank.
2. Park the tractor on a level surface.
3. Oil should be at 60° F to 90° F (16 – 32 °C), when
checking level. Do not check level when oil is hot.
4. Drain and replace the hydraulic oil every 200 hours.
Use ISO 68 Hydraulic grade oil. Replace both hydraulic
filters every 200 hours.
The oil should be changed after a major component failure,
or if you notice any of the following.
•
Present of water - (noted by a cloudy or milky
appearance)
•
Present of air - (noted by foaming)
•
Excessive heat - (noted by rancid odor)
5. To drain hydraulic oil tank, remove the drain plug in the
back of the hydraulic tank.
6. Reinstall drain plug and fill hydraulic tank until the oil is
evel with the bottom of the screen in the fill tube. Use only
filtered hydraulic oil. The total hydraulic system oil capacity
is approx. 10-12 gallons.
7. Jack up rear tires so they spin freely.
8. Start engine; operate the traction pedal and turn steering
from right to left to free the system of air. Recheck oil level.
7.11—HYDRAULIC OIL FILTERS
To prevent damage to the hydraulic system, the hydraulic oil
filters (located under right fender and under steering column
shroud) should be changed after the first 25 hours of operation
and every 200 hours thereater.
7.12—JUMPER CABLES
The battery on the I-Trim is located at the rear of the tractor,
See.
1. Stop the engine on the vehicle with the good battery.
2. Connect one jumper cable to the positive terminal on the
good battery. Connect the other end of the jumper cable to
either the positive terminal on the dead battery or the
battery side of the solenoid located on the right front of the
engine.
3. Connect one jumper cable to negative terminal on dead
battery. Connect the other end to ground (frame) of vehicle
with the good battery.
Содержание I-TRIM
Страница 2: ...2 ...
Страница 8: ...8 F G H J I ...
Страница 25: ...I TRIM 25 THIS PAGE IS BLANK ...
Страница 27: ...I TRIM 27 18 19 21 7 14 7 7 13 17 1 2 7 7 3 9 5 15 7 7 7 7 4 12 12 12 20 12 12 22 12 7 5 11 10 6 8 8 8 8 16 23 ...
Страница 34: ...34 ...
Страница 35: ...I TRIM 35 ...
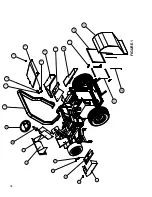
Страница 36: ...36 FIGURE 1 23 4 5 3 6 7 8 9 10 11 12 13 15 16 19 20 2 1 18 21 17 22 24 ...
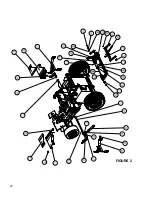
Страница 40: ...40 FIGURE 3 2 7 1 2 4 6 8 1 0 1 1 1 2 5 1 3 1 4 1 6 1 7 1 8 1 9 2 0 2 1 2 2 2 3 2 4 2 5 9 7 3 1 5 2 8 2 6 ...
Страница 42: ...42 FIGURE 4 4 1 2 26 5 6 7 8 9 10 11 12 13 14 15 16 17 18 19 20 21 22 23 24 25 27 28 29 3 29 ...
Страница 44: ...44 FIGURE 5 16 4 6 2 7 10 11 13 11 14 11 13 11 15 11 8 11 15 8 21 17 7 18 19 5 3 1 2 6 22 20 8 8 12 12 21 9 ...
Страница 45: ...I TRIM 45 FIGURE 5 PEDAL ASSY HYD PUMPS ...
Страница 46: ...46 FIGURE 6A FIGURE 6B ...
Страница 47: ...I TRIM 47 FIGURE 6A FRONT AXLE FUEL TANK AND FRAME FIGURE 6B FRONT WHEEL ASSY ...
Страница 55: ...I TRIM 55 FIGURE 12 HYDRAULIC WHEEL MOTORS STEERING ...
Страница 60: ...60 ...
Страница 62: ...62 ...


