background image

© National Instruments Corporation

vii

VXI-1200 User Manual

Table

of

Contents

About This Manual

Organization of This Manual........................................................................................xi
Conventions Used in This Manual................................................................................xii
Customer Communication ............................................................................................xii

Chapter 1
Getting Started

What You Need to Get Started .....................................................................................1-1
Optional Equipment......................................................................................................1-1
Key Features .................................................................................................................1-2

Ease of Use .....................................................................................................1-2
Portable Bench-Top Mainframe .....................................................................1-3
Three Slot Locations for B-Size VXI/VME Modules....................................1-4
Rack-Mount Configuration (5U Footprint)....................................................1-5

Modular Mainframe Design..........................................................................................1-6
720 Watts Available DC Power....................................................................................1-7
High-Capacity Positive-Pressure Cooling system ........................................................1-8

Bench-Top Cooling System ...........................................................................1-8
Rack-Mount Cooling System .........................................................................1-9

Rack-Mount Options ....................................................................................................1-10
Backplane......................................................................................................................1-10

Chapter 2
Configuring the VXI-1200

AC Mains Power...........................................................................................................2-1
Site Considerations .......................................................................................................2-2
Select VXIbus Slot 0 Controller Location....................................................................2-2
Installing VXI Modules ................................................................................................2-3
Installing and Removing Card-Guide Covers (Airflow Directors) ..............................2-4
Installing Filler Panels ..................................................................................................2-6
Installing ASFP Panel ...................................................................................................2-6
Installing Rack-Mount Door .........................................................................................2-7

Содержание VXI-1200

Страница 1: ...VXI 1200 User Manual December 1996 Edition Part Number 321404A 01 Copyright 1996 National Instruments Corporation All Rights Reserved ________________________________________________...

Страница 2: ...0 Austria 0662 45 79 90 0 Belgium 02 757 00 20 Canada Ontario 905 785 0085 Canada Qu bec 514 694 8521 Denmark 45 76 26 00 Finland 09 527 2321 France 01 48 14 24 24 Germany 089 741 31 30 Hong Kong 2645...

Страница 3: ...nal Instruments must be brought within one year after the cause of action accrues National Instruments shall not be liable for any delay in performance due to causes beyond its reasonable control The...

Страница 4: ...l area is likely to cause harmful interference in which case the user will be required to correct the interference at his own expense Notices to User Changes or modifications not expressly approved by...

Страница 5: ...prong adapter This will defeat the protective feature of the third conductor in the power cord Maintenance and calibration procedures sometimes call for operation of the unit with power applied and pr...

Страница 6: ...I VME Modules 1 4 Rack Mount Configuration 5U Footprint 1 5 Modular Mainframe Design 1 6 720 Watts Available DC Power 1 7 High Capacity Positive Pressure Cooling system 1 8 Bench Top Cooling System 1...

Страница 7: ...11 Chapter 4 Understanding the VXI 1200 Power Supply 4 2 Power Supply Interconnection 4 2 Power Supply Protections 4 2 Backplane 4 3 Backplane Interconnections 4 3 Cooling System 4 4 Cooling the Powe...

Страница 8: ...em 1 8 Figure 1 7 VXI 1200 Rack Mount Configuration Positive Pressure Cooling System 1 9 Figure 2 1 Select VXIbus Slot 0 Controller Location 2 3 Figure 2 2 Airflow Directors 2 4 Figure 2 3 Filler Pane...

Страница 9: ...DC Current 1 7 Table 3 1 J415 Rear Panel Monitor Control Connector 3 6 Table 3 2 P1 Connector Pinouts 3 8 Table 3 3 P2 Connector Pinouts for All Non Slot 0 Locations 3 9 Table 3 4 P2 Connector Pinout...

Страница 10: ...es procedures to install and configure the VXI 1200 Chapter 3 Operating the VXI 1200 explains the front and rear panel controls and indicators and describes how to use the VXI 1200 Chapter 4 Understan...

Страница 11: ...es emphasis a cross reference or an introduction to a key concept Abbreviations acronyms metric prefixes mnemonics symbols and terms are listed in the Glossary Customer Communication National Instrume...

Страница 12: ...ows either the C0 slot or B0 slot to function as the mainframe VXIbus Slot 0 location The VXI 1200 fully complies with the VXIbus Specification Revision 1 4 requirements and is VXIplug play compatible...

Страница 13: ...iguration of backplane switch settings or jumpers has been eliminated Universal AC Input The VXI 1200 AC input is both auto voltage and auto frequency ranging The chassis does not require the configur...

Страница 14: ...Top Mainframe The VXI 1200 is a portable streamlined high performance 9 slot VXI mainframe that is only 5U 8 720 in wide when used in a bench top configuration as shown in Figure 1 1 14 017 8 720 C Si...

Страница 15: ...1200 backplane can accommodate up to six C size VXI modules and up to three B size VXI or VME modules The plug in Personality module allows either the C0 slot or B0 slot to function as the mainframe...

Страница 16: ...rporation 1 5 VXI 1200 User Manual Rack Mount Configuration 5U Footprint The VXI 1200 mainframe is designed for rack mounting in a 5U tall 8 720 in footprint 8 720 Rack Mount Ear Cable Duct 19 00 Figu...

Страница 17: ...Corporation Modular Mainframe Design The VXI 1200 highly modular design is virtually wireless with low MTTR and high MTBF B0 B1 B2 Rear Removable Fan Blind Mate Pluggable Power Supply Rear Removable F...

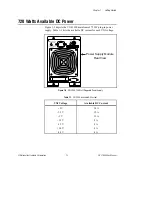
Страница 18: ...he VXI 1200 mainframe s 720 W plug in power supply Table 1 1 lists the available DC current for each VXI voltage Power Supply Module Rear View Figure 1 5 VXI 1200 720 Watt Pluggable Power Supply Table...

Страница 19: ...ng System The VXI 1200 uses forced air positive pressure cooling to direct air to the VXI modules Bench Top Cooling System Figure 1 6 details the cooling system in the bench top configuration Rear Air...

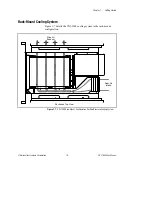
Страница 20: ...1 9 VXI 1200 User Manual Rack Mount Cooling System Figure 1 7 details the VXI 1200 cooling system in the rack mount configuration Rear Air Intake Side Air Exhaust Sectioned Top View Figure 1 7 VXI 120...

Страница 21: ...or VME modules The plug in Personality module allows either the C0 slot or B0 slot to function as the mainframe VXIbus Slot 0 location The VXI 1200 has a jumperless auto configurable backplane using a...

Страница 22: ...s or optional filler panels Connect safety ground Reconfigure fan speed range HI LO setting AC Mains Power The VXI 1200 AC input is both auto voltage and auto frequency ranging and requires no voltage...

Страница 23: ...figure the VXI 1200 to locate the VXIbus Slot 0 controller in the rear B0 slot freeing one full C sized instrument slot Refer to Figure 2 1 as you follow these steps to configure the mainframe to oper...

Страница 24: ...ule to the front of the mainframe until the module connectors mate solidly with the backplane connectors Secure the module s front panel to the mainframe using the module s front panel mounting screws...

Страница 25: ...m when using airflow directors do not cover more than three empty slots at any time If module density is low space airflow directors evenly across the mainframe 1 2 3 4 Figure 2 2 Airflow Directors 1...

Страница 26: ...ide 3 6 With a slotted screwdriver or similar flat bladed tool depress the spring hook 4 at a slight downward angle applying light pressure to the logo area This will cause the snap in hook to firmly...

Страница 27: ...ance you should install optional filler panels into unused or empty slots Secure with two captive mounting screws Refer to Figure 2 3 Blank Panel Mounting Screws Figure 2 3 Filler Panels Installing AS...

Страница 28: ...mount kits for the VXI 1200 are included in the kit that is shipped with the rack mount option When you are finished installing the rack mount kit install the rack mount door as shown in Figure 2 4 C...

Страница 29: ...s a common ground connection between instruments Warning For your protection from electrical shock when operating at mains frequencies greater than 63 Hz connect the chassis safety ground terminal to...

Страница 30: ...2 9 VXI 1200 User Manual Fan Speed Range You can manually select between full or reduced fan speed by adjusting the position of the full three quarter fan speed switch Refer to Figure 2 6 B0 B1 B2 Fa...

Страница 31: ...g the VXI 1200 3 Chapter This chapter explains the front and rear panel controls and indicators and describes how to use the VXI 1200 Figures 3 1 and 3 2 show the VXI 1200 front and rear respectively...

Страница 32: ...Grounding Screw J415 Monitor Control Fan Full 3 Quarter Speed Switch Module Cooling Fan Assembly Concealed Handle Power Supply J400 AC Input Connector F400 AC Fuse Figure 3 2 VXI 1200 Rear View See th...

Страница 33: ...VXI 1200 User Manual Powering on the Mainframe Figure 3 3 shows the steps you should perform when powering on the mainframe B0 B1 B2 Ensure AC Power is Connected Observe Power Indicator is Illuminated...

Страница 34: ...ents Corporation Using Remote Power On Standby Switching Find the Monitor Control connector on the VXI 1200 at location J415 see Figure 3 4 Pin Function 15 Remote INHIBIT 7 11 Logic Ground GND B0 B1 B...

Страница 35: ...he remote switch shorting pin J415 15 to logic ground INHIBIT to GND or by driving J415 15 to a TTL low state with an open collector driver that can sink 5 mA of current The OC voltage at J415 15 is 3...

Страница 36: ...ACFAIL VXIbus ACFAIL Input or Monitor Output see note following this table 7 GND Logic Ground 8 RSV Reserved 9 24 VMON VXIbus Voltage Monitor Output 10 12 VMON VXIbus Voltage Monitor Output 11 GND Lo...

Страница 37: ...he P1 connector pinouts for all slots in the VXI 1200 Table 3 3 shows the P2 connector pinouts for all non Slot 0 slots Table 3 4 shows the P2 connector pinouts for the VXIbus Slot 0 located in either...

Страница 38: ...06 BG1OUT D14 8 D07 BG2IN D15 9 GND BG2OUT GND 10 SYSCLK BG3IN SYSFAIL 11 GND BG3OUT BERR 12 DS1 BR0 SYSRESET 13 DS0 BR1 LWORD 14 WRITE BR2 AM5 15 GND BR3 A23 16 DTACL AM0 A22 17 GND AM1 A21 18 AS AM2...

Страница 39: ...D 8 LBUSA02 A28 LBUSC02 9 LBUSA03 A29 LBUSC03 10 GND A30 GND 11 LBUSA04 A31 LBUSC04 12 LBUSA05 GND LBUSC05 13 5 2 V 5 V 2 V 14 LBUSA06 D16 LBUSC06 15 LBUSA07 D17 LBUSC07 16 GND D18 GND 17 LBUSA08 D19...

Страница 40: ...8 MODID10 A28 LBUSC02 9 MODID09 A29 LBUSC03 10 GND A30 GND 11 MODID08 A31 LBUSC04 12 MODID07 GND LBUSC05 13 5 2 V 5 V 2 V 14 MODID06 D16 LBUSC06 15 MODID05 D17 LBUSC07 16 GND D18 GND 17 MODID04 D19 L...

Страница 41: ...to a supply pin at J415 Connect the reference lead of the voltmeter to one of the ground pins Compare each voltage reading to the values listed in Table 3 5 Table 3 5 Power Supply Voltages at J415 J4...

Страница 42: ...y backplane and cooling system Figure 4 1 shows the functional block diagram of the VXI 1200 Backplane Slot B2 Slot B1 Slot B0 Monitor Control Fan Full 3 Quarter Speed Switch AC In Slot C3 Slot C4 Slo...

Страница 43: ...ch results in improved dynamic current performance Refer to Appendix A Specifications for further details Power Supply Protections The seven VXIbus power supply outputs are protected for the following...

Страница 44: ...ltages and currents to modules Connects the VME communications interface across P1 and P2 to all slots Connects the VXI extensions across P2 rows a and c to all slots There is no VXI local bus connect...

Страница 45: ...ressurized plenum below the VXI modules The high pressure in the plenum forces the air through a metered plate into the P2 connector side of the VXI modules The air passing over components in the modu...

Страница 46: ...manual describe removal and replacement procedures to repair the VXI 1200 to the module level Module level repairs are accomplished by exchanging faulty modules with known good modules or parts No co...

Страница 47: ...rd handling precautions for static sensitive devices while servicing the mainframe Always wear a grounded wrist strap or equivalent while servicing the mainframe Inspection and Cleaning The mainframe...

Страница 48: ...lint free cloth or a soft bristle brush If any dirt remains wipe with a cloth moistened in a mild soap solution Remove any soap residue by wiping with a cloth moistened with clear water Do not use abr...

Страница 49: ...own in Figure 5 1 Figure 5 1 Cleaning the Fan Filters 1 Pry off the plastic grill retaining the supply fan filter Use a flat blade screwdriver if necessary 2 Remove the supply fan filter toward the re...

Страница 50: ...Fuseholder Figure 5 2 Removing and Replacing the AC Mains Fuse 1 Ensure that the AC mains input J400 is disconnected 2 Insert a flat blade screwdriver into the fuse carrier slot at F400 in the power...

Страница 51: ...outlet Power On Standby switch not switched on Set the front Power On Standby switch to the ON position Refer to the Powering on the Mainframe section in Chapter 3 Remote inhibit input on the rear pan...

Страница 52: ...put Voltage Range 90 to 250 VRMS Input Frequency Range 47 to 440 Hz 120 V operation 47 to 63 Hz 230 V operation Power Consumption 1440 W line power maximum Fuse Rating 90 to 250 V Operation 207 to 250...

Страница 53: ...The Power On Standby switch must be in Power On position prior to use of remote inhibit Power Factor Correction Over entire input voltage range 47 to 63 Hz DC Output Specifications Characteristic Des...

Страница 54: ...V 600 mV 360 mV 24 V 1 2 V 720 mV Maximum Load Ripple Noise Voltage Ripple Noise 24 V 150 mVpp 12 V 50 mVpp 5 V 50 mVpp 2 V 50 mVpp 5 2 V 50 mVpp 12 V 50 mVpp 24 V 150 mVpp Maximum Induced Ripple Noi...

Страница 55: ...iption Per Slot Cooling Capacity Typically 80 W per slot 0 35 mm H20 Figure A 1 shows the worst case slot cooling curve of the mainframe Cooling System Forced air circulation positive pressurization S...

Страница 56: ...VXI 1200 User Manual 0 5 1 0 1 5 2 0 0 1 2 3 4 5 6 7 H2O mm L Sec Figure A 1 Mainframe Worst Case Slot Cooling Curve Safety Characteristic Description Safety Characteristics EN61010 1 IEC Characterist...

Страница 57: ...15 000 ft Vibration 0 013 in double amplitude 5 to 55 Hz Functional Shock Operating Half sine 30 g 11 ms duration EMI FCC Class A Verified EC Certified Immunity Enclosure Radio Frequency Electromagnet...

Страница 58: ...Grant Interrupt Acknowledge Solid state auto configuring jumperless VXIbus CLK10 Distribution Full differential Physical Characteristic Description Overall Dimensions Standard Mainframe 7U Height Widt...

Страница 59: ...e Electronic Services Bulletin Board Support National Instruments has BBS and FTP sites dedicated for 24 hour support with a collection of files and documents to answer most common customer questions...

Страница 60: ...s no National Instruments office in your country contact the source from which you purchased your software to obtain support Telephone Fax Australia 02 9874 4100 02 9874 4455 Austria 0662 45 79 90 0 0...

Страница 61: ...nstruments hardware or software products related to this problem include the configuration forms from their user manuals Include additional pages if necessary Name Company Address Fax Phone Computer b...

Страница 62: ..._________________________________________ Personality Module Orientation C0 or B0 slot ________________________________________ Fan Speed ______________________________________________________________...

Страница 63: ...ber 1996 Part Number 321404A 01 Please comment on the completeness clarity and organization of the manual If you find errors in the manual please record the page numbers and describe the errors Thank...

Страница 64: ...1 VXI 1200 User Manual Glossary Prefix Meaning Value n nano 10 9 m milli 10 3 c centi 10 2 k kilo 103 M mega 106 Symbols degrees equal or greater than equal or less than V change in voltage per cent...

Страница 65: ...J2 BERR Bus error an error that signals failed access to an address Bus errors occur with low level accesses to memory and usually involve hardware with bus mapping capabilities For example nonexiste...

Страница 66: ...lectrostatic discharge F ft feet G GND ground H Hz hertz cycles per second I IACK interrupt acknowledge IEC International Electrotechnical Commission an organization that sets international electrical...

Страница 67: ...or installation in Slot 0 of a VXIbus mainframe This device is unique in the VXIbus system in that it performs the VMEbus system controller functions including clock sourcing and arbitration for data...

Страница 68: ...nual T Tr Th rise time hold time TTL transistor transistor logic U U Eurocard size V V volts VAC volts alternating current VDC volts direct current VME Versa Module Eurocard or IEEE 1014 Vpp volts pea...

Страница 69: ...ctions 4 3 interconnections 4 3 specifications A 7 backplane connections P1 connector pinouts table 3 8 P2 connector pinouts all non Slot 0 locations table 3 9 VXIbus Slot 0 table 3 10 bench top cooli...

Страница 70: ...support B 1 functional check 3 11 fuse for AC mains blown fuse table 5 6 removing and replacing 5 5 G GND signal table 3 6 ground connecting 2 8 I inspection of VXI 1200 5 2 installation See configura...

Страница 71: ...plug in power supply available DC current table 1 7 illustration 1 7 AC mains power 2 1 cooling 4 4 electrical specifications A 1 to A 4 AC input A 1 to A 2 DC output A 2 to A 4 interconnections 4 2...

Страница 72: ...ic components e g power supply block diagram 4 1 ease of use 1 2 features 1 1 to 1 5 front view figure 3 1 optional equipment 1 1 overview backplane 1 10 cooling system 1 8 to 1 9 modular mainframe de...

Отзывы: