Digital I/O Connections
Figure 3. Connecting to the DIO Channels
NI PCIe-7822R
Power
FPGA
Connection
Accessory
DIO0
DIO1
DIO30
DIO31
Connector X (DIO)
1
2
1. High-speed signal frequencies up to 80 MHz with logic levels configured as 1.2 V, 1.5 V, 1.8 V, 2.5 V, or
3.3 V
2. LED
The DIO channels connect to the FPGA through protection circuitry, which has overvoltage
and undervoltage protection as well as overcurrent protection.
Note
Refer to the device specifications, available at
information.
When the system powers on, the DIO channels are set as input low with pull-down resistors.
To set another power-on state, you can configure the PCIe-7822R to load a VI when the
system powers on. The VI can then set the DIO lines to any power-on state. Visit
and enter
RSeries_PowerUpStates
to learn more about configuring the power-up states
for the PCIe-7822R.
All the DIO channels on Connectors 0 through 3 are routed with a 50 Ω characteristic trace
impedance. Route all external circuitry with a similar impedance to ensure best signal quality.
NI recommends performing signal integrity measurements to test the affect of signal routing
with the cable and connection accessory for your application.
Installing Noise Suppression Ferrites
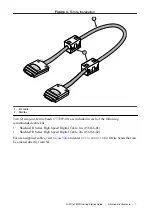
For each connected I/O cable, install two (2) snap-on, ferrite beads (777297-01), one on each
end of the cable, as close to the connector as practical.
6
|
ni.com
|
NI PCIe-7822R Getting Started Guide


