background image

9.

Replace the computer cover.

10. Plug in the computer.

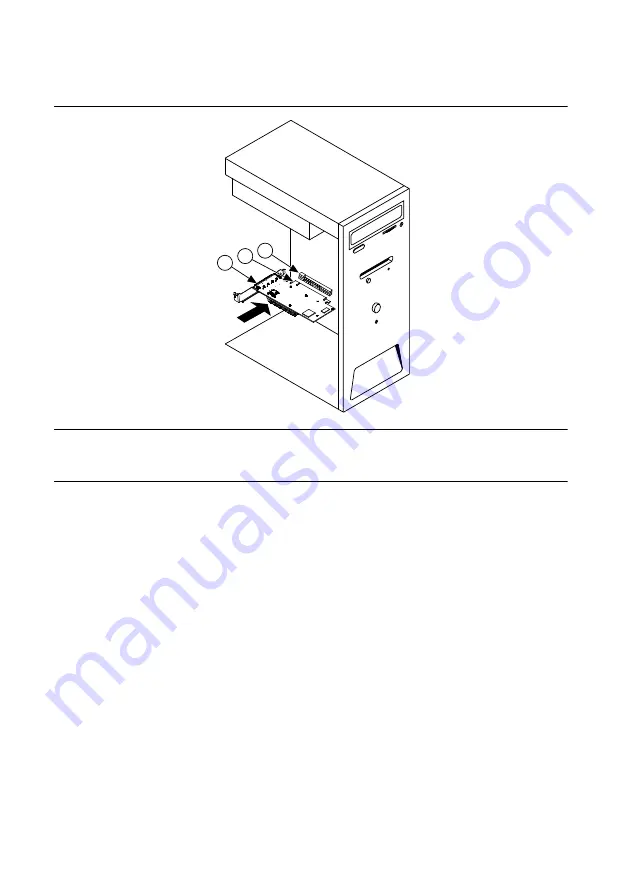
Figure 9.  Installing the PCIe-8398

1

2

3

1. PCIe-8398
2. PCI Express x16 Card-Edge Connector
3. PCI Express Slot (x16)

Installing the Low-Profile Bracket on the PCIe-8398
(Optional)

To install the PCIe-8398 in a host computer that requires a low-profile height card, you must
replace the front bracket with the low-profile bracket included with your kit. Complete the
following steps to replace the bracket.
1.

Remove the standard height front bracket already installed on your PCIe-8398 card by
removing the two 4-40 × 5/32 in. Phillips head screws that attach the bracket to the card.
Note that the two mounting tabs for the standard height bracket rest against the back side
of the card. Set the two screws aside to re-use when installing the low-profile bracket.

MXI-Express Gen-3 x16 User Manual

  | 

© National Instruments

  | 

13

Содержание MXI-Express Gen-3 x16

Страница 1: ... the protection the controllers provide Contents Overview 2 Description and Features 3 Functional Block Diagram 4 Basic MXI Express Gen 3 x16 Systems 6 Larger MXI Express Gen 3 x16 Systems 7 Connection Options 8 Compatibility with Host PCs 10 Installation and Configuration 11 Equipment Needed 11 Unpacking 11 Hardware Installation 12 Installing a PCIe 8398 12 Installing the Low Profile Bracket on t...

Страница 2: ...onality such as chassis and controller identification trigger routing and slot detection install the PXI Platform Services software included with your kit You also can find this software at ni com updates by searching for PXI Platform Services The basic PCI Express lane consists of dual unidirectional differential links implemented as one transmit pair and one receive pair The link between the PC ...

Страница 3: ...iple chassis in a daisy chain configuration The following table lists the models and their features for comparison Table 2 Feature Comparison of Available MXI Express Gen 3 x16 Interfaces Model Slot Type Number of Lanes Cable Support PCIe 8398 PCI Express Gen 3 x16 16 MXI Express x8 PXIe 8394 PXI Express Peripheral Expansion Module 16 MXI Express x8 MXI Express x4 PXIe 8398 PXI Express Controller ...

Страница 4: ...nal Block Diagram Figure 1 PCIe 8398 156877x 01L Block Diagram MXI Express Gen 3 x16 PWR LNK Status LED PCI Express Gen 3 x16 PCI Express Gen 3 x16 PCI Express Switch 4 ni com MXI Express Gen 3 x16 User Manual ...

Страница 5: ...and PXIe 8399 work in both two and four link chassis A four link chassis supports four links up to x4 width each for a maximum of 16 PCI Express lanes A two link chassis supports one link up to x8 and a second link up to x16 for a maximum of 24 PCI Express lanes The PXIe 8398 and PXIe 8399 maximize the use of all available backplane lanes for either configuration Note National Instruments offers G...

Страница 6: ...lish Gen 3 backplane links A chassis can support up to a x8 link Basic MXI Express Gen 3 x16 Systems The simplest MXI Express Gen 3 x16 system consists of a PCIe 8398 in a PC connected to a PXIe 8398 in the controller slot of a PXI Express chassis as shown in the following figure Figure 4 Example of a Basic MXI Express Gen 3 x16 Link Topology Note In this manual whenever a PXI Express chassis is r...

Страница 7: ...I Express Gen 3 x16 System Expansion Topology If you are using a PC to control multiple chassis but do not have additional PCI Express slots in the PC you can use a PXIe 8399 to daisy chain to an additional chassis daisy chain topology The PXIe 8399 supports two x16 links on its front panel and you can connect the second link to an additional chassis For example you could set up two chassis using ...

Страница 8: ...e 7 Example of a MXI Express Gen 3 x16 System Expansion Topology Using a PXIe 8394 in Each Chassis Systems need not be exclusively star or daisy chain It is generally preferable to use a star topology but you can daisy chain or star additional chassis as needed There are additional choices described in the next section if the full x16 bandwidth is not required Connection Options The MXI Express Ge...

Страница 9: ...d ports 3 4 will connect to 3 4 For the PXIe 8399 connect daisy chain ports 5 and 6 to ports 1 and 2 on the PXIe 8398 or PXIe 8399 Figure 8 Connection Options PXIe 8399 PXIe 8398 PXIe 8394 PCIe 8398 PXIe 8399 PXIe 8398 PXIe 8394 PWR LINK PWR LINK PWR LINK PWR LINK 4 1 4 3 2 1 4 3 2 1 4 3 2 1 8 7 6 5 PWR LINK MXI Express MXI Express MXI Express Port 1 of the PXIe 8398 and PXIe 8399 is upstream faci...

Страница 10: ...s but it may comprise one two or four ports to form a x4 x8 or x16 link The following table lists possible configurations Module Configuration 1 Configuration 2 Configuration 3 Configuration 4 PCIe 8398 1 4 x16 1 2 x8 3 4 x8 PXIe 8394 PXIe 8398 PXIe 8399 ports 1 4 1 4 x16 1 2 x8 3 4 x8 1 2 x8 3 x4 4 x4 1 x4 2 x4 3 x4 4 x4 PXIe 8399 ports 5 8 5 8 x16 5 6 x8 7 8 x8 5 6 x8 7 x4 8 x4 5 x4 6 x4 7 x4 8 ...

Страница 11: ...ess x8 cables One PXIe 8398 Connecting Additional Expansion Chassis to a System with a PXIe 8394 Chassis to daisy chain from Expansion chassis to daisy chain to One Gen 3 MXI Express x8 cable One PXIe 8398 or PXIe 8399 One PCIe 8394 Note Not all PCI Express expansion slots that have x16 physical connectors are electrically capable of x16 PCI Express operation Check with the motherboard manufacture...

Страница 12: ... the following steps to install the PCIe 8398 in your computer 1 Power off your computer Caution To protect both yourself and the computer from electrical hazards your computer should remain off until you finish installing all hardware as instructed 2 Remove the top cover or access port to the PCI Express expansion slots 3 Touch the metal part of the power supply case inside the computer to discha...

Страница 13: ...he front bracket with the low profile bracket included with your kit Complete the following steps to replace the bracket 1 Remove the standard height front bracket already installed on your PCIe 8398 card by removing the two 4 40 5 32 in Phillips head screws that attach the bracket to the card Note that the two mounting tabs for the standard height bracket rest against the back side of the card Se...

Страница 14: ...de of the card for the low profile bracket Ensure that the LED is situated in the display hole correctly 3 Align the mounting holes on the card with the threaded holes on the mounting tabs of the bracket and insert the screws from the top side 4 Tighten each screw to a maximum torque of 5 in lb 0 565 N m Installing a PXIe 8398 PXIe 8399 or PXIe 8394 The following table provides information on whic...

Страница 15: ...icity that might be on your clothes or body 4 Make sure the injector ejector handle is in its downward position Be sure to remove all connector packaging and protective caps from retaining screws on the module Align the PXI Express board with the card guides on the top and bottom of the system controller slot Caution Do not raise the injector ejector handle as you insert the PXI Express board It w...

Страница 16: ... 11 Example PXI Express Board Installation In a PXI Express Chassis 3 1 4 2 1 PXI Express CompactPCI Express Chassis 2 PXI Express Board 3 Ejector Handle in Down Position 4 Injector Ejector Rail Cabling The following table shows the various MXI Express x8 copper cables available from National Instruments Table 4 National Instruments MXI Express x8 Copper Cables Cable Length Meters Description Part...

Страница 17: ...nd powered up system should report a valid link and power status on all of these boards once the host PC is powered on Refer to the LED Indicators section for more information Typical PCI Express switches are used to add PCI devices to a PCI hierarchy in which all the bridges and devices are contained within a single chassis Because of this BIOSes and operating systems make the assumption that all...

Страница 18: ...is out of spec Solid Amber Power is within spec no cable link or not all cables linked Solid Green Power is within spec links established on all connected cables 1 To clear this state remove all power from the board Ensure the heatsink is dust free and check for air blockages in the chassis Pay special attention to the solid red state of the PCIe 8398 front panel LED In the event of a fan failure ...

Страница 19: ...rimarily off blinks on three times One or two lanes linked at PCI Express Gen 3 Primarily off blinks on twice One or two lanes linked at PCI Express Gen 2 Primarily off blinks on once One or two lanes linked at PCI Express Gen 1 Note The following table lists the maximum theoretical throughput of PCI Express lanes Raw Bitrate is the speed of bits on the wire Bitrate After Encoding is the speed of ...

Страница 20: ... smaller PCB and may be visible through openings on the top of the chassis They represent from top right to bottom left ports 5 6 7 and 8 Figure 13 PXIe 8399 LEDs for Ports 5 8 5 6 7 8 LEDs for Backplane Links Onboard link indicators for the first 16 backplane lanes are on the top side of the board as shown in the following figure 20 ni com MXI Express Gen 3 x16 User Manual ...

Страница 21: ...n these slots determine the actual link established to the PXIe 8398 or PXIe 8399 and the corresponding backplane link status LED is set appropriately For a 4 link backplane the LEDs represent links 1 2 3 and 4 from top to bottom For a 2 link backplane the top two LEDs represent link 1 x8 max and the bottom two LEDs indicate the status of the first eight lanes of link 2 x16 max For the PXIe 8394 t...

Страница 22: ...r PXI Express slot This technology will be recognized as a collection of PCI to PCI bridges to the operating system and has CompactPCI Express level support without any additional software Note For full PXI PXI Express functionality such as chassis and controller identification trigger routing and slot detection install the PXI Platform Services software included with your kit You also can find th...

Страница 23: ...s specific NI assembly number in parentheses Ensure that the specifications of interest match the NI assembly number printed on either the front or back side of the board Note x denotes all letter revisions of the assembly PCIe 8398 156877x 01L Specifications Note These specifications are typical at 25 C unless otherwise stated and are subject to change without notice Physical Dimensions 6 89 cm 1...

Страница 24: ... C to 70 C Tested in accordance with IEC 60068 2 1 and IEC 60068 2 2 Relative humidity range 5 to 95 noncondensing Tested in accordance with IEC 60068 2 56 Note Clean the PCIe 8398 with a soft nonmetallic brush Make sure that the device is completely dry and free from contaminants before returning it to service Safety This product is designed to meet the requirements of the following standards of ...

Страница 25: ...ine Product Certification section CE Compliance This product meets the essential requirements of applicable European Directives as follows 2014 35 EU Low Voltage Directive safety 2014 30 EU Electromagnetic Compatibility Directive EMC Online Product Certification Refer to the product Declaration of Conformity DoC for additional regulatory compliance information To obtain product certifications and ...

Страница 26: ... specifications are typical at 25 C unless otherwise stated and are subject to change without notice Physical Dimensions 10 7 cm 17 5 cm 4 4 in 6 9 in Maximum cable length 3 m Slot requirements One system slot PXI Express or CompactPCI Express Compatibility Fully compatible with the PXI Express Hardware Specification Revision 1 0 PICMG CompactPCI Express EXP 0 R2 0 Specification and the PCI Expres...

Страница 27: ... 2 Meets MIL PRF 28800F Class 3 limits Relative humidity range 5 to 95 noncondensing Tested in accordance with IEC 60068 2 56 Caution Clean the PXIe 8398 with a soft nonmetallic brush Make sure that the device is completely dry and free from contaminants before returning it to service Shock and Vibration Operating shock 30 g peak half sine 11 ms pulse Tested in accordance with IEC 60068 2 27 Meets...

Страница 28: ...rope Canada Australia and New Zealand per CISPR 11 Class A equipment is intended for use only in heavy industrial locations Note Group 1 equipment per CISPR 11 is any industrial scientific or medical equipment that does not intentionally generate radio frequency energy for the treatment of material or inspection analysis purposes Note For EMC declarations and certifications and additional informat...

Страница 29: ...r more information about how to recycle NI products in your region visit ni com environment weee 电子信息产品污染控制管理办法 中国 RoHS 中国客户 National Instruments 符合中国电子信息产品中限制使用某些有害物 质指令 RoHS 关于 National Instruments 中国 RoHS 合规性信息 请登录 ni com environment rohs_china For information about China RoHS compliance go to ni com environment rohs_china PXIe 8399 156874x 02L Specifications Note These specifications are typic...

Страница 30: ...ts MIL PRF 28800F Class 3 low temperature limit and MIL PRF 28800F Class 2 high temperature limit Relative humidity range 10 to 90 noncondensing Tested in accordance with IEC 60068 2 56 Storage Environment Ambient temperature range 40 C to 71 C Tested in accordance with IEC 60068 2 1 and IEC 60068 2 2 Meets MIL PRF 28800F Class 3 limits Relative humidity range 5 to 95 noncondensing Tested in accor...

Страница 31: ...dards for electrical equipment for measurement control and laboratory use EN 61326 1 IEC 61326 1 Class A emissions Basic immunity EN 55011 CISPR 11 Group 1 Class A emissions AS NZS CISPR 11 Group 1 Class A emissions FCC 47 CFR Part 15B Class A emissions ICES 001 Class A emissions Note In the United States per FCC 47 CFR Class A equipment is intended for use in commercial light industrial and heavy...

Страница 32: ...n refer to the Minimize Our Environmental Impact web page at ni com environment This page contains the environmental regulations and directives with which NI complies as well as other environmental information not included in this document Waste Electrical and Electronic Equipment WEEE EU Customers At the end of the product life cycle all NI products must be disposed of according to local laws and...

Страница 33: ...85550 0x are passive Environment Maximum altitude 2 000 m Pollution Degree 2 Indoor use only Operating Environment Ambient temperature range 0 C to 55 C Tested in accordance with IEC 60068 2 1 and IEC 60068 2 2 Meets MIL PRF 28800F Class 3 low temperature limit and MIL PRF 28800F Class 2 high temperature limit Relative humidity range 10 to 90 noncondensing Tested in accordance with IEC 60068 2 56 ...

Страница 34: ...tromagnetic Compatibility This product meets the requirements of the following EMC standards for electrical equipment for measurement control and laboratory use EN 61326 1 IEC 61326 1 Class A emissions Basic immunity EN 55011 CISPR 11 Group 1 Class A emissions AS NZS CISPR 11 Group 1 Class A emissions FCC 47 CFR Part 15B Class A emissions ICES 001 Class A emissions Note In the United States per FC...

Страница 35: ... page at ni com environment This page contains the environmental regulations and directives with which NI complies as well as other environmental information not included in this document Waste Electrical and Electronic Equipment WEEE EU Customers At the end of the product life cycle all NI products must be disposed of according to local laws and regulations For more information about how to recyc...

Страница 36: ...ximum length for a MXI Express Gen 3 copper cable is 3 m National Instruments offers 3 m copper cables Refer to the Cabling section for more information MXI Express Gen 3 x16 Upgrade Questions What are some of the improvements in MXI Express Gen 3 x16 MXI Express Gen 3 x16 incorporates the latest technology to include Support for Gen 3 PCI Express slots Improved performance Modular cabling for fle...

Страница 37: ...g systems for NI PXI Platform Services If PXI Platform Services does not support your operating system you can still use MXI Express Gen 3 x16 as a PCI Express expansion solution However access to features such as chassis and controller identification trigger routing and slot detection will be lost Documentation Notice for Third Party Software This product includes code from WISHBONE I2C Master Co...

Страница 38: ...reements EULAs and third party legal notices in the readme file for your NI product Refer to the Export Compliance Information at ni com legal export compliance for the NI global trade compliance policy and how to obtain relevant HTS codes ECCNs and other import export data NI MAKES NO EXPRESS OR IMPLIED WARRANTIES AS TO THE ACCURACY OF THE INFORMATION CONTAINED HEREIN AND SHALL NOT BE LIABLE FOR ...

Отзывы: