Driver and
Reco
very Media
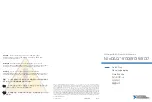
Documentation
Power Connector
SD Card Slot Cover
Screwdri
ver
Ferrites
NI cDA
Q-9133/91
35/9137
C
V2
C
V1
ACT/
LINK
ACT/
LINK
NI-XNET
CAN/LIN
10/100
/1000
10/100
/1000
INPUT
9–30V
46W MAX
V1
C
V2
C
PFI 0
1: SD AC
T
1 2
V1
C
V2
C
DO NOT SEP
AR
AT
E CONNECT
ORS WHEN
ENERGIZED IN HAZARDOUS LOCA
TIONS
USER1
RS-232
2
1
1
2
3
4
RESET
1: POWER
2: STAT
US
3: USER1
4: USER2
SD
NI CompactDAQ
NI cDAQ-9135
NA
TIONAL
INSTRUMENTS
1
2
3
4
5
6
7
8
PUSH
TO
EJECT
Contents I Contenu I Inhalt
内容
I
내용
I
内容
クイックスタート
시작하기
快速入门
注意
デバイスを取り付ける前に、すべての製品ドキュメントをお読みに
なり、安全、
、環境規制を遵守してください。
주의 디바이스를 설치하기 전에 모든 제품 관련 문서를 읽고 안전,
EMC, 환경 규정을 준수하는지 확인하십시오.
警告 安装设备之前,请阅读所有产品文档,确保符合安全、
以
及环境法规。
1 1
Connectez le contrôleur cDA
Q à la terre. Ensuite, inst
allez les modules d’E/S. R
eportez-vous
aux instructions d’utilisation du module pour ef
fect
uer les connexions de signal.
Erden Sie den cDA
Q-Controller. B
auen Sie anschließend die I/O-Module ein. Die
Verkabelung
jedes Moduls ist in der Modulanleitung besc
hrieben.
cDA
Q
コントローラをアースに接続します。 続いて、
I/O
モジュールを取り付けます。 信号接続につ
いては、モジュールの操作手順を参照してください。
cDA
Q
컨트롤러를 접지에
연결합니다. 그런
다음
I/O
모듈을 설치합니다. 신호
연결은 해당
모듈의 사용 설명서를
참조하십시오.
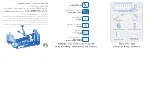
Connect the cDA
Q controller to earth ground. Then inst
all I/O modules. Ref
er to the module
operating instructions f
or signal connections.
连接
cDA
Q
至地。安装
I/O
模块。关于信号连接
,
见模块使用说明。
Useful Links I Liens utiles I Nützliche Links
役に立つリンク
I
유용한 링크
I
相关链接
Software
ni.com/downloads
Pinouts
In MAX, right-click
module name
AI1
AI2
AI3
AI4
AI5
1
2
3
4
5
Examples
ni.com/info
a
daqmxexp
Services and Support
ni.com/services
NI cDAQ-9133/9135/9137
Documentation
ni.com/manuals
a
9133
Accuracy and Mounting
ni.com/info
a
cdaqmounting
Содержание cDAQ-9133
Страница 1: ...cDAQ 9137...


