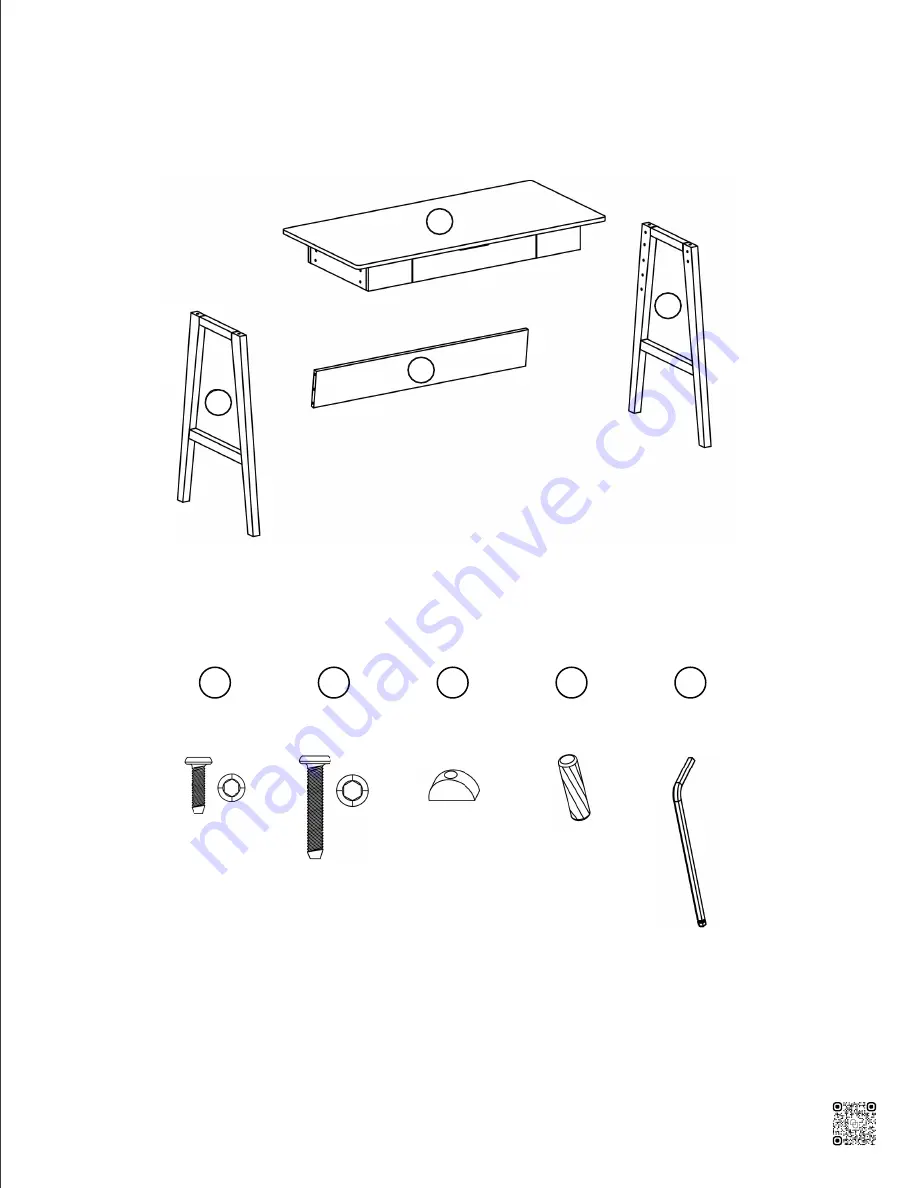
NATHAN JAMES Telos Скачать руководство пользователя страница 21

3

The goods

IMPORTANT

1. Do not tighten bolts / screws completely until all bolts / screws are lined up and  

inserted into holes.
2. Do not over tighten screws and bolts to avoid stripping.
3. Please use hand tools to assemble this product. Do not use power tools.

B

C

D

A

3

4

5

1

2

Содержание Telos

Страница 1: ...Lightweight Max 600 ft lbs Torque Output Adjustable Power Twin Hammer Silver 3 4 x 8 2 x 8 8 inches User Manual of Product 2 Ingersoll Rand 301B Air Die Grinder 1 4 Right Angle 21 000 RPM Ball Bearin...

Страница 2: ...Telos Storage Unit Let s build the 20 1119 Scan me Inspiration Digital Instructions Free Lifetime Warranty 50 5 0 MINU T E A S S E M B L Y...

Страница 3: ...t product damage during assembly Phillips head screwdriver Description Qty A Top Panel 1 B Bottom Panel 1 C Right Side Panel 1 D Left Side Panel 1 E Middle Partition Panel 1 F Right Shelf Panel 1 G Le...

Страница 4: ...ten bolts screws completely until all bolts screws are lined up and inserted into holes 2 Do not over tighten screws and bolts to avoid stripping 3 Please use hand tools to assemble this product Do no...

Страница 5: ...ion Qty 1 8 30mm Wooden Dowel 20 2 3 5x15mm Wood Screws 3 3 Cam Lock Bolt 20 4 Allen Key 1 5 Cam Lock 20 6 Plastic Connector 2 7 Anchor 2 8 M4 38mm Screw 2 9 M3 5 x 15mm Screw 2 10 Plastic Anti tip Te...

Страница 6: ...PORTANT 1 Do not tighten bolts screws completely until all bolts screws are lined up and inserted into holes 2 Do not over tighten screws and bolts to avoid stripping 3 Please use hand tools to assemb...

Страница 7: ...e Left Side Panel D You re getting the hang of this Let s get this thing fired up Lay down packaging carton or use carpet as a working surface Start by screwing on the Cam Lock Bolts 3 and to the Righ...

Страница 8: ...7 Screw on the Cam Lock Bolts 3 and Wooden Dowels 1 to the Top Panel A No this isn t Deja Vu Repeat with the bottom panel B Step 3 Step 4 A 1 3 1 1 1 B 3 1 1 1 1...

Страница 9: ...e time Screw on the Cam Lock Bolts 3 and Wooden Dowels 1 to the Middle Partition Panel E Step 5 You re halfway there After the Top Panel A to the Middle Partition Panel E with the Cam Locks 5 Step 6 1...

Страница 10: ...9 Attach the Bottom Panel B to the Middle Partition Panel E with the Cam Locks 5 Step 7 5 E B B E A...

Страница 11: ...10 Attach the Left Shelf G and Right Shelf F to the Middle Partition Panel E with the Cam Locks 5 Step 8 B G F E A E F 5 Time for some yoga Breathe in Breathe out Stretch Okay let s keep going...

Страница 12: ...11 Attach the Right Side Panel C to the Right Shelf F Top Panel A and Bottom Panel B with the Cam Locks 5 Step 9 F B A 5 A C 5 5 F C C...

Страница 13: ...12 Slide in the Back Panel H and then securely attach the Left Side Panel D Twist on the Center Leg I Step 10 6 D 5 H 11 I B A 5...

Страница 14: ...13 Tighten the Back Panel H with the Wood Screws 2 Step 11 H 2...

Страница 15: ...ttach the Plastic Connector 6 to the Back Panel H and securely attach the unit to the wall using the Plastic Strap 10 Step 12 Ta da Your Telos storage unit is officially done H 6 9 7 7 6 8 8 6 10 6 Te...

Страница 16: ...t with zero hassle We really don t want you to go through the hassle of re packaging your item and sending it back because let s be honest nobody has time for that No heartburn when we handle the retu...

Страница 17: ...NOT use outdoors Proper use Safety first fun later Safe use of this product starts with you Use this storage unit responsibly with the primary concern for your safety Follow assembly instructions car...

Страница 18: ...happy For starters thanks for being you Toll free at 1 866 619 1004 Help nathanjames com NathanJames com help We do our best to ensure your furniture arrives without any problems but occasionally mis...

Страница 19: ...Telos Desk Let s build the 19 1022 Scan me Inspiration Digital Instructions Free Lifetime Warranty 15 1 5 MINUT E A S S E M B L Y...

Страница 20: ...surface to prevent product damage during assembly Description Qty A Desk Top Frame 1 B Back Panel 1 C Left Frame Leg 1 D Right Frame Leg 1 1 Short Bolt 8 2 Long Bolt 2 3 Support Metal 2 4 Wood Dowel 8...

Страница 21: ...ten bolts screws completely until all bolts screws are lined up and inserted into holes 2 Do not over tighten screws and bolts to avoid stripping 3 Please use hand tools to assemble this product Do no...

Страница 22: ...like the illustration below B C D A D C Patience grasshopper don t screw the legs in just yet only place the wood dowels in for support This will help for step 2 keeping part B in place especially if...

Страница 23: ...5 1 1 1 1 5 Ok the time has come You can screw the legs in and carefully flip the table over we recommend grabbing a friend for this step Ta da Is it time for pizza yet Step 3...

Страница 24: ...with zero hassle We really don t want you to go through the hassle of re packaging your item and sending it back because let s be honest nobody has time for that No heartburn when we handle the retur...

Страница 25: ...NOT make temporary repairs DO NOT use outdoors Proper use Safety first fun later Safe use of this product starts with you Use this desk responsibly with the primary concern for your safety Follow asse...

Страница 26: ...happy For starters thanks for being you Toll free at 1 866 619 1004 Help nathanjames com NathanJames com help We do our best to ensure your furniture arrives without any problems but occasionally mis...

Отзывы: