background image


Note

Please backup your data of old HDD firstly. Because all the data in used HDD 

would lost after set-up. 

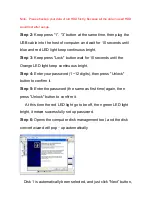
Step 2:

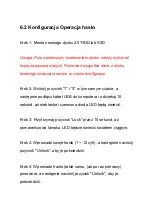
 Keep press 

“1”, “3” button at the same time, then plug the 

USB cable into the host of computer, and wait for 10 seconds until 

blue and red LED light keep continuous bright.   

Step 3:

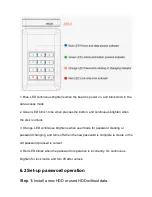
 Keep press "Lock" button wait for 10 seconds until the 

Orange LED light keep continuous bright. 

Step 4:

 Enter your password (1~12 digits), then press "Unlock" 

button to confirm it. 

Step 5: 

Enter the password (the same as first time) again, then 

press "Unlock" button to confirm it. 

At this time the red LED light go to be off, then green LED light 

bright, it mea

successfully set up password. 

Step 6: 

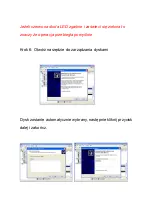
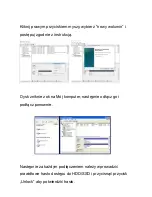
Opens the computer disk management tool, and the disk 

convert wizard will pop

up automatically


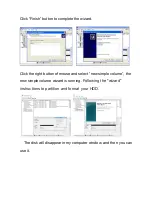
Disk 1 is automatically been sele

cted, and just click “Next” button,


Содержание Rhino

Страница 1: ...User Manual USB 3 0 Keypad Encrypted HDD Enclosure...

Страница 2: ...ssword input LED power encrypted status indicators Less screw for setup HDD Simple setup and installation 2 Specifications Interfaces USB 3 0 2 0 1 1 Supports USB Super speed 5Gbps operation Case mate...

Страница 3: ...Active USB port 4 Package contents USB 3 0 Keypad Encrypted HDD Enclosure User manual USB 3 0 cable 5 Hard disk installation Step 1 Push shown in the location and direction of picture to open the bott...

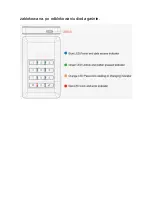
Страница 4: ...Step 3 Close the bottom cover push as shown the direction of picture 6 Hardware Setup 6 1 The LED behaviors...

Страница 5: ...Orange LED continuous brightens when user mode for password creating or password changing and turns off when the new password is complete to create or the old password pressed is correct 4 Red LED bl...

Страница 6: ...for 10 seconds until the Orange LED light keep continuous bright Step 4 Enter your password 1 12 digits then press Unlock button to confirm it Step 5 Enter the password the same as first time again th...

Страница 7: ...rd Click the right button of mouse and select new simple volume the new simple volume wizard is running Following the wizard instructions to partition and format your HDD The disk will disappear in my...

Страница 8: ...connect Encrypted HDD enclosure to computer by USB cable Step 2 Keep press Lock button wait for 10 seconds until the red LED and orange LED bright at the same time then loosen Lock button Step 3 Enter...

Страница 9: ...se a same enclosure and press the same password then allows accessing the data 3 What s the situation if changing password is failure ANS It s only need to enter the original password and it s still a...

Страница 10: ...Instrukcja obs ugi OBUDOWA ZEWN TRZNA SATA NATEC RHINO CODE 2 5 USB 3 0...

Страница 11: ...aksymalnie 4 TB Pasuje do wszystkich dysk w twardych 2 5 cala grubo 7 9 5mm Obs uga silnego AES 256 bitowego szyfrowania sprz towego bezproblemowo szyfruje wszystkie dane na dysku w czasie rzeczywisty...

Страница 12: ...dostarczane przez komputer Temperatura pracy 5 C do 50 C Temperatura przechowywania od 40 C do 70 C Wilgotno pracy 5 do 90 bez kondensacji 3 Wymagania systemowe Wymagania PC Minimum procesor Intel Pe...

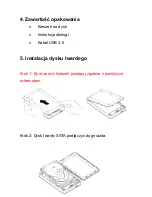
Страница 13: ...Zawarto opakowania Kiesze na dysk Instrukcja obs ugi Kabel USB 3 0 5 Instalacja dysku twardego Krok 1 By otworzy kiesze post puj zgodnie z poni szym schematem Krok 2 Dysk twardy SATA pod czy do gniazd...

Страница 14: ...ona je eli mruga oznacza to e na dysk pracuje 2 Zielona dioda LED miga raz podczas wci ni cia przycisku a wiat em ci g ym gdy dysk jest odblokowany 3 Pomara czowy LED rozja nia si podczas ci g ego try...

Страница 15: ...zablokowana po odblokowaniu dioda ga nie...

Страница 16: ...sk 1 i 3 w tym samym czasie a nast pnie pod cz kabel USB do komputera i odczekaj 10 sekund a niebieska i czerwona dioda LED b d wieci Krok 3 Przytrzymaj przycisk Lock przez 10 sekund a pomara czowa la...

Страница 17: ...ona dioda LED zga nie i za wieci si zielona to znaczy e operacja przebieg a pomy lnie Krok 6 Otw rz narz dzie do zarz dzania dyskami Dysk zostanie automatycznie wybrany nast pnie kliknij przycisk dale...

Страница 18: ...y wolumin i post puj zgodnie z instrukcj Dysk zniknie z okna M j komputer nast pnie od cz go i pod cz ponownie Nast pnie za ka dym pod czeniem nale y wprowadzi prawid owe has o dost pu do HDD SSD i pr...

Страница 19: ...rok 3 Wprowad istniej ce has o a nast pnie naci nij przycisk Unlock aby potwierdzi w tej chwili pomara czowa dioda powinna si wy czy Krok 4 Wpisz nowe has o a nast pnie naci nij przycisk Unlock aby je...

Страница 20: ...tarczy zakup tej samej obudowy 3 Co je eli zmiana has a si nie uda ODP To wystarczy wprowadzi oryginalne has o 4 Je li dysk twardy umie cimy w innej obudowie to nadal b dziemy mie do niego dost p ODP...

Отзывы: