background image


9

EN

www.napoleon.com

N415-0526 DEC 10. 19

Do not locate this gas grill in windy settings.  High winds adversely affect the cooking performance of the 

gas grill.  In extreme circumstances when consistent high winds come from directly behind the unit, heat 

can vent underneath the control panel. This may cause the control panel to become extremely hot to 

touch and the knobs to deform.  

Napoleon includes a wind deflector with your unit. It will help prevent the possibility of improper heat 

build-up.  

(Refer to your Quick Assembly Guide for installation instructions).

NOTE!

 Napoleon is not responsible for: over firing, blow outs caused by environmental conditions 

such as strong winds, or inadequate ventilation.

Cooking Instructions

Initial Lighting

: When lit for the first time, the gas grill emits a slight odor. This is a normal temporary 

condition caused by the “burn-in” of internal paints and lubricants used in the manufacturing process and 

does not occur again. Simply run the main burners on high for approximately one-half hour. 

Main Burner Use

:  When searing foods, we recommend preheating the grill by operating all main burn

-

ers in the high position with the lid closed for approximately 10 minutes.  Food cooked for short periods 

of time (fish, vegetables) can be grilled with the lid open. Cooking with the lid closed will ensure higher, 

more even temperatures that can reduce cooking time and cook meat more evenly. Food that has a cook

-

ing time longer than 30 minutes, such as roasts, can be cooked indirectly (with the burner lit opposite to 

the food placement). When cooking very lean meats, such as chicken breasts or lean pork, the grids can 

be oiled before pre-heating to reduce sticking. Cooking meat with a high degree of fat content can create 

flare-ups. Either trim the fat or reduce temperatures to inhibit this. Should a flare-up occur, move food 

away from the flames and reduce the heat. Leave the lid open.  Learn more grilling techniques and deli

-

cious recipes by acquiring Napoleon’s cookbooks.

Direct Cooking

: Place food to be cooked on the grill directly over the heat. This method is generally used 

for searing or for foods that do not require prolonged cooking times such as hamburgers, steaks, chicken 

pieces, or vegetables. The food is first seared to trap-in the juices and flavor, and then the temperature is 

lowered to finish cooking the food to your preference.

Indirect Cooking

: With one or more burners operating, place food to be cooked on the grill over a burner 

that is not operating. The heat circulates around the food, cooking slowly and evenly. Cooking with this 

method is much the same as cooking in your oven and is generally used for larger cuts of meats such 

as roasts, chickens 

or turkeys, but can also be used for cooking foods that are prone to flare-ups or for 

smoking foods. Lower tem

peratures and slower cooking times result in tender foods.

!

Rear Burner Use (If Equipped):  Remove the warming rack prior to use, the extreme heat will damage the 

warming rack. Cooking grids should also be removed if they interfere with the rotisserie.  The rear burner 

is designed to be used in conjunction with the rotisserie kit available from your dealer.  See the rotisserie 

kit assembly instructions.  
To use the counterbalance - remove the rotisserie motor from the gas grill.  Place the spit with meat being 

cooked across the hangers inside the grill.  The meat will naturally hang with the heavy side down.  Tighten 

the counterbalance arm and weight so the arm is facing up.  Slide the counterweight in or out to balance 

the load and tighten in place.  Re-install the motor and begin cooking.  Place a metal dish underneath the 

meat to collect drippings for basting and naturally delicious gravy. Basting liquid may be added as re

-

quired.  To seal in juices, first operate rear burner on high until brown, then reduce the heat to thoroughly 

cook foods.  Keep the lid closed for best results.  Your roasts and fowl will brown perfectly on the outside 

and stay moist and tender on the inside.  For example, a 3-pound chicken on the rotisserie will be done in 

approximately 1½ hours on medium to high.  Search Grill Master Recipes at

 https://www.napoleon.com/

en/us/grills/recipes

 for “rotisserie”.

ATTENTION!

 Barbecue sauce and salt can be corrosive and will cause rapid deterioration of 

the gas grill components unless cleaned regularly.  When finished cooking disassemble rotisserie 

components, wash thoroughly with warm soapy water and store indoors.

!

Содержание PRESTIGE PRO665RSIB-3

Страница 1: ...not try to light this appliance without reading the LIGHTING instructions section of this manual Do not store or use gasoline or other flammable liquids or vapors in the vicinity of this or any other...

Страница 2: ...or any transportation charges labor costs or export duties This Limited Warranty is provided in addition to any rights afforded to you by local laws Accordingly this Limited Warranty imposes no obliga...

Страница 3: ...se is cut it must be replaced prior to using the gas grill with a replacement pressure regulator and hose assembly specified by the grill manufacturer Do not route hose underneath drip pan proper hose...

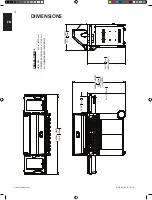
Страница 4: ...T 51 130cm 56 142cm LID OPEN 16 3 4 43cm 36 1 2 93cm OVERALL WIDTH 76 3 4 195cm 36 1 2 93cm GRILL HEIGHT OVERALL DEPTH 25 1 2 65cm PRO665 3 GRILL GRILL SIZE 665 in 2 4324 cm 2 WARMING RACK SIZE 345 in...

Страница 5: ...or specified by the manu facturer must be used The regulator must supply a pressure of 11 inches water column 0 39 PSI to the gas grill and have a QCC1 type fitting Cylinders to be used with this unit...

Страница 6: ...ed upstream of and as close to the quick disconnect as is feasible The flared end of the hose must be connected to the fitting on the end of the manifold tube or flex tube if applicable as illustrated...

Страница 7: ...taller If the leak cannot be stopped immediately shut off the gas supply disconnect it and have the grill inspected by a certified gas installer or dealer Do not use the grill until the leak has been...

Страница 8: ...gnite within 5 seconds turn the control knob to the off position and wait 5 minutes for any excess gas to dissipate Either repeat steps 2 and 3 or light with a match 4 If the burner will not ignite wi...

Страница 9: ...ng or for foods that do not require prolonged cooking times such as hamburgers steaks chicken pieces or vegetables The food is first seared to trap in the juices and flavor and then the temperature is...

Страница 10: ...e burner lid WARNING Do not close the side burner lid while it is operating or hot WARNING Do not adjust cooking grid while hot or operating WARNING Do not use side burner to deep fry foods as cooking...

Страница 11: ...ame principle Charcoal grilling is our most familiar choice for infrared cooking The glowing briquettes emit infrared energy to the food being cooked with very little drying effect Any juices or oils...

Страница 12: ...o Napoleon s woodchip smoker Chicken pieces High setting 2 min each side then medium low to low setting 20 25 min The joint connecting the thigh and the leg from the skinless side should be sliced 3 4...

Страница 13: ...at green Quickly Press Twice to stop the spectrum at any color you choose Press twice again to let it con nue changing colors Motion Sensor The knob and logo lights will remain ON as long as mo on is...

Страница 14: ...ove the cooking grids Use a brass wire brush to clean loose debris from the casting sides and underneath the lid Scrape the sear plates with a putty knife or scraper and use a wire brush to remove the...

Страница 15: ...reme field conditions adjustments might be required When the air shutter is adjusted correctly the flames will be dark blue tipped with light blue and occasionally yellow With too little air flow to t...

Страница 16: ...ollecting on your burner light the burner and operate on high for 5 minutes with the lid open allowing debris to burn off Burner The burner is made from heavy wall 304 stainless steel but extreme heat...

Страница 17: ...ure s directions for curing WARNING Always wear protective gloves when changing the halogen bulb in the internal lights of your grill Lights To replace the halogen bulb in your grill you must first re...

Страница 18: ...with yellow flame accompanied by the smell of gas Possible spider web or other debris or improper air shutter adjustment Thoroughly clean burner by removing See general maintenance instructions Open...

Страница 19: ...Clean out venturi tube Ensure lighting procedure is followed carefully All gas grill valves must be in the off position when the tank valve is turned on Turn tank on slowly to allow pressure to equal...

Страница 20: ...nel Illumination of the knob and switch lights work fine but the side rear burner ignition does not work The ignitor switch does not work properly The ignitor block does not work properly Replace the...

Страница 21: ...owing information is required 1 Model and serial number of the unit 2 Part number and description 3 A concise description of the problem broken is not sufficient 4 Proof of purchase photocopy of the i...

Страница 22: ...22 FR www napoleon com N415 0526 DEC 10 19...

Страница 23: ...ril PRO665 3 AVERTISSEMENT Ne tentez pas d allumer cet appareil avant d avoir lu la section INSTRUCTIONS D ALLUMAGE de ce manuel Pour votre s curit n entreposez pas et n utilisez pas d essence ou autr...

Страница 24: ...tifs ou indirects ni de tous frais de transport de main d uvre ou taxes d exportation La pr sente garantie limit e vient s ajouter tous les droits qui vous sont accord s par la l gislation locale Par...

Страница 25: ...le fabricant avant d utiliser le gril Ne pas passer le tuyau d alimentation sous le tiroir d gouttement afin de garder une distance raisonnable entre le tuyau et le fond du gril Ne faites pas passer l...

Страница 26: ...130cm 56 142cm 16 3 4 43cm 36 1 2 93cm 76 3 4 195cm 36 1 2 93cm 25 1 2 65cm PRO665 3 GRILL DIMENSIONS GRILLE 665 in 2 4324 cm 2 DIMENSIONS GRILLE DE R CHAUD 345 in 2 2185 cm 2 TOUS LES DIMENSIONS SONT...

Страница 27: ...uces de colonne d eau 0 39 lb po au gril et poss der un raccord de type QCC1 Les cylindres utilis s avec ce gril doivent tre munis d une soupape QCC1 Un cylindre QCC1 poss de un raccord qui emp che l...

Страница 28: ...Raccordez le bout vas du tuyau au raccord qui est au bout du tube collecteur Resserrez avec une cl N utilisez pas de scellant enduit tuyaux L installation doit tre conforme la norme CAN B149 1 du Cod...

Страница 29: ...s d une fiche trois broches de calibre suffisant pour la puissance de cet appareil approuv es pour utilisation ext rieure et identifi es W A Test de d tection de fuites AVERTISSEMENT Il doit tre fait...

Страница 30: ...le br leur ne s allument pas apr s 5 secondes tournez le bouton de contr le en position off et attendez 5 minutes pour que le gaz en exc s puisse se dissiper Ensuite r p tez les tapes 2 et 3 ou allum...

Страница 31: ...ts cuire sur la grille de cuisson directement au dessus de la chaleur Cette m thode est habituellement utilis e pour faire saisir les aliments ou pour la nourriture n cessitant une courte cuisson les...

Страница 32: ...ajustez pas la grille de cuisson lorsqu elle est chaude ou que le br leur fonctionne AVERTISSEMENT N utilisez PAS le br leur lat ral pour faire frire la nourriture car le fait de cuire avec de l huil...

Страница 33: ...n le m me principe Le charbon de bois est la m thode traditionnelle de cuisson l infrarouge dont nous sommes les plus familiers Les briquettes incandescentes mettent de l nergie infrarouge l aliment q...

Страница 34: ...c t ensuite r glage de moyen bas bas 20 25 min L articulation qui retient le pilon la cuisse doit tre coup e au 3 4 partir du c t sans peau afin de permettre la viande d tre plus plat sur la grille d...

Страница 35: ...ur la couleur choisie Pressez deux fois nouveau pour con nuer changer les couleurs D tecteur de mouvement Les boutons et le logo resteront allum s tant qu un mouvement sera d tect dans un rayon d un m...

Страница 36: ...ement Le tiroir d gouttement devrait tre gratt l aide d un couteau mastic ou d un grattoir en jetant les d bris dans le r cipient graisse jetable Le r cipient jetable devrait tre remplac entre deux et...

Страница 37: ...nt peut tre requis Lorsque le volet d air est bien ajust les flammes seront bleues fonc es avec des pointes bleues p les ou quelques fois jaunes Si le br leur ne re oit pas assez d air les flammes ser...

Страница 38: ...xyg ne et causer des retours de flamme Si cela se r p te souvent la c ramique pourrait fissurer Ne recouvrez jamais plus de 75 de la surface de cuisson avec du m tal robuste une plaque de cuisson ou d...

Страница 39: ...Portez toujours des gants protecteurs lorsque vous remplacez l ampoule halog ne des lumi res internes de votre gril Lumi res Pour remplacer l ampoule halog ne de votre gril vous devez d abord retirer...

Страница 40: ...s flammes produites par les br leurs sont jaunes et vous d tectez une odeur de gaz Possibilit de toiles d araign e ou autres d bris ou d un mauvais ajustement des volets d air Retirez le br leur et ne...

Страница 41: ...la proc dure d allumage est suivie la lettre Tous les boutons de contr le du gril doivent tre ferm s lorsque vous ouvrez la soupape de la bonbonne Tournez la soupape de la bonbonne lentement pour ass...

Страница 42: ...voyants de l interrupteur fonctionne bien mais l allumage du br leur lat ral arri re ne fonctionne pas Le commutateur d allumage ne fonctionne pas correctement Le bloc d allumage ne fonctionne pas co...

Страница 43: ...suivante est n cessaire 1 Mod le et num ro de s rie de l appareil 2 Num ro de la pi ce et description 3 Description concise du probl me cass n est pas suffisant 4 Preuve d achat copie de la facture D...

Страница 44: ...s the grain 5 Follow all instructions in the order that they are laid out in this manual 6 Two people are required to lift the grill head onto the assembled cart If you have any questions about assemb...

Страница 45: ...een the two heights The grid must be at the lower height in order to close the lid Installation de la grille de caisson La grille de cuisson tre install e deux niveaux diff rents Le niveau inf rieur e...

Страница 46: ...on uneven ground For easy hinge adjustment follow the illustrations outlined below Les portes du cabinet ont t align es en usine mais il est possible qu un ajustement des charni res soit n cessaire da...

Страница 47: ...e kit components as shown Instructions d assemblage de l ensemble de r tissoire inclus avec la plupart des appareils avec br leur arri re Assemblez les composantes de la r tissoire tel qu illustr Ensu...

Страница 48: ...er contre les d charges lectriques branchez l appareil de cuisson ext rieur au gaz sur un circuit muni d une prise avec interrupteur de d faut la terre seulement Afin de fournir du courant votre gril...

Страница 49: ...THE KNOB AND LOGO LIGHTS AS WELL THE OVEN AND CABINET LIGHTS WILL TURN OFF AFTER TWO HOURS IF THE MOTION SENSOR IS OFF THE KNOB AND LOGO LIGHTS WILL ALSO SHUT OFF AFTER TWO HOURS MAXIMUM LABEL SIZE 7...

Страница 50: ...FUSE FUSIBLE 4 A IGNITER MODULE D ALLUMAGE 12VAC DC 1 5W 120mA KNOB LIGHT LUMI RES DES BOUTONS x6 12VDC 0 4 1 1W 34 95mA SWITCH IGNITION COMMUTATEUR ALLUMAGE 12VDC 0 3 0 8W 22 65mA SWITCH LIGHTS COMM...

Страница 51: ...re sinon il risque de fondre de provoquer une fuite et causer un feu WARNING The installation must be performed by a licensed gas fitter and all connections must be leak tested before operating the gr...

Страница 52: ...le performing this test and remove all sources of ignition See Leak Testing Diagram for areas to check 1 Turn all burner controls to the off position Turn gas supply valve on 2 Brush a half and half s...

Страница 53: ...que fois qu une pi ce du syst me de gaz est remplac e ou r par e Ne fumez pas et enlevez toutes sources d allumage lorsque vous faites ce test Consultez le sch ma de test de fuites pour voir les endro...

Страница 54: ...ce orifice br leur arri re p W456 0050 rear burner orifice orifice br leur arri re n 20 N255 0058 90 degree elbow fitting raccord x 21 N570 0008 screw 10 24 x 3 8 vis 10 24 x 3 8 x 22 N720 0056 smoker...

Страница 55: ...12 SER bottle opener d capsuleur x 62 55110 tool hook bracket support crochet d outil x 63 N475 0430 panel left front panneau gauche avant x 64 N750 0069 control box wire harness harnais de fil our bo...

Страница 56: ...lf left tablette lat rale en acier inoxydable gauche x 98 N325 0064 shelf handle side poign e de tablette lat ral x 99 N120 0033 GY0TX side shelf end cap left embout de la tablette lat ral gauche x 10...

Страница 57: ...blette droite x 133 N590 0189 cutting board conseil de d coupage x 134 N185 0003 ice bucket seau de glace x 135 N010 0992 stainless steel side shelf right tablette lat rale en acier inoxydable droite...

Страница 58: ...DEC 10 19 41 40 26 37 56 46 39 69 68 60 59 62 38 64 50 1 57 44 65 46 36 43 42 67 66 7 30 2 10 53 28 51 45 21 34 54 31 20 19 27 25 55 17 11 49 42 33 12 48 63 52 18 13 15 61 32 14 58 29 23 16 24 22 35...

Страница 59: ...80 81 82 83 76 77 75 93 95 97 103 98 92 88 89 87 96 99 100 91 94 90 102 101 86 134 133 135 138 139 137 136 132 121 122 120 119 118 117 116 115 109 114 113 108 110 111 107 105 106 84 85 141 31 18 126...

Страница 60: ...N415 0526...

Отзывы: