Napoleon LEX 485 Скачать руководство пользователя страница 10

www.napoleongrills.com

10  

Operating The Grill

Initial Lighting

: When lit for the first time, the gas grill emits a slight odor. This is a normal temporary 

condition caused by the “burn-in” of internal paints and lubricants used in the manufacturing process and 

does not occur again. Simply run the main burners on high for approximately one-half hour. 

Direct Cooking

: Place food to be cooked on the grill directly over the heat. This method is generally used 

for searing or for foods that do not require prolonged cooking times such as hamburgers, steaks, chicken 

pieces, or vegetables. The food is first seared to trap-in the juices and flavor, and then the temperature is 

lowered to finish cooking the food to your preference.

Indirect Cooking

: With one or more burners operating, place food to be cooked on the grill over a burner 

that is not operating. The heat circulates around the food, cooking slowly and evenly. Cooking with this 

method is much the same as cooking in your oven and is generally used for larger cuts of meats such 

as roasts, chickens or turkeys, but can also be used for cooking foods that are prone to flare-ups or for 

smoking foods. Lower temperatures and slower cooking times result in tender foods.

Rear Burner Use (If Equipped)

:  Remove the warming rack prior to use, the extreme heat will damage the 

warming rack. Cooking grids should also be removed if they interfere with the rotisserie.  The rear burner 

is designed to be used in conjunction with the rotisserie kit available from your dealer.  See the rotisserie 

kit assembly instructions.  
To use the counterbalance - remove the rotisserie motor from the gas grill.  Place the spit with meat 

being cooked across the hangers inside the grill.  The meat will naturally hang with the heavy side down.  

Tighten the counterbalance arm and weight so the arm is facing up.  Slide the counterweight in or out 

to balance the load and tighten in place.  Re-install the motor and begin cooking.  Place a metal dish 

underneath the meat to collect drippings for basting and naturally delicious gravy. Basting liquid may be 

added as required.  To seal in juices, first operate rear burner on high until brown, then reduce the heat to 

thoroughly cook foods.  Keep the lid closed for best results.  Your roasts and fowl will brown perfectly on 

the outside and stay moist and tender on the inside.  For example, a 3 pound chicken on the rotisserie will 

be done in approximately 1½ hours on medium to high.  See ‘Your all Season Grill’ cookbook by Napoleon 

for more detailed instructions.

WARNING!

 Barbecue sauce and salt can be corrosive and will cause rapid deterioration of the gas 

grill components unless cleaned regularly.  When finished cooking disassemble rotisserie components, 

wash thoroughly with warm soapy water and store indoors.

Main Burner Use

: When searing foods, the lid must be kept open and the burners can be set to high.  If 

cooking with the lid closed, preheat grill on high for 10 minutes with the lid closed, and then turn the main 

burners to low.  Food cooked for short periods of time (fish, vegetables) can be grilled with the lid open. 

Cooking with the lid closed will ensure higher, more even temperatures that can reduce cooking time 

and cook meat more evenly. Food that has a cooking time longer than 30 minutes, such as roasts, can be 

cooked indirectly (with the burner lit opposite to the food placement). When cooking very lean meats, 

such as chicken breasts or lean pork, the grids can be oiled before pre-heating to reduce sticking. Cooking 

meat with a high degree of fat content can create flare-ups. Either trim the fat or reduce temperatures to 

inhibit this. Should a flare-up occur, move food away from the flames and reduce the heat. Leave the lid 

open.  See 

Your All Season Grill

 cookbook by Napoleon for more detailed instructions.

Infrared Main Burner Use

: The glass reflector must be in position prior to using appliance, otherwise it 

will affect the performance of the burner.  Follow the Infrared Burner Ignition procedures and operate on 

high for 5 minutes with the lid closed or until the ceramic burners glow red. When searing foods, the lid 

must be kept open and the burners can be set to high.  If cooking with the lid closed, preheat grill on high 

with the lid closed, and then turn the main burners to low.  
Place food on the grill(s) and cook according to times listed in the Infrared Grilling Chart. Depending upon 

your taste, continue cooking over infrared burners on high, medium, or low, turning food frequently, or 

place food over unlit burners, close lid, and allow the oven temperature to slowly finish cooking your food.

CAUTION!

 Due to the intense heat the infrared burners provide, food left unattended over burners 

will burn quickly. Keep the lid open when cooking with the infrared burners set to high. The intense 

heat ensures adequate searing temperatures even with the lid open. This also allows observation of 

the food to prevent burning.

Содержание LEX 485

Страница 1: ...re department LEX 485 SAI Global SAI 400025 AS4557 DO NOT REMOVE WARNING Do not try to light this appliance without reading the LIGHTING instructions section of this manual Do not store or use gasolin...

Страница 2: ...er the wholesale price of any warranted but defective part s NAPOLEON will not be responsible for the installation labor or any other costs or expenses related to the re installation of a warranted pa...

Страница 3: ...the supply when being stored indoors Inspect the gas line hose before each use If there is evidence of excessive abrasion or wear it must be replaced before using the gas grill with a replacement hose...

Страница 4: ...rtial enclosure that includes an overhead cover and no more than two sidewalls These sidewalls may be parallel as in a breezeway or at right angles to each other Within a partial enclosure which inclu...

Страница 5: ...LL HEIGHT 49 1 4 125cm 59 1 4 151cm LID OPEN 14 1 4 36cm 35 89cm OVERALL WIDTH 57 3 4 147cm OVERALL DEPTH 27 1 2 70cm 36 1 4 92cm GRILL HEIGHT GRILL SIZE 485 in 2 3130 cm 2 WARMING RACK SIZE 190 in 2...

Страница 6: ...th drip pan Do not route hose over top of back panel Ensure all hose connections are tightened using two wrenches Do not use teflon tape or pipe dope on any hose connection Ensure the hose does not co...

Страница 7: ...Cylinder Installation Cylinder Connection Ensure that the gas regulator hose is kink free Remove the cap or plug from the cylinder fuel valve Insert the POL regulator nipple onto the POL fuel valve Ha...

Страница 8: ...t and remove all sources of ignition See Leak Testing Diagram for areas to check Turn all burner controls to the off position Turn gas supply valve on Brush a half and half solution of liquid soap and...

Страница 9: ...burner lights or light by match 4 If the pilot and burner will not ignite within 5 seconds turn the control knob to the off position and wait 5 minutes for any excess gas to dissipate Either repeat s...

Страница 10: ...ound chicken on the rotisserie will be done in approximately 1 hours on medium to high See Your all Season Grill cookbook by Napoleon for more detailed instructions WARNING Barbecue sauce and salt can...

Страница 11: ...nto the charcoal and vaporize into smoke giving the food its delicious grilled taste The Napoleon infrared burner cooks in the same way In each burner 10 000 ports each with its own tiny flame cause t...

Страница 12: ...to Napoleon s woodchip smoker Chicken pieces High setting 2 min each side then medium low to low setting 20 25 min The joint connecting the thigh and the leg from the skinless side should be sliced 3...

Страница 13: ...mbustion air Keep the cylinder enclosure ventilation openings located on the cart sides and at the front and back of the bottom shelf free and clear from debris WARNING Turn off the gas at the source...

Страница 14: ...brown hue This discoloration is normal and does not affect the performance of the grill Porcelain enamel components must be handled with additional care The baked on enamel finish is glass like and wi...

Страница 15: ...leaning Do not clean the ceramic tile with a wire brush If debris is collecting on your burner light the burner and operate on high for 5 minutes with the lid open allowing debris to burn off Infrared...

Страница 16: ...umbling noise and fluttering blue flame at burner surface Lack of gas Supply hose is pinched Dirty or clogged orifice Spider webs or other matter in venturi tube Universal Liquefied Petroleum Gas regu...

Страница 17: ...ent 4 Proof of purchase photocopy of the invoice In some cases the Customer Solutions Representative could request to have the parts returned to the factory for inspection before providing replacement...

Страница 18: ...lly assembled and operates to your satisfaction 3 Assemble the grill where it is to be used lay down cardboard or a towel to protect parts from being lost or damaged while assembling 4 Most stainless...

Страница 19: ...www napoleongrills com 19 1 X N430 0002 16 X N570 0073 1 4 20 X 3 8 3 8 10mm non relvolving caster left side...

Страница 20: ...www napoleongrills com 20 Propane Only 4 x N570 0080 14 x 1 2 3 8 10mm...

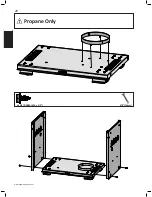
Страница 21: ...www napoleongrills com 21 6 x N570 0080 14 x 1 2 3 8 10mm Propane Only...

Страница 22: ...www napoleongrills com 22 3 8 10mm 4 x N570 0080 14 x 1 2 1 X N430 0002...

Страница 23: ...the grill head remove zip tie holding regulator This was installed at the factory to protect the regulator hose during shipping and is no longer required Take care when removing the tie not to damage...

Страница 24: ...www napoleongrills com 24 3 8 10mm 4 x N570 0080 14 x 1 2 ATTENTION Ensure that all tabs are bent down before installation...

Страница 25: ...www napoleongrills com 25 2 x N570 0080 14 x 1 2 3 8 10mm Back View Front View ATTENTION Ensure that all tabs are bent up after installation...

Страница 26: ...www napoleongrills com 26 disposable grease tray...

Страница 27: ...www napoleongrills com 27 3 8 10mm 6 x N570 0080 14 x 1 2 Back View Front View ATTENTION Ensure that all tabs are bent up after installation...

Страница 28: ...www napoleongrills com 28 3 8 10mm 2 x N570 0073 1 4 20 X 3 8...

Страница 29: ...www napoleongrills com 29 8 x N570 0076 8 X 1 2 4 x N570 0013 8 X 5 8 Engage edge of shelf under ribs in end cap N570 0013 8 X 5 8...

Страница 30: ...www napoleongrills com 30 4 x N570 0082 1 4 20 X 5 8 3 8 10mm 4 x N735 0001 Tabs located on either side of ice bucket must engage notches in side shelf...

Страница 31: ...napoleongrills com 31 4 x N570 0082 1 4 20 X 5 8 3 8 10mm 4 x N735 0001 1 x N160 0023 Fit orifice into burner tube and secure with hose retainer clip supplied Attach the wire to the side burner electr...

Страница 32: ...www napoleongrills com 32 4 x N570 0099 14 x 3 4 3 8 10mm 4 x N340 0007 WARNING Do not over tighten the screws as this will cause the handle to crack Propane Only 1 2 3 3 8 10mm N570 0080 14 x 1 2...

Страница 33: ...www napoleongrills com 33 2 x N105 0011 1 2 x N160 0022 2 3 BOTTOM TOP 4...

Страница 34: ...www napoleongrills com 34 FOLD TABS OVER TO SECURE GLASS IN PLACE...

Страница 35: ...www napoleongrills com 35...

Страница 36: ...www napoleongrills com 36 Rotisserie Kit Assembly Instruction optional Assemble rotisserie kit components as shown Ensure stop bushing is tightened on the inside of hood casting...

Страница 37: ...ttached so that no part of the hose touches the underside of the grill or drip pan A fire will result if these directions are ignored Clip hose to side panel using hose retainer clip supplied Ensure t...

Страница 38: ...st be leak tested before operating the grill Do not use pipe dope or teflon tape on this connection Tighten the connection with two wrenches WARNING FIRE HAZARD WARNING Do not route hose over top of r...

Страница 39: ...light bracket x 21 N570 0008 8 x 1 2 screw x 22 N475 0347 AU control panel x 23 N010 0835 AU manifold assembly p N010 0838 AU manifold assembly n 24 Z510 0003 black silicone lid bumper x 25 N660 0002...

Страница 40: ...062 door handle x 63 N555 0025 lighting rod x 64 N485 0016 pivot pin door top x 65 N485 0017 pivot pin door bottom x 66 N570 0099 14 x 3 4 screw x 67 N570 0082 1 4 20 x 5 8 screw x 68 N735 0001 insula...

Страница 41: ...ire clip x 99 N590 0189 cutting board x 100 N500 0041 side burner plate x 101 N100 0037 side burner electrode x 102 N305 0059 side burner grate x 103 N455 0057 side burner orifice 62 x 104 N160 0016 s...

Страница 42: ...21 45 80 46 41 21 31 91 97 102 98 100 90 21 93 20 26 26 22 69 25 19 94 92 18 55 36 79 21 90 103 74 95 71 73 67 106 104 72 72 52 75 67 68 83 82 83 81 3 17 12 11 55 14 64 61 66 60 58 76 59 62 59 65 63...

Страница 43: ...www napoleongrills com 43 Notes...

Страница 44: ...N415 0275 AU...

Отзывы: