


4. Transformer/Rear Cart Panel Installation
Install the transformer onto the rear panel as illustrated using (4) M4 x 8mm screws and (4) M4 lock nuts. Route the power
cord through the rubber grommet in the rear panel.
Fit the rear cart panel between the two end panels; ensure the large holes in the rear panel are to the bottom of cart as il-
lustrated. Fasten using (6) #14 x 1/2” screws, three on each side.
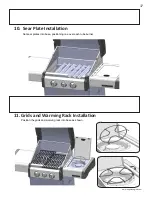
9 x N570-0042 (#10-24 x 3/8”)
3. Rear Cart Panel Installation
4. Front Cabinet Support Installation
4 x N570-0042 (10-24 x 3/8”)
30
www.napoleongrills.com
Fit the rear cart panel between the two end panels. Ensure the large holes in the rear panel are to the bottom
of cart as illustrated. Fasten using (9) #10-24 x 3/8” screws, three on each side.
Fasten top rail assembly to the front of the side panels using (4) #10 -24x 3/8” screws. For ease of installation
start all screws (4) #10-24 X3/ 8” before tightening.
Содержание 325
Страница 46: ...PARTS DIAGRAM 46 www napoleongrills com ...
Страница 49: ...49 www napoleongrills com PARTS DIAGRAM ...
Страница 50: ......


