NAPCO LIBRA-P432EX Series Скачать руководство пользователя страница 5

NAPCO Security Systems  

LIBRA LIB-P432EX Series Programming Instructions 

Page 5


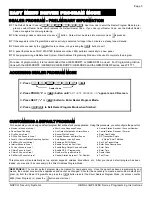
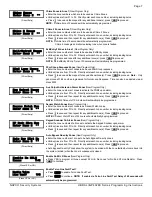
EASY MENU DRIVEN PROGRAM MODE 

DEALER PROGRAM - PRELIMINARY INFORMATION 

The Default Dealer Code is 

456789

.  Use this code to enter the Dealer Program Mode to pro-

gram a custom Dealer Code, which replaces the Default Dealer Code.  If you clear your Dealer Code, use the Default Dealer 
Code once again to enter programming. 

After entering codes or data, press the save 

u

 button.  Data will not be stored into memory unless 

u

 is pressed. 

If the keypad is in the Program Mode and no activity is detected for longer than 4 minutes, a steady tone will sound.  

Silence the sounder by the 

G

 button to continue, or by pressing the 

y

 button to exit. 

A panel that has been COLD STARTED (Address Location 2286) performs identically to a new panel. 

When programming a Multiple Area System, Direct Address Programming Mode must be used to complete the program. 

For ease of programming, it is recommended that a GEM-DXRP1 or GEM-DXK1 be used.  For Programming Instruc-
tions with the GEM-DXRP2 / GEM-DXK2, GEM-DXRP3 / GEM-DXK3 and the GEM-DXK4RF series, see WI1771.   
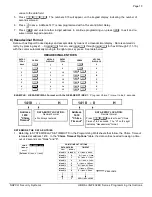
Number of Zones in Area 1 

Panel Zone Doubling 

Fire Zones in Area 1 

2-Wire Fire Zones in Area 1 

Local or Central Station Reporting System 

Exit/Entry Zones in Area 1 

Interior Zones in Area 1 

24 Hour Zones in Area 1 

Chime Zones in Area 1 

Chime 2 Zones in Area 1 

Exit/Entry2 Zones in Area 1 

50mS Loop Response Zones


Aux Output Activated on Alarm Zones 

Sensor Watch Zones 

Keypad Sounder on Alarm Zones 

Auto Bypass re-entry Zones 

Enable no EOLR Zones 

Enable Telco Line Fault Test 

Enable Burg Output Chirp on Keyfob 

Enable CP-01 Programming 

Number of Keypads in Area 1 

Central Station Receiver 1 Tel. Number 

Central Station Receiver 1 Account Number 

Central Station Receiver 1 Format 

Enter User Codes 

RF Transmitter Points 

Quick "Enroll" Method 

Key Fob Transmitters 

Enter Zone Descriptions 

Enter Date 

Enter Time 

Dealer Code 

Test Timer 

NEW PANELS:

 The custom default program may be created for new panels only.  Once the panel has been programmed by any 

means, the number zones will be suppressed and cannot be changed.  Should it be necessary to create a new custom default pro-
gram, (a) from the Dealer Program Mode, press the 

y


button to enter the Direct Address Program Mode; (b) access Location 

2285 (Clear Program); (c) press the


u

 button and start over. 

This procedure will automatically set up system keypads, wireless transmitters, etc.  After your basic default program has been 
loaded, you may alter it as necessary in the Direct Address Program Mode. 

ACCESSING DEALER PROGRAM MODE 

CUSTOMIZING A DEFAULT PROGRAM 

For new panels, you can design a default program that will best suit your application.  Using this procedure, you will configure the panel for: 


 1. Press 

456789 w


 2. Press 

PRIOR 

("

X

" or 

q

button until 

"

ACTIVATE PROGRAM Y/N

"

 appears on LCD screen. 


 3. Press


NEXT 

("

r

" or 

p

button to Enter Dealer Program Mode. 


 4. Press


yy

 to Exit Dealer Program Mode when finished. 

Dealer Code 

Содержание LIBRA-P432EX Series

Страница 1: ...he battery 3 Configure the keypad see page 42 4 Access the Easy Menu Driven Dealer Program Mode Press 456789 w Press NO q until ACTIVATE PROGRAM Y N appears on the keypad display Press YES p to Enter...

Страница 2: ...s manual as well The Instant z button and the AWAY q button operate identically in Program Mode for both keypads These buttons are also used to answer NO or PRIOR to questions that appear on the keypa...

Страница 3: ...ormat 8 Enter User Codes 8 RF Transmitter Points 9 Key Fob Transmitters as Arm Disarm Control Devices 9 Key Fob Transmitters as Zone Input Devices 10 Enter Zone Descriptions 10 Enter Date 10 Enter Tim...

Страница 4: ...the Dealer Program Mode wherein data is entered at the keypad by location This mode is accessed from the Easy Menu Driven Program Mode by pressing the y button at any time User Program Mode Keypad Pr...

Страница 5: ...nes in Area 1 50mS Loop Response Zones Aux Output Activated on Alarm Zones Sensor Watch Zones Keypad Sounder on Alarm Zones Auto Bypass re entry Zones Enable no EOLR Zones Enable Telco Line Fault Test...

Страница 6: ...ectly enter each zone number including leading zeros Press u to save and repeat for any additional zone s press p to proceed NOTE Exit Entry Entry time of 30 seconds will automatically be programmed I...

Страница 7: ...leading zeros Press u to save and then repeat for any additional zone s Press p to proceed NOTE A PGM2 Timeout of 15 minutes will automatically be programmed Sensor Watch Zones New Program Only Enter...

Страница 8: ...or p to proceed Enter User Codes Press w to set cursor For default program enter up to 64 User Codes with Area 1 2 3 4 Options Press the w button once to set the cursor to the User Code Press 0 throu...

Страница 9: ...ammed Transmitter 287613 1 point 1 will be mapped to Zone 6 5 Enter Zone 09 6 Close point 1 loop and open point 2 loop 7 Remove the transmitter battery then re install it The keypad will beep once to...

Страница 10: ...on Press u to save Press NEXT r or p to proceed Dealer Code Directly enter the Dealer Code default 456789 using 0 through 9 buttons Press u to save Re enter the Dealer Code to verify the previous code...

Страница 11: ...splay and accept data in number format For example Zone Features are turned on by the pressing of keypad buttons 1 through 8 with the activated Zone s displaying the corresponding decimal digit replac...

Страница 12: ...automatically moving to the right upon each key press EXAMPLE DECIMAL Format with the GEM DXRP1 DXK1 Program Abort Delay to be 15 seconds DETERMINE THE DATA ENTRIES 1 Referring to SYSTEM DELAYS TIMEOU...

Страница 13: ...1 Referring to SYSTEM DELAYS TIMEOUTS in the Programming Worksheets that follow the Chime Timeout is located at address 1418 In the Chime Timeout Options table the data entries needed to assign a time...

Страница 14: ...ws software following any keypad programming and that the PCD Windows s error check feature be utilized to reduce the possibility of programming omissions or conflicts 3 Keep the Keypad Programming Wo...

Страница 15: ...is page and on the following pages are automatically set after exiting the Easy Menu Driven Mode 1 Enter delay timeout in corresponding address locations above Note All entries for address 1418 are in...

Страница 16: ...AT In Pager Format reporting the message typically begins with 00 However for some pager services this will cause the Pager s Voice Mail feature to activate This option allows you to program these dig...

Страница 17: ...Ambush Code is selected and Address 2045 is not left blank then the 2 digit Global Ambush Code is the two digits entered in address 2045 Enter in address location both 1st and 2nd digits valid entries...

Страница 18: ...FIRE KEYPAD AUX KEYPAD TAMPER FAIL TO OPEN FAIL TO CLOSE Keyfob Low Batt 1 2 3 4 5 6 7 8 Pulsed Alarm Output 0872 Alarm Output 0873 PGM1 Output 0874 PGM2 Output 0876 Report Event Telco 1 0877 Report...

Страница 19: ...F 3 Reset Day Zone with Arm Disarm Only OFF 3 Wireless Trouble Activates Telco 3 OFF 4 Enable Residential Fire OFF 4 Enable Alarm Output on Telco Fail only when Armed OFF 5 Disable Keypad Function Mod...

Страница 20: ...for dial tone F Ignore location Default for CS Receiver 1 Tele phone Number depends on Easy Menu Question C E N T R A L PHONE Default blank across digits 1 20 for CS Receiver Telephone Num bers 2 and...

Страница 21: ...RIGHT DIGITS 1 4 0596 0597 0598 0599 CS Telco 3 Sub scriber Event ID Number Area 1 ADDRESS 0648 0651 RIGHT DIGITS 1 4 0648 0649 0650 0651 CS Telco 3 Sub scriber Opening Closing ID Number Area 3 ADDRES...

Страница 22: ...0 0705 CS AREA SYSTEM REPORTING OPTIONS ADDRESS 0785 0786 0788 Default blank blank DISABLE OPENING REPORTS LEFT DIGIT RIGHT DIGIT SUM OF DATA VALUES blank ADDRESS 0785 NOTE If neither Touch tone Diali...

Страница 23: ...al requires a Set Unset code Enter level 2 3 4 to come alive The keypad will stay alive Normal for 128 seconds default or for a time in a programma ble EEProm location in seconds This location 2060 co...

Страница 24: ...ZONE 22 ZONE 23 ZONE 24 0740 0741 0742 0743 NOTE If Zone Doubling Address 1423 is not enabled then Zones 1 4 are included in the control panel and Zones 5 32 are wireless Zones If Zone Doubling is en...

Страница 25: ...n not available 3 Press u to save USERS 49 56 USERS 57 64 Enable Users to Report Opening and Closings ADDR U49 U50 U51 U52 U53 U54 U55 U56 ADDR U57 U58 U59 U60 U61 U62 U63 U64 1 2 3 4 5 6 7 8 1 2 3 4...

Страница 26: ...LIBRA LIB P432EX Series Programming Instructions NAPCO Security Systems Page 26 This page left blank intentionally...

Страница 27: ...sarm Default Option Disarming Area 1 ON 1 Area 1 Pulsed Burg Output Silenced OFF 2 Area 2 Pulsed Burg Output Silenced OFF 3 Area 3 Pulsed Burg Output Silenced OFF 4 Area 4 Pulsed Burg Output Silenced...

Страница 28: ...eypad Area Assignment KEYPAD TYPE Up to 7 key pads may be programmed if they are connected NOTE See Keypad Configura tion Mode 1 Select keypad type for each keypad from the tables shown 2 Enter data i...

Страница 29: ...NAPCO Security Systems LIBRA LIB P432EX Series Programming Instructions Page 29 This page left blank intentionally...

Страница 30: ...d to a new global value Address 2062 accepts three decimal digits which are multiplied by 10 milli seconds to get a new value that replaces the default value of 750ms If the loca tion is set to 000 th...

Страница 31: ...98 Trouble on Short 0935 0999 Zone Area 1 0936 1000 Zone Area 2 0937 1001 Zone Area 3 0938 1002 Keypad Sounder on Alarm 0941 1005 2 Wire Smoke Detectors 0942 1006 Fire 0943 1007 Fire Alarm Verificatio...

Страница 32: ...1129 Interior Stay Bypass 1068 1132 Keypad Sounder on Alarm 1069 1133 Fire 1071 1135 Fire Alarm Verification 1072 1136 Zone ANDing Group 1 1074 1138 Zone ANDing Group 2 1075 1139 Zone ANDing Group 3...

Страница 33: ...NAPCO Security Systems LIBRA LIB P432EX Series Programming Instructions Page 33 This page left blank intentionally...

Страница 34: ...LIBRA LIB P432EX Series Programming Instructions NAPCO Security Systems Page 34 This page left blank intentionally...

Страница 35: ...LAY EVENT 15 1559 1560 1561 1562 1563 RELAY AREA TIMEOUT EVENT ID COND ADDRESS 1554 1558 RELAY EVENT 14 1554 1555 1556 1557 1558 RELAY AREA TIMEOUT EVENT ID COND ADDRESS 1574 1578 RELAY EVENT 18 1574...

Страница 36: ...and Timeout Type from Table 5A on next page enter in corresponding left address location 5B Select Activation Conditions from Table 5B on next page enter in corresponding right address location STEP 2...

Страница 37: ...General System Alarm D 8 Area 1 General System Alarm D 9 Area 2 General System Alarm D 0 Area 3 General System Alarm D B Area 4 General System Alarm F blank Relay Control Group 1 F 1 Relay Control Gr...

Страница 38: ...nutes 2 Enter in corresponding address locations below right nibble 3 Press u to save NOTE These timers apply only to Supervised RF Transmitters see RF Transmitters in Easy Menu Driven Mode Programmin...

Страница 39: ...chedules can only be programmed again with the Downloading Software If power fails time and date restarts at 00 00 00 and a date of 01 01 04 January 1 2004 2285 XX H 2286 XX H USER PROGRAM MODE PRELIM...

Страница 40: ...s The cursor will then advance to the User Code and read the existing code if any Enter the new User Code using the number buttons 0 9 If an old code is displayed program over it To erase the digit at...

Страница 41: ...change to uppercase Press u to save To advance to the next zone or to any other zone move the cursor to the displayed zone number i e 01 using w and x Change the zone number using keys 0 through 9 Ent...

Страница 42: ...M DXRP1 GEM DXK1 keypad must be configured for a keypad tactile beep b entry sounder c keypad address and d compatibility number To enter the Keypad Configuration Mode 1 Move jumper JP1 located in the...

Страница 43: ...press the y button to exit Zone Response THIS FEATURE IS NOT COMPATIBLE WITH THE LIB P432EX CON TROL PANEL DO NOT CHANGE THIS SETTING Press the w button to continue or press the y button to exit Prog...

Страница 44: ...ccount Number Central Station Receiver 1 Format blank Ademco Slow Silent Knight Slow 2 Radionics Fast 3 Silent Knight Fast 4 Radionics DCI Franklin Slow 5 Universal High Speed B SIA C Ademco Point ID...

Страница 45: ...RF Transmitter Points XMTR ZONE CHECK SUM POINT 1 2 3 4 5 6 7 8 9 10 11 12 13 14 15 16 RF ID printed on xmtr box XMTR ZONE CHECK SUM POINT 17 18 19 20 21 22 23 24 25 26 27 28 29 30 31 32 RF ID printe...

Страница 46: ...9 10 11 12 13 14 15 16 17 18 19 20 21 22 23 24 25 26 27 28 29 30 31 32 1 2 3 4 5 6 7 8 9 10 11 12 13 14 15 16 17 18 19 20 21 22 23 24 25 26 27 28 29 CHARACTERS AVAILABLE See below Dealer Code Charact...

Страница 47: ...NAPCO Security Systems LIBRA LIB P432EX Series Programming Instructions Page 47 This page left blank intentionally...

Страница 48: ...NTROL OPTIONS ADDRESS 1473 1488 27 AREA BURG OUTPUT SILENCED 27 AREA OPTIONS 8 9 AUTO ARMING DISARMING USER 65 25 AUTO BELL TEST ON ARMING 19 AUTO BYPASS RE ENTRY ZONES 7 AUTO RESET AFTER BURGLARY OUT...

Страница 49: ...AT 22 DISABLE ZONE FAULT SCROLLING 19 DISARMING AREAS 1 4 BURG OUTPUT SILENCED 27 DON T CLEAR PGM2 OUTPUT WITH DISARM 19 DOWNLOAD FUNCTION OVERVIEW 4 DOWNLOAD CALLBACK OPTIONS ADDRESS 0526 0545 16 DOW...

Страница 50: ...KEYPAD ADDRESS 42 KEYPAD AUX 17 KEYPAD AUX KEYPAD OPTION 28 KEYPAD CONFIGURATION MODE 42 KEYPAD ENTRY SOUNDER 42 KEYPAD FIRE 17 KEYPAD FIRE KEYPAD OPTION 28 KEYPAD NUMBER ASSIGNING 42 KEYPAD OPTIONS...

Страница 51: ...MING USER 66 25 R RADIONICS FAST 20 RADIONICS DCI 20 RELAY CONTROL EXTERNAL ADDRESS 1489 1648 35 REMOTE DOWNLOADING OVERVIEW 4 REPORT CANCEL WINDOW ADDRESS 2055 15 REPORT EVENT TELCO 1 ADDRESS 0840 17...

Страница 52: ...ORT ZONE OPTION 31 32 33 34 TROUBLE RESTORE ADDRESS 0672 22 TROUBLE RESTORE 1 ZONE OPTION 31 32 33 34 TROUBLE RESTORE 3 ZONE OPTION 31 32 33 34 TROUBLE TELCO 1 ZONE OPTION 31 32 33 34 TROUBLE TELCO 3...

Страница 53: ...ERVISION 22 ADDRESS 0675 XMITTER TAMPER 22 ADDRESS 0677 OPENING 22 ADDRESS 0678 CLOSING 22 ADDRESS 0679 OPENING AFTER ALARM 22 ADDRESS 0680 CONDITIONAL CLOSE 22 ADDRESS 0681 CANCEL 22 ADDRESS 0682 TES...

Страница 54: ...ESS 0872 0887 SYSTEM OPTIONS 18 ADDRESS 0873 ALARM OUTPUT 18 ADDRESS 0874 PGM1 OUTPUT 18 ADDRESS 0876 PGM2 OUTPUT 18 ADDRESS 0877 REPORT EVENT TELCO 1 18 ADDRESS 0879 REPORT EVENT TELCO 3 18 ADDRESS 0...

Страница 55: ...Y CONTROL EXTERNAL 35 ADDRESS 2029 2044 RF RECEIVER SUPERVISORY TIMER OPTIONS 38 ADDRESS 2045 GLOBAL AMBUSH CODE 17 ADDRESS 2045 SYSTEM OPTIONS 17 ADDRESS 2050 SENSOR WATCH TIME 15 ADDRESS 2050 SYSTEM...

Страница 56: ...LIBRA LIB P432EX Series Programming Instructions NAPCO Security Systems Page 56 LIB P432EX WIRING DIAGRAM...

Страница 57: ...NAPCO Security Systems LIBRA LIB P432EX Series Programming Instructions Page 57 LIB P432EXT WIRING DIAGRAM...

Страница 58: ...LIBRA LIB P432EX Series Programming Instructions NAPCO Security Systems Page 58 LIB P432EXT 230 WIRING DIAGRAM...

Страница 59: ...NAPCO Security Systems LIBRA LIB P432EX Series Programming Instructions Page 59 NOTES...

Страница 60: ...60 R Publicly traded on NASDAQ Symbol NSSC NAPCO Security Group Inc 333 Bayview Avenue Amityville New York 11701 For Sales and Repairs call toll free 800 645 9445 For direct line to Technical Service...

Отзывы: