NAPCO Gemini GEM-X255 Скачать руководство пользователя страница 20

20

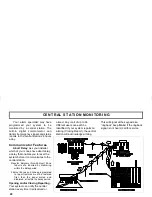
Your alarm specialist may have

programmed your system to be
monitored by a central station. The
built-in digital communicator can
transmit emergency signals and status
reports to the central station 24 hours
a day.

Communicator Features

Abort Delay.

 Ask your installer

which of your zones have abort delay,
a delay that enables you to reset the
system before it communicates to the
central station.

Regular Burglary (Non-24-Hour) Zone

reports are aborted by disarming
within the delay period.

24-Hour Zones and zones programmed

to report restores must be restored
first, then the panel armed and
disarmed, all within the delay period.

Opening and/or Closing Reporting.

Your system can notify the central
station every time it is disarmed or

armed. Any or all of up to 96
different users can each be
identified. If your system reports on
arming (Closing Report), the central
station will acknowledge arming.

This will signal at the keypad as a
“ringback” beep. 

Note:

 If the ringback

signal is not heard, call for service.

C E N T R A L   S T A T I O N   M O N I T O R I N G

GEM-X255_OI273_USER.pub 
page 20

Tuesday, September 10, 2002 13:14 

Содержание Gemini GEM-X255

Страница 1: ...1 OPERATING GUIDE for the GEM X255 Security System NAPCO 2001 DESIGN PATS PENDING ARMED COMPUTERIZED SECURITY SYSTEM STATUS GEMINI A 1 2 3 B 4 5 6 C 7 8 9 0 E F G J SYSTEM ARMED 01 01 00 12 00 AM...

Страница 2: ...lly check its condition and state of readiness by testing it at least once a week in both the ac battery and battery only modes ask your alarm professional how to make these tests INTRODUCTION IMPORTA...

Страница 3: ...HE DATE AND TIME 25 KEYPAD MESSAGES 26 GLOSSARY 29 SYSTEM TROUBLE ERROR CODES 32 TROUBLESHOOTING 37 TO SILENCE AN ALARM ENTER YOUR CODE AND PRESS J FOR SERVICE CALL _____________________ CENTRAL STATI...

Страница 4: ...4 KEYPAD CONTROLS INDICATORS ARMED COMPUTERIZED SECURITY SYSTEM STATUS GEMINI A 1 2 3 B 4 5 6 C 7 8 9 0 E F G J SYSTEM ARMED 01 01 00 12 00 AM 1 2 3 4 5 6 7 12 8 9 10 11...

Страница 5: ...s displays etc See text 2 Resets residential smoke detectors Numerical Keys 1 9 0 Used to enter codes zone numbers etc ON OFF Button Entry key Causes the entered code or selected function to be execut...

Страница 6: ...the keypad will display INVALID ENTRY TRY AGAIN Re enter your code immediately 3 Leave the premises Leave through the exit door before exit time expires Priority Arming If you attempt to arm with a f...

Страница 7: ...artitioned system To arm disarm a different area 1 Press the numerical key representing the other area number 2 Press G followed by J The keypad will now provide status and control of that area 3 Ente...

Страница 8: ...e house prompting it to automatically adjust the interior protection accordingly If you arm the system and remain in the house all Interior Zones are automatically bypassed The keypad will display BYP...

Страница 9: ...it on your system GEM P3200 GEM P9600 V11D or less GEM P1632 V8G or less Press D to activate Easy Exit on your system GEM P3200 GEM P9600 V20 or greater GEM P816 P1632 V9A or greater Emergency Buttons...

Страница 10: ...a neighbor s phone To silence an audible alarm 1 Enter your code and press J After the system is disarmed the window will continue to display ALARM followed by the zone s violated 2 To reset the disp...

Страница 11: ...s If a smoke detector tripped its red alarm indicator light will be on 5 After the alarm condition is corrected thermostat cooled down smoke cleared from detector etc pressing C again will reset the k...

Страница 12: ...th all those who use the building 1 In a residence sleep with the bedroom door closed A closed door will hold back deadly smoke while you escape 2 When the fire alarm signals escape quickly Do not sto...

Страница 13: ...13 FIRE PROTECTION Floorplan Draw a plan of your premises in the space provided below Floorplan...

Страница 14: ...es because the fire may be a slow smoldering low heat type producing smoke because they may not be near the fire or because the heat of the fire may bypass them These detectors will not detect oxygen...

Страница 15: ...g A and B respectively To return to normal keypad operation press the C button The keypad will automatically return to its normal operating mode if no activity is detected for longer than one minute D...

Страница 16: ...OR Buttons to scroll zones Display Fire Troubles Displays trouble conditions that have been detected on the Fire Zone s Use NEXT E and PRIOR F to scroll zones Activate Chime The Chime Mode will sound...

Страница 17: ...e number of the sensor in question To reset press C to clear the display enter the Function Menu scroll to RESET SENSOR MSG and press D If you cannot correct the problem call for service Start Exit Ti...

Страница 18: ...to 4 hours To Delay Arm the system With the function TO ARM IN 1 4 HRS displayed in the window enter the desired Delay Arming time in hours 1 2 3 or 4 followed by J At the end of this 1 4 hour Delay A...

Страница 19: ...group on or off press NEXT E to proceed to the next group or PRIOR F to scroll back to the previous group Press C when done Relay Group 01 ____________________________________ Relay Group 02 ________...

Страница 20: ...Non 24 Hour Zone reports are aborted by disarming within the delay period 24 Hour Zones and zones programmed to report restores must be restored first then the panel armed and disarmed all within the...

Страница 21: ...30 seconds a communication problem may exist call for service Function 11 Start Exit Time may then be used to manually start the exit delay however reporting capability may be sacrificed If your syste...

Страница 22: ...or each User Code to be programmed Erasing a User Code 1 Enter the 2 digits of the user number to be erased followed by AA 2 Press G0 to erase each digit of the User Code and then press D Example Eras...

Страница 23: ...User No 30 then press A A followed by 3784 4 Press Jto save the code 5 Press C to exit the Program Mode Notes If the system contains more than one keypad only the keypad designated No 1 may be used f...

Страница 24: ...ctuation marks and a variety of symbols Use the above buttons to enter each character of the description and then press D to save when the zone description is complete To advance to the next zone or t...

Страница 25: ...000 enter 07 29 00 2 Press Dto save the Date Programming the Time After entering in the Date press NEXT E for the Time Entry screen 1 At the Enter Time screen simply punch in the correct time using th...

Страница 26: ...cates Service Code active I indicates arming with Instant protection Entry delay in progress XXX shows entry time remaining in seconds System armed If displayed I indicates arming with Instant protect...

Страница 27: ...on a Fire Zone Press C to silence sounder Evacuate premises or correct cause of alarm For partitioned systems only Code not valid for area Wrong code entered or Easy Bypass function not enabled In Ma...

Страница 28: ...es problem s detected on system See examples below and SYSTEM TROUBLE ERROR CODES for a complete list of system troubles and corrective actions Check power transformer Check for blown fuse or circuit...

Страница 29: ...your code at the keypad then pressing J Battery Backup power source in the control panel enclosure to provide protection in the event of a power failure BYPASS Button Enables you to manually remove on...

Страница 30: ...eport A transmission to a central station notifying of a change in the status of the system alarm trouble low battery etc RF Low Battery Wireless sys tems only Weak transmitter battery RF Check In Wir...

Страница 31: ...akes place through the normal exit entry door first Fire Zone Detects fire alarms or trouble conditions Interior Zones Circuits within the premises usually including space protection devices interior...

Страница 32: ...System Trouble Condition Action E01 00 AC Power Failure This trouble will occur if AC power is not present Make sure system transformer is plugged into AC receptacle and check the circuit breaker oth...

Страница 33: ...required for the GEM PIR and GEM GB The replacement battery for the GEM SMK is the Duracell MN1604 9 Volt Alkaline 2 required The GEM DT Dual Technology Sensor requires 4 C cell alkaline batteries Wa...

Страница 34: ...em has been detected with an Expansion Module Call installing company for service E16 NN Wireless Receiver Jam A problem has been detected with the wireless receiver Call installing company for servic...

Страница 35: ...detecting activity Press C to clear the display and then use the Function Menu to Reset Sensor Watch Failure see page 17 If you cannot correct the problem yourself call installing company for service...

Страница 36: ...omatic self test routine Call installing company for service E41 NNN Fire Trouble A problem has been detected on the Fire zone indicated Call installing company for service E51 00 Bell Siren Trouble T...

Страница 37: ...the scrolling error codes which represent the trouble Press C and you will now be able arm to the system but the trouble must be fixed as soon as possible See Page 7 28 The Fire Alarm is sounding and...

Страница 38: ...38 NOTES...

Страница 39: ...39 NOTES...

Страница 40: ...d to any or all of the following criminal tampering electrical or communications disruption it is possible for the system to fail to perform as expected NAPCO does not represent that the product syste...

Отзывы: