background image


720012-0000R 

May 2019 


17 

High Speed Video Lottery Advanced Thermal 

Printer 

Owner’s Manual


1. Remove the power source from the printer before disassembly. 
 
2. Remove the paper roll from the printer by following the steps in reverse outlined in 1.4 
(Changing the paper) 
 
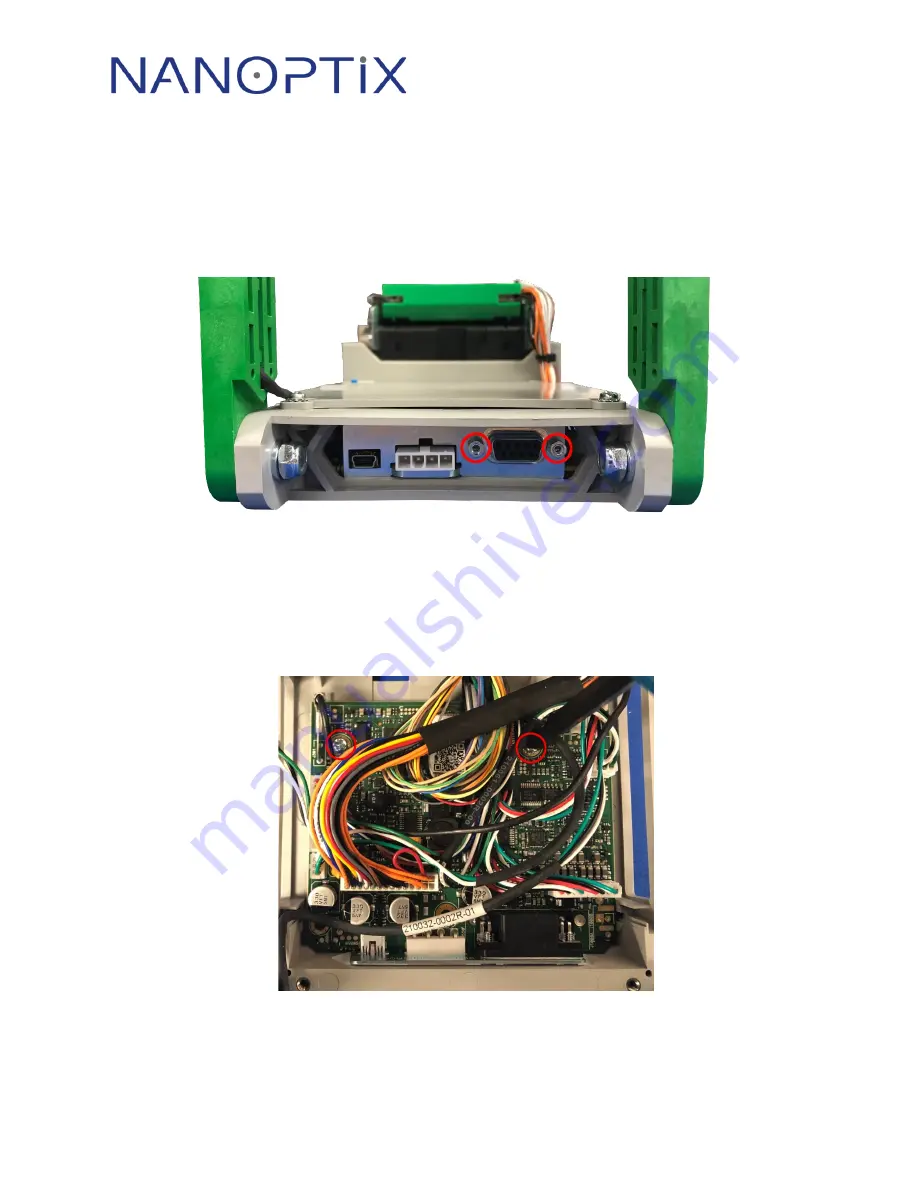
3. Remove the two screws holding the DB9 serial connector located on the back of the 
printer. 


4. Remove the two screws holding on the plastic plate covering the main board. Slide the 
cover away from the mech. assembly 

 se

e “

Rem

oving Mech. Assembly” step 3

 
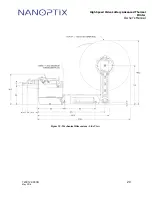
5. Disconnect harnesses, grounds, etc. Remove the last two screws holding the circuit 
board to the printer base. 


6. The paper feed button can be removed from the main board cover by feeding the wiring 
between the notches and removing the screw. 

Figure 11: DB9 Screw Location


Figure 12: Main Board Screw Location


Содержание HSVL ADVANCED

Страница 1: ...High Speed Video Lottery Advanced Owner s Manual First Edition May 2019 Last Revision May 2019 Document 720012 0000R ...

Страница 2: ... Microsoft Corporation Nanoptix is a trademark Other trademarks and registered trademarks are the property of their respective holders Federal Communications Commission FCC Radio Frequency Interference Statement Warning Changes or modifications to this unit not expressly approved by the party responsible for compliance could void the user s authority to operate the equipment Note This equipment ha...

Страница 3: ...arameters Power Supply UL Listed power supply with standard 60Hz 50Hz 100 240VAC input and 24VDC output equipped with AC line filtering over current and short circuit protection Use of this product with a power supply other than the Nanoptix Inc power supply will require you to test the power supply and Nanoptix Inc printer for FCC and CE mark certification Communication Interface Cable An approve...

Страница 4: ...oubleshooting the Printer 10 Printer LED 10 Printing Problems 11 Printer Does Not Work 11 2 Media and Supplies Guide 12 2 1 Thermal Paper Specifications 12 2 2 Ordering Thermal Paper 12 2 3 Ordering Miscellaneous Supplies 13 Ordering Power Supply and Power Cords 13 Ordering Communication Cables 13 Communication Cables Pin Out 14 2 4 Communicating with the Printer 14 3 Printer Disassembly 15 4 Mech...

Страница 5: ... LOCKING PAPER 7 FIGURE 7 SPINDLE CONFIGURATIONS 8 FIGURE 8 TESTING PRINTER 9 FIGURE 9 CIRCUIT BOARD COVER REMOVAL 15 FIGURE 10 MECH REMOVAL 16 FIGURE 11 DB9 SCREW LOCATION 17 FIGURE 12 MAIN BOARD SCREW LOCATION 17 FIGURE 13 PAPER FEED BOARD SCREW LOCATION 18 FIGURE 14 MECHANICAL DIMENSIONS FRONT VIEW 19 FIGURE 15 MECHANICAL DIMENSIONS SIDE VIEW 20 FIGURE 16 MECHANICAL DIMENSIONS BOTTOM VIEW 21 FI...

Страница 6: ...LESHOOTING WITH STATUS LED 10 TABLE 3 TROUBLESHOOTING PRINTING PROBLEMS 11 TABLE 4 PRINTER DOES NOT WORK 11 TABLE 5 THERMAL PAPER DIMENSIONS 12 TABLE 6 ORDERING THERMAL PAPER 12 TABLE 7 POWER CORD PART NUMBER 13 TABLE 8 COMMUNICATION CABLES PART NUMBERS 13 TABLE 9 RS 232 DB9 FEMALE INTERFACE 14 TABLE 10 4 PIN MOLEX POWER INTERFACE 14 ...

Страница 7: ...High Speed Video Lottery Advanced thermal printer is extremely fast quiet and very reliable With thermal printing technology there is no ribbon cassette to change and paper loading is extremely simple The HSVL Advanced features drop in loading allowing the printer to be installed between two devices Figure 1 High Speed Video Lottery Advanced Printer ...

Страница 8: ...Temperature 0 to 50 C Storage Temperature 30 C to 70 C Operating Relative Humidity 5 to 90 RH at 50C non condensing Communication Interface Options Serial USB 2 0 Memory Firmware 64MBit SDRAM upgradable to 256MBits 16MBit Flash upgradable to 64MBits 64KBit non volatile FRAM memory Resident Character Sets Arial Bold 6 sizes Note Other Character sets can be programmed quickly Integrated Bar Codes UP...

Страница 9: ...ls To reset Printer For the High Speed Video Lottery Advanced thermal printer simply disconnect and reconnect the printer s power connector to reset the printer in case of a fault condition Once the printer is reconnected the printer goes through a startup routine and resets itself Figure 2 Resetting Printer ...

Страница 10: ...ottery Advanced Thermal Printer Owner s Manual Paper Feed Button Light Emitting Diode Use the Paper Feed Button to advance the paper The LED on the main controller board shows the printer status Figure 3 Paper Feed Button Status Indicator LEDs ...

Страница 11: ...f it runs out of paper The printer will report paper out but it may continue to accept data from the host computer Because the printer cannot print any transactions the data will be lost 1 Remove the used roll 2 Tear off the end of the new roll so that the edge is loose Turn the spindles until the rollers are flush with the arms Figure 4 Spindle Movement ...

Страница 12: ...inter Owner s Manual 3 Place the new paper roll between the arms so that the spindle roller fits into the paper rolls core Caution The paper must be unwound from the top of the roll Figure 5 Otherwise the printer may not print or the paper may jam Figure 5 Loading Paper ...

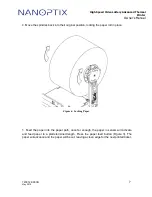
Страница 13: ...inal position locking the paper roll in place 5 Feed the paper into the paper path once far enough the paper in sensor will activate and feed paper to a predetermined length Press the paper feed button Figure 3 The paper will advance and the paper will be cut leaving a clean edge for the next printed ticket Figure 6 Locking Paper ...

Страница 14: ...e top front portion of the print mechanism to open the mech to the paper path and remove any paper obstructions Close the print mechanism and re feed the paper 1 6 Spindle Arm Configurations The HSVL Advance can be mounted in various positions The arms can be moved by loosening the mounting nuts using an 8mm wrench or ratchet Figure 7 Spindle Configurations ...

Страница 15: ...eed button can also pressed and held for several seconds to print a performance report including number of prints errors firmware on time etc Model DSP HPQ Firmware HSVL 5 15B Protocol E T88 COMMUNICATION Interface Serial Baud Rate 9600 Data Bits 8 Parity NONE Handshaking PRT RTS Print Mode Line Aux Port Disabled PRINT CONTROL Print Method No HPQ Final Speed 250 mm sec Black Bar Index Disabled No ...

Страница 16: ...e printer may be having If the procedures in this section do not correct the problem contact a service representative Printer LED Condition LED Status Green LED Status Red Unit ready ON OFF Unit is in Reset or Booting ON OFF Unit in standby powered off OFF OFF Paper Out OFF ON Door Open Fast Blink ON Paper Jam ON Fast Blink Missing Black Index Mark ON Slow Blink Temperature Error OFF Medium Blink ...

Страница 17: ...ntative Print is light or spotty Paper roll loaded incorrectly Check that the paper is loaded properly Thermal printhead is dirty Use recommended thermal receipt paper Vertical column of ticket is missing This indicates a serious problem with the printer electronics Contact your authorized service representative One side of receipt is missing This indicates a serious problem with the printer elect...

Страница 18: ...8 in Table 5 Thermal Paper Dimensions The paper must not be attached to the core If Top of Form Option is installed paper with a colored stripe at the end can be used to indicate that the paper is running low 2 2 Ordering Thermal Paper Manufacturer Numbers Appvion Specialty Papers 825 E Wisconsin Avenue P O Box 359 Appleton WI 54912 0359 Tel 866 315 0467 Toll free 800 922 1729 Kanzaki Specialty Pa...

Страница 19: ...et connector 213005 0013R 24V 60W Power Supply 4 Pin Molex connector GDS Standard Table 7 Power Cord Part Number Contact your Nanoptix sales representative for more information from our toll free line at 1 888 983 3030 Ordering Communication Cables Please specify the Nanoptix part number when ordering communication cables Part Number Part Description 102085 0002R Mini USB communication Cable 6ft 1...

Страница 20: ...Ground 6 No connect n a n a n a 7 RS232_CTS Input Output Handshake 8 RS232_RTS Output Input Handshake 9 NC or PWR No connect No connect reserved Table 9 RS 232 DB9 Female Interface The table below details the connection pin out for the power supply interface on the printer side The Nanoptix power supply conforms to GDS Standards Pin Allocation 1 12V 2 Ground 3 Ground 4 24V Table 10 4 Pin Molex Pow...

Страница 21: ...er by following the steps in reverse outlined in 1 5 Changing the paper 3 Remove the two screws holding on the plastic plate covering the main board Slide the cover away from the mech assembly 4 Remove the two screws holding on the print mechanism to the printer base Remove the harnesses going to the main board and lift the print mechanism Use ESD protection such as a wrist strap anytime a PCB is ...

Страница 22: ...720012 0000R May 2019 16 High Speed Video Lottery Advanced Thermal Printer Owner s Manual 3 2 Access to the Main Board Figure 10 Mech Removal ...

Страница 23: ...ial connector located on the back of the printer 4 Remove the two screws holding on the plastic plate covering the main board Slide the cover away from the mech assembly see Removing Mech Assembly step 3 5 Disconnect harnesses grounds etc Remove the last two screws holding the circuit board to the printer base 6 The paper feed button can be removed from the main board cover by feeding the wiring b...

Страница 24: ...720012 0000R May 2019 18 High Speed Video Lottery Advanced Thermal Printer Owner s Manual Figure 13 Paper Feed Board Screw Location ...
Страница 25: ...720012 0000R May 2019 19 High Speed Video Lottery Advanced Thermal Printer Owner s Manual 4 Mechanical Drawings Figure 14 Mechanical Dimensions Front View ...

Страница 26: ...720012 0000R May 2019 20 High Speed Video Lottery Advanced Thermal Printer Owner s Manual Figure 15 Mechanical Dimensions Side View ...

Страница 27: ...720012 0000R May 2019 21 High Speed Video Lottery Advanced Thermal Printer Owner s Manual Figure 16 Mechanical Dimensions Bottom View ...

Страница 28: ...720012 0000R May 2019 22 High Speed Video Lottery Advanced Thermal Printer Owner s Manual ...

Страница 29: ...hichever is reached first Do not clean the head unit immediately after printing 1 Unlatch the print mech pulling up on the top front portion of the print mech Unlatch the roller assembly by pushing up on the top green lever 2 The top of form sensor is located opposite the thermal head platform The sensor can be cleaned with a cotton swab and isopropyl alcohol Wait for the alcohol to dry before clo...

Страница 30: ...r approval request to Nanoptix Inc which should include Printer model Serial Brief problem description Ship defective products to Nanoptix Inc Ensure that each package being sent is identified by the specified RMA number NOTE Make sure to place a blank ticket or a piece of paper between the thermal print head and roller for shipping and storage United States of America Canada and International RMA...

Страница 31: ...ery Advanced Thermal Printer Owner s Manual 6 2 Technical Support Contact Information Service department Nanoptix Inc 699 Champlain St Dieppe NB Canada E1A 1P6 Tel 506 384 3388 Fax 506 384 3588 E mail support nanoptix com Web site www nanoptix com ...

Отзывы: