background image

10

10.0  NCP-DVR100 APP OPERATION

To use the NCP-DVR100 App, your smart device will need to be connected to the dash 
camera's WiFi connection. For instructions on connecting please see 

"9.0 Downloading and 

installing the NCP-DVR100 App" on page 8 

of this manual.

After connecting with the dash camera's 
WIFI, follow the below steps to use the App: 

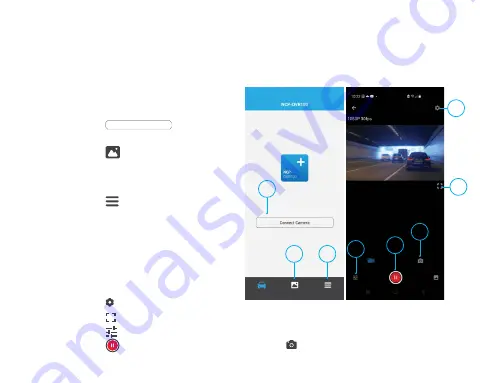
1. 

Press 

Connect Camera

 to connect with 

the dash camera.

2. 

Press 

 to open the local library of 

folders to access videos and photos 
saved from the dash camera to your 
phone, via the App.

3. 

Press 

 to check the Firmware 

version and for instructions on how to 
work the APP user manual.

4. 

After connecting with the camera, the 
screen will change to live view. Whilst 
in live view you can adjust the position 
of the lens or position of the dash 
camera.

5. 

Press   to enter settings. 

6. 

Press   to change to full screen.

7. 

Press 

  to change the Video recording resolution.

8. 

Press 

 to 

START 

and 

STOP RECORDING 

& press   to change to Picture Mode.

1

2

3

5

6

7

8

4

Содержание NCP-DVR100

Страница 1: ...Full HD Dash Camera with WiFi Supercapacitor NCP DVR100 USER MANUAL Your Safety Our Priority...

Страница 2: ......

Страница 3: ...RTS 6 8 0 KEY FUNCTIONS 7 9 0 DOWNLOADING AND INSTALLING THE NCP DVR100 APP 8 10 0 NCP DVR100 APP OPERATION 10 11 0 SETTINGS 11 12 0 PLAYBACK DELTE AND DOWNLOAD THE FILES FROM THE DASH CAMERA TO PHONE...

Страница 4: ...any devices that emit radio interference eg microwave ovens It is considered normal for the dash camera to get warm while using it IT IS HIGHLY RECOMMENDED THAT YOU FORMAT BOTH USED OR NEW MICRO SD CA...

Страница 5: ...following the steps as outlined on page 8 Please select SETTINGS and press FORMAT SD CARD The dash camera will format the Micro SD card and will communicate via the unit s audio commands that the Mic...

Страница 6: ...ic Film x1 5 0 PRODUCT OVERVIEW CAMERA 1 Adhesive sticker 2 Speaker vent 3 Camera lens 4 Recording indicator LED 5 Power connected LED 6 WIFI connected LED 7 Mini USB connector for power 8 Microphone...

Страница 7: ...ic film Press down on the base of the bracket with your hand for 30 seconds to ensure that the sticker adhesive is attached to the electrostatic film Adjust the camera by rotating the barrel until the...

Страница 8: ...our Micro SD card is full please replace or reformat Please connect your smartphone to format the Micro SD card Please connect your smartphone to synchronise time Please insert your Micro SD card The...

Страница 9: ...take a photo hold for 3 seconds to turn on off WIFI Power button Power on off Hold down for 3 seconds to power on off Reset Hold down for 8 10 seconds to reset the device and again for 3 seconds to p...

Страница 10: ...Phone iPhone 5 or later using iOS 10 0 and above Samsung Galaxy S3 and later using Android 6 0 and above For you to correctly connect your smart device to your NCP DVR100 you will need to download and...

Страница 11: ...nstalled on your smartphone and the dash camera has been turned on open your phone s WiFi settings and connect to the wireless connection named NCPDVR100 4 When prompted enter the password 12345678 WI...

Страница 12: ...ash camera 2 Press to open the local library of folders to access videos and photos saved from the dash camera to your phone via the App 3 Press to check the Firmware version and for instructions on h...

Страница 13: ...pressing the settings button the settings menu pictured will be displayed 1 Press each setting to change Please refer the table on page 12 4 NCP DVR100 App Settings on page 14 to access setting option...

Страница 14: ...ess to cancel and go back to the previous menu 3 Press to select all files or select individual files by pressing on the in the top left hand corner of the preview image 4 After selection s is made pr...

Страница 15: ...Select video videos and press the button 5 The download will start and automatically save footage to your phone This data can be accessed through the NCP DVR100 App in the Folder named Local 12 3 SHA...

Страница 16: ...d videos Volume Off Low Mid High Allows you to adjust the sound level of the inbuilt speaker Loop Duration 1 3 and 5 minutes Loop recording allows you to set the duration of video the camera will reco...

Страница 17: ...re the privacy of your recorded videos If you forget your password you can reset it in the dash camera by holding down the power button on the dash camera for 8 10 seconds or by selecting Factory Rese...

Страница 18: ...de Supported Sensor 200W Pixel Resolution 1920 1080P 30FPS Battery Supercapacitor Video Format TS MOV Mic 42db Photo format JPG Speaker 8 1W Frequency 50HZ 60HZ Power interface 5V 1A Timestamp Support...

Страница 19: ...stated on the packaging This warranty is only valid where you have used the product in accordance with any recommendations or instructions provided by Directed Electronics This warranty excludes defec...

Страница 20: ...defects in materials and workmanship for one 1 year from the date of your purchase unless a longer warranty period is required by law The specifics of this Nanocam Plus limited warranty are covered in...

Страница 21: ...r purpose or that Nanocam Plus equipment and services provided will detect or avert such incidents or their consequences Nanocam Plus does not undertake any risk that you or property or the person or...

Страница 22: ...or any loss or damage of any kind incurred in connection with use of or exposure to any content posted emailed accessed transmitted or otherwise made available via Nanocam Plus Nanocam Plus liability...

Страница 23: ...n or limitation of incidental or consequential damages so the above limitation or exclusion may not apply to you Additionally this provision is not intended to limit Nanocam Plus s liability in the ev...

Страница 24: ...com au www directed co nz All Images Information and Content are Copyright 2021 Directed Electronics Australia Pty Ltd All Rights Reserved V1 0 www nanocamplus com au www nanocamplus co nz Your Safety...

Отзывы: