EN
5
WWW.NAKAYAMATOOLS.COM
Changing the engine oil
Drain the oil while the engine is still warm to assure rapid and complete draining.
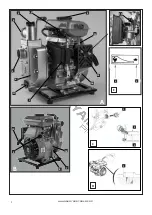
(1) Remove the oil filler cap/ dip stick and drain plug to drain the oil.
(2) Reinstall the drain plug and tighten securely.
(3) Refill with the recommended oil to the specified level
Engine oil tank capacity: 0.35Littres
Please dispose of used motor oil in a manner that is compatible with the environment.
We suggest you take it in a sealed container to your local recycling centre or service station for reclamation. Do not throw it in the trash or pour it on the ground.
Air Cleaner maintenance instructions
A dirty air cleaner will restrict air flow to the carburettor. To prevent carburettor malfunction, service the air cleaner regularly. Service more frequently when
operating the pump in extremely dusty areas.
Warning: Never use gasoline or low flash point solvents for cleaning the air cleaner element. A fire or explosion could result.
Never run the engine without the air cleaner. Rapid engine wear will result from contaminants, such as dust and dirt being drawn into the engine.
1. Unscrew the wing nut, remove the air cleaner cover and remove the foam element.
2. Wash the element in solution of household detergent and warm water, then rinse thoroughly, or wash in non-flammable or high flash point solvent. Allow
the element to dry thoroughly.
3. Soak the element in dean engine oil and squeeze out the excess oil. The engine will smoke during initial start-up if too much oil is left in the element.
4. Reinstall the air cleaner element and the cover.
Spark plug maintenance instructions
In order to service the spark plug, you will need a spark plug wrench (commercially available).
Recommended spark plug: F7TC/F7RTC
To ensure proper engine operation, the spark plug must be properly gapped and free of deposits.
Warning: If the engine has been running, the muffler will be very hot. Be careful not to touch the muffler.
1. Remove the spark plug cap.
2. Clean any dirt from around the spark plug base.
3. Use a spark plug wrench to remove the spark plug.
4. Visually inspect the spark plug. Discard it if the insulator is cracked or chipped. Clean the spark plug with a wire brush if it is to be reused.
5. Measure the plug gap with a feeler gauge. Correct as necessary by carefully bending the side electrode. The gap should be: (0.70-0.80mm)
6. Check that the spark plug washer is in good condition, and thread the spark plug in by hand to prevent cross- threading.
After the spark plug is seated, tighten with a spark plug wrench to compress the washer.
If installing a new spark plug, tighten 1/2 turn after the spark plug seats to compress the washer. If reinstalling a used spark plug, tighten 1/8-1/4 turn after
the spark plug seats to compress the washer.
Notice: The spark plug must be securely tightened.
An improperly tightened spark plug can become very hot and could damage the engine.
Never use spark plugs which have an improper heat range. Use only the recommended spark plugs or equivalent.
Transportation / storage
Warning: To avoid a fire, make sure to cool the water pump down thoroughly before transportation or storage in room.
Transport the water pump with the fuel cock turned off, besides, keep it horizontal to prevent fuel from spilling. Spilled gasoline and gasoline vapour may ignite.
1. Make sure the storage site for the water pump is dry and clean.
2. Clean the water pump inside.
If the water pump is used to pump water mud, sand or heavy debris, deposit of such may remain inside it. Before storage, operate the water pump to suck
into fresh water to wash, otherwise impeller may be damaged once reuse. Finishing wash, drive off the water drain plug, then empty the water in the pump
thoroughly, and reinstall the water drain plug.
3. Empty fuel inside the fuel tank.
a. Set the fuel cock to OFF, drive off the fuel drain plug of the carburettor floater room, drain out the fuel in the carburettor. Hold drained gasoline in a proper
container.
b. Set the fuel cock to ON.
c. Reinstall the fuel drain plug of the carburettor floater room.
4. Replace engine oil.
S. Dismantle the spark plug, and fill clean specified engine oil into the cylinder about one soup spoon. Turn the engine several times to distribute oil evenly and
then reinstall the spark plug.
6. Pull the starter handle until feel anti- action, and then continues pulling until the triangle mark on the starter wheel lines up with the starter screw hole. In
this location, both the air inlet and exhaust valve s are closed, which may prevent the engine inside rusting.
7. Cover the water pump to protect from dust.
Troubleshooting
Engine cannot start
Check according to the following:
1. Check if there is enough fuel.
2. Check if the fuel cock is turned on.
3. Check if the enters the carburettor. in the case that the fuel cook id turned on, check through dismantle the fuel drain plug at the bottom of the carburettor.
Warning: If fuel is spilled, be sure to wipe it dry before checking the spark plug and starting up the engine, otherwise spilled fuel or fuel vapour may ignite.
4.Check if the engine switch is at ON.
5.Check if there is enough engine oil in the crankcase.
6.Check if there is spark plug spark.
a. Dismantle the spark plug cap. Clear away dirt around the spark plug, and then dismantle it.
b. Install the spark plug into the spark plug cap.
c. Set the engine plug into the spark plug cap.
Содержание SP9800
Страница 1: ...en el WWW NAKAYAMATOOLS COM ART NO SP9800 042815...
Страница 2: ...2 WWW NAKAYAMATOOLS COM 3 4 C D 1 1 2 3 7 1 2 4 6 7 8 9 10 14 17 11 13 12 15 16 E A B 3 5...
Страница 8: ...8 WWW NAKAYAMATOOLS COM EL 90 3 4 1 2 3 ON 4 5 6 1800 3 5 C 1 2 3 D 1 SF SG API 1 2...
Страница 10: ...10 WWW NAKAYAMATOOLS COM EL 4 ON 5 6 7 2 1 2 3 4 5 6 Service 1 2 3 OFF ON 4 5 6 7 1 1 2 3...
Страница 11: ......


