10
ELECTRIC BLANKET FUNCTIONING
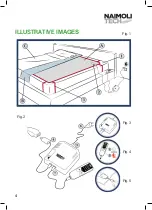
(FIG. 2-3-4-5)
WARNING!
Use the under blanket only with the electronic controller provided
(
model
PU.NML.001
)
.
CONNECTIONS FIG
. 2
Make sure that the connecting cable
(4)
from the controller is correctly plugged
into the connector on the upper side of the blanket
(2).
For the 2-persons
blanket, it is necessary to repeat the operation to connect the second connecting
cable too. Plug the cable/plug into the controller socket
(5),
and insert the plug into
the wall socket
(6).
SWITCHING ON/OFF THE ELE
C
TRIC BLANKET
AND FUNCTIONING
ON/OFF SWITCH
(FIG. 3-4)
The on/off switch
(1)
ispositioned on the underside of the controller
(
fig.3
),
and it
allows to power the system. In
“
1
”
position the system is powered and the LED 1
lights signal that the controller
(fig.4)
has switched on. In this condition, the sytem
does not power the electric under blanket, but it is in standby more ready for
operation.
FUNCTIONING
(FIG. 4)
TIMER BUTTONS 2
SWITCH ON: The timer button 2 allows the start of the heating function. A long
pression (3 seconds) on button 2 (timer) switches the system on with the timer set at
1 hour of operation.
TIMER
:
Pressing button 2 allows setting the heating timer from 1h to 8h.
Содержание Thin padding
Страница 1: ...15 USER S MANUAL Heating under blanket Model Thin padding Model Top Padding...
Страница 2: ......
Страница 4: ...4 ILLUSTRATIVE IMAGES Fig 1 Fig 2 Fig 3 Fig 4 Fig 5...


