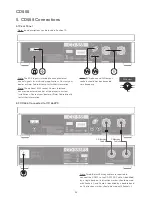
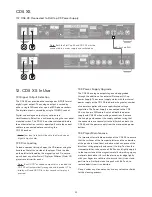
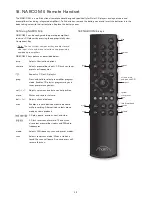
NAIM CD555 Скачать руководство пользователя страница 7

E5

CD555

6. CD555 In Use

6.1 Disc Loading

To open the transport door press the player door button or 
the handset open key. To load a disc place it on the platter 
followed by the magnetic puck. Do not use a puck from any 
other Naim CD player.

If the player is stopped the door will open automatically 
when a hand is moved towards the proximity sensor located 
in the player front panel display window.

To close the door press the player door button or the 
handset open key. The door will also close if the player play 
button or handset play key are pressed.

Note: If the door hits an obstruction the door indicator 
will flash and the door will stop moving. Remove the 
obstruction before attempting to open or close the door 
again.

Note: If the door is left open for five minutes it will close 
automatically to prevent inadvertent damage or dust 
build-up within the player.

Note: If an HDCD® encoded compact disc is loaded the 
CD555 will automatically recognise and decode it. The 
display will read HDCD for a few seconds after play is 
pressed.

6.2 Player Maintenance

It is important for reliable operation of the CD555 to ensure 
that the surfaces of the transport platter and the underside 
of the puck are free of dust or debris which can prevent the 
disc from sitting properly and cause it to slip.

To clean the transport platter, take a piece of Blu-Tack and 
lightly apply it to the top surface of the hub, picking up any 
material attached to it. Brush the plastic outer edge lightly 
with your finger or a soft brush to ensure that it is dust and 
particle free. Similarly, clean the puck with Blu-Tack, to 
remove debris from its underside.

Do not, under any circumstances, use any solvents or fluids 
for the cleaning process.

6.3 Player Door Reset and Calibration

If at any time the player door fails to open or close correctly, 
or the top panel door button flashes, the door may need re-
setting and calibrating. The procedures are as follows. 

Note: It may only be necessary to carry out the Position 
Calibration procedure.

6.3.1 Door Position Calibration

Switch the player off. Hold down the top panel door button 
and switch the player on. The player display should read - - . 
Switch the player off and, after a short while, back on again. 
If the door button flashes this indicates that the Door Reset 
and Motion Calibration procedures are necessary. Carry out 
the following two procedures.

6.3.2 Door Reset

Note: Door Reset will also reset DIN/Phono Socket 
selection, Display settings, RC5/RS232 settings and 
Control Mode setting (see Section 16.2).

Switch the player off. Hold down the top panel stop button 
and switch the player on. Switch the player off and carry out 
the Door Motion Calibration procedure.

6.3.3 Door Motion Calibration

With the door fully closed press and hold the top panel door 
and play buttons and switch the player on. 

The door will continually open and close and the level of 
open/close gain adjustment will be displayed. Allow the 
player to run until the values displayed for open and close 
have settled to consistent values. The door should now open 
and close consistently. Switch the player off and, after a 
short while, back on again. The door should now operate 
correctly.

®

,


HDCD

®

, High Definition Compatible Digital

®

 and Pacific Microsonics™ are either registered trademarks or trademarks of Pacific Microsonics, Inc. in the United States and/or other countries.

Содержание CD555

Страница 1: ...Reference Manual English CD PLAYERS CD555 CDX CD5 XS CD5si...

Страница 2: ...E6 9 CDX2 In Use E7 CD5 XS E8 10 CD5 XS Introduction and Installation E8 11 CD5 XS Connections E8 12 CD5 XS In Use E9 CD5si E10 13 CD5si Introduction and Installation E10 14 CD5si Connections E10 15...

Страница 3: ...wire coloured GREEN AND YELLOW must be connected to the terminal in the plug marked by the letter E or by the safety earth symbol or coloured GREEN or GREEN and YELLOW The wire coloured BLUE must be c...

Страница 4: ...circumstances depending on where you live and the earthing arrangements in your home you may experience radio frequency interference Controls on broadcasting in some territories allow very high levels...

Страница 5: ...cting cables or switching on Ensure that power amplifiers are switched off and the preamplifier volume is turned down before the power supply is switched on The power button is located on the front pa...

Страница 6: ...player in custom installations Contact your dealer or Naim Audio directly for further information ch1 ch2 ve nc nc DIN output CD Burndy Cable 1 CD Burndy Cable 2 Note Two different Burndy cables are r...

Страница 7: ...uck with Blu Tack to remove debris from its underside Do not under any circumstances use any solvents or fluids for the cleaning process 6 3 Player Door Reset and Calibration If at any time the player...

Страница 8: ...once the transit screw is removed The player and external power supply if used should be installed in its final location before connecting cables or switching on Ensure that power amplifiers are switc...

Страница 9: ...ally recognise and decode it The display will temporarily read HDCD after play is selected 9 3 Power Supply Upgrade The CDX2 can be upgraded by the addition of a CD 555PS XPS or XP5 XS Power Supply Th...

Страница 10: ...e the transit screw is removed The player and external power supply if used should be installed in its final location before connecting cables or switching on Ensure that power amplifiers are switched...

Страница 11: ...an external Flatcap or Hi Cap Power Supply The external supply works with the internal power supply of the CD5 XS to offer both a greater number of separate supplies and more sophisticated voltage re...

Страница 12: ...taneously 15 CD5si In Use 15 1 Disc Loading To load a compact disc pull open the CD drawer using the handle on the left hand side of the player Place the disc on the platter followed by the magnetic p...

Страница 13: ...t reverse rather than step forwards and step backwards can be selected by pressing and holding the CD player next and prev buttons respectively The alternative interface also provides a pause function...

Страница 14: ...ch R com back into CD player mode either press the pre or tun key again In default mode the R com keys have the following functions disp Scrolls through the display options of track time and display o...

Страница 15: ...ecord device output to be heard while recording Alternatively selects mono mode on some products CD play pause previous next and stop CD fast reverse and forward The keys can also select preamplifier...

Страница 16: ...ucks are illustrated below and their player applications listed 19 Diagram Icons Analogue signal Power switch Digital signal DIN Phono socket selection switch 555PS Power Supply Optional 555PS Power S...

Страница 17: ...ting it from the mains Warning an apparatus with CLASS I construction shall be connected to a mains socket outlet with a protective earthing connection Warning batteries installed shall not be exposed...

Страница 18: ...Go Deeper Naim Audio Ltd Southampton Road Salisbury England SP1 2LN Call 44 0 1722 426600 Email info naimaudio com naimaudio com 12 001 0034 Issue 8C...

Отзывы: