Nadatel SDVR-9000C Скачать руководство пользователя страница 44

5. Live, Search, and Playback 

5-1. Live Viewing Screen 

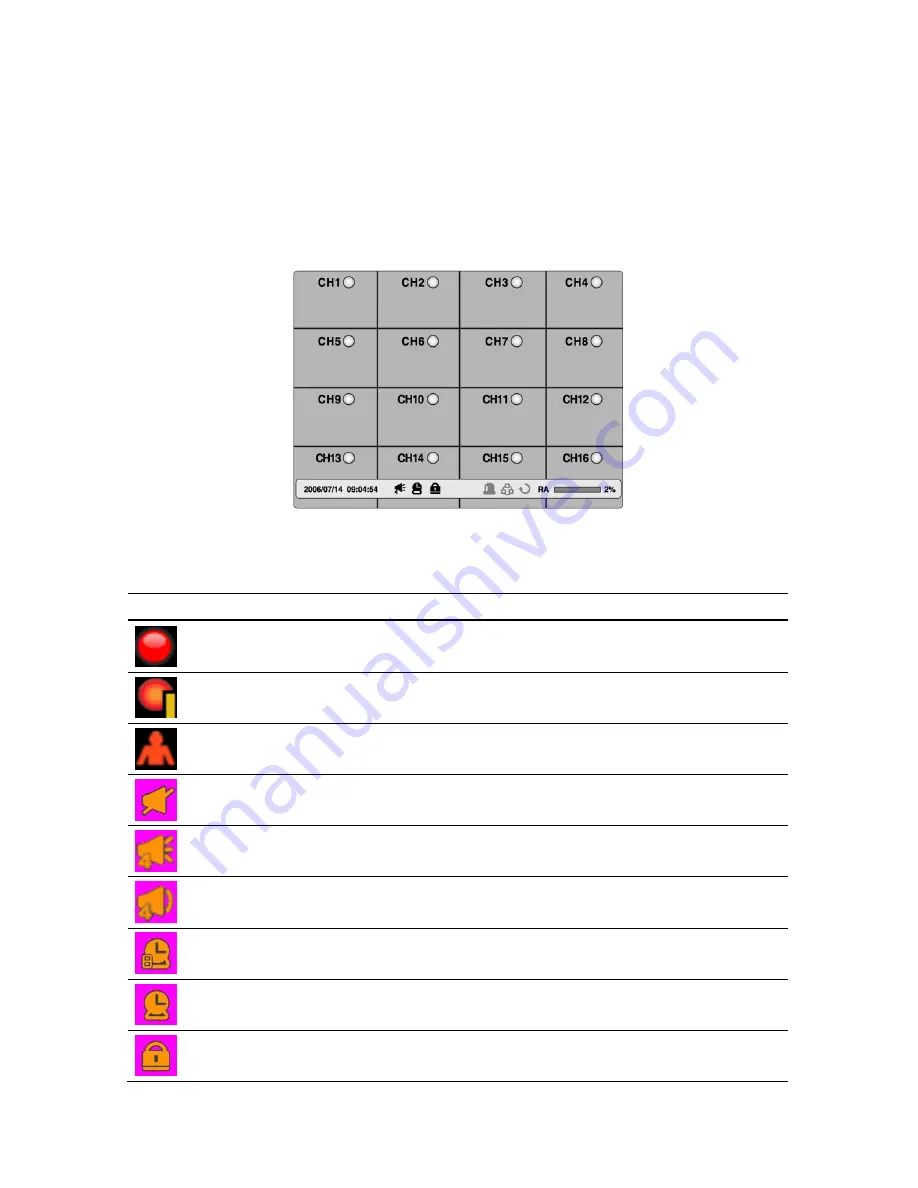
In the Live screen, video inputs from the cameras are displayed as they are configured in the 

Display Setup screen. Various on-screen display (OSD) symbols, which indicate the status of 

the DVR, are described in Table 5.1.1. 


Figure 5.1.1. Live Viewing Screen 


Table 5.1.1. Status Indicator Icons in Live Viewing Screen 

Icon Description 


Continuous recording in progress. 


Manual recording in progress. To set the Manual recording mode, press the Record 

button on the front panel. 


Motion alarm recording in progress. 


Audio mute. To set audio mute, press the Audio button on the front panel. 


Single audio display. To set audio single for highlighted channel only, press the Audio 

button on the front panel. 


Mixed audio display 


Indicates that alarm is set. To set the alarm function, press the Alarm button on the 

front panel.   


Indicates that alarm output is activated. 


Indicates that lock function for a remote control is set.   

 44

Содержание SDVR-9000C

Страница 1: ...r Ver 2 1 About this user guide Before installing and using this unit please read this user guide carefully Be sure to keep it handy for later reference The specification and information are subject t...

Страница 2: ...of electric shock to persons Cautions This product has multiple rated voltages 110v and 220v See installation instructions before connecting to the power supply This product uses a Lithium battery To...

Страница 3: ...s not responsible for any damage caused by improper use of the product or failure to follow instructions for the product The manufacturer is not responsible for any problems caused by or resulting fro...

Страница 4: ...air flow required for safe operation of the equipment is not compromised C Mechanical Loading Mounting of the equipment in the rack should be such that a hazardous condition is not achieved due to une...

Страница 5: ...to ensure the components specified below are included DVR Set CDRW Option Client Software CD Remote Control Battery1 5V AAA x 2EA User Guide IDE HDD Cable 80pin 1EA IDE CDRW Cable 40pin 1EA Option Po...

Страница 6: ...22 485 Select RS 485 Termination 485 422 ON OFF NOTICE 1 Do not change the setting when the power is on When the switch is changed the DVR should be rebooted to apply the new setting 2 RS 485 Terminat...

Страница 7: ...GB 7200 RPM 2 M E IDE SAMSUNG 160 GB 7200 RPM 2 M E IDE 160 GB 7200 RPM 2 M E IDE 200 GB 7200 RPM 8 M E IDE 250 GB 7200 RPM 8 M E IDE Western Digital 320 GB 7200 RPM 8 M E IDE 40 GB 7200 RPM 2 M E ID...

Страница 8: ...nstall the CDRW inside the DVR 2 Fasten the screws on both side of CDRW as indicated in red circle below 3 Connect the IDE CDRW 40pin cable and Power cable to the point on both CDRW and Main board as...

Страница 9: ...ver of the unit 2 Fix the bracket to the hard disk using the supplied HDD mounting bracket screws 3 Connect the supplied IDE HDD 80pin cable and Power cable to the hard disk and fix the hard disk to t...

Страница 10: ...CH S VIDEO 1CH VGA Output Level Composite 1 0Vp p _0 2 75 Ohm Signal Format NTSC PAL VGA Video Output Etc Output 9 16CH Loop back 1CH SPOT Input Output 4 CH Line input 1 CH Line output Audio Audio Cod...

Страница 11: ...S Own developed Designed for never broken by any power failure USB 2 0 flash stick Still Image AVI CDRW Still Image AVI Storage Backup Network Moving picture Still Image Menu Display GUI User I F Inpu...

Страница 12: ...704x240 120fps 704x480 60fps SDVR 16200C PAL 352x288 200fps 704x288 100fps 704x576 50fps NTSC 352x240 480fps 704x240 240fps 704x480 120fps SDVR 16400C PAL 352x288 400fps 704x288 200fps 704x576 100fps...

Страница 13: ...To Specific Time 48 5 2 6 Log List Search 48 5 2 7 Archive Search 49 5 3 Play mode 49 6 PTZ Control 50 7 Backup 51 7 1 Still Image backup onto USB flash memory or CD media 51 7 2 Video backup onto US...

Страница 14: ...Download Web Brower Viewer and Connection 66 10 2 Main Features 67 10 2 1 Live 67 10 2 2 Search and Playback 68 APPENDIX 69 1 How to register DDNS Dynamic Domain Name Server 69 1 1 Setting of NETWORK...

Страница 15: ...es remote live playback PTZF control and backup Network via LAN DHCP ADSL Dynamic and Static IP address 4 channels audio recording User friendly setup menu with graphic user interface Easy to schedule...

Страница 16: ...P Indicating that USB or CDRW storage device is stored images or video Table 2 1 2 Front panel buttons NO Name Description 1 POWER POWER ON OFF 2 NUMBER Channel keys For channel 10 press the 0 key For...

Страница 17: ...ess to move up the menu in Setup mode It is also used as the number 1 when entering password 14 RIGHT Press to move right or to change the values in Setup mode It is also used as the number 2 when ent...

Страница 18: ...NTSC or PAL format 5 S VHS S VHS output 6 VGA Connector for VGA monitor 7 AUDIO IN 4 connectors for audio input 8 AUDIO OUT 1 connector for audio output 9 RS 232 For engineering use only 10 LAN RJ 45...

Страница 19: ...e Mute or Highlighted channel only LOCK Locks functions SEQ Sequence of Full or Quad view RECORD Manual recording SEARCH Search menu screen DIRECTION SELECT Direction or number 1 to 4 Enter ID DVR ID...

Страница 20: ...y pressing the up button 4 times and then pressing the SEL button It is recommended that a new password be assigned to protect the system The procedure for assigning a password is found in section 3 7...

Страница 21: ...NCE SEQ DWELL TIME OSD CONTRAST CHANNEL DISPLAY BRIGHTNESS CONTRAST HUE SATURATION RECORD RESOLUTION CHANNEL FRAME RATE QUALITY RECORDING SENSOR RECORDING 21 PRE RECORD POST EVENT RECORD AUDIO SCHEDUL...

Страница 22: ...BANDWIDTH SAVING NETWORK TYPE IP GATEWAY SUBNET MASK DNS DDNS CONFIG SAVE CONFIG LOAD CONFIG LOAD DEFAULT LOAD FACTORY DEFAULT 3 2 Setup Display Mode To set values for live display use the UP and DOWN...

Страница 23: ...ngs Presses SELECT to change channel name DISPLAY Enable disable display of the video channel in live display mode BRIGHTNESS Change the brightness value for the specified channel CONTRAST Change the...

Страница 24: ...4 240 NTSC 704 288 PAL 60 50 fps 704 480 NTSC 704 576 PAL 480 400fps version 480 400fps 352 240 NTSC 352 288 PAL 240 200fps 704 240 NTSC 704 288 PAL 120 100 fps 704 480 NTSC 704 576 PAL QUALITY Select...

Страница 25: ...o to Record Channel and press SEL button 2 Then the bellow setup screen will pop up Figure 3 3 2 QUICK RECORD setup screen 3 3 2 Recording Schedules To set up a recording schedule select SCHEDULE in t...

Страница 26: ...e using the SEL button is applied to the selected 1 hour increment for the selected channel SEL The recording mode can be selected using the SEL button COPY FROM to COPY TO Setup values of recording m...

Страница 27: ...ivity for the specified channel Control the motion sensitivity from 1 to 9 KEY TONE Enable disable key tone REMOTE CONTROL ID Select an ID of remote control 1 Select ID 2 Press the same number as ID s...

Страница 28: ...3 Menu item in SPOT OUT Setup screen Item Description SPOT TYPE Select either FULL or QUAD for spot channel display SPOT ON EVENT Enable disable spot channel display when event occurred SPOT EVENT DW...

Страница 29: ...a ID using the LEFT and RIGHT arrow controls The following options are available on the PTZ control screen CHANNEL channel number that the PTZ is connected to NAME protocol type SPEED 19200 14400 9600...

Страница 30: ...5 Motion Zone selection screen 3 5 Setup Storage Mode Set the storage parameters in the Storage setup screen Figure 3 5 1 STORAGE setup screen Table 3 5 1 Menu items in STORAGE Setup screen Item Desc...

Страница 31: ...d that you archive any data that you may need in the future before you format the hard drive DISK INFO Hard drive information RECORDING LIMIT Enable disable recording limit RECORDING LIMIT DAYS Set th...

Страница 32: ...firm the name SPACE Caps Lock Select either Capital or Lower letter BS Back space Erase previous character Clear Erase all characters DESCRIPTION Press SEL to view system information System version st...

Страница 33: ...UP and DOWN arrow controls to change the selected character Press ESC and select YES to confirm the new date and time DAY LIGHT SAVING Set the DLS Daylight Saving for the area The options are USA EU O...

Страница 34: ...disable sending daily e mail reports on the status of your DVR EVENT ALARM Enable disable sending e mail reports when event alarm occurs MAIL ADDRESS Enter the appropriate email address to enable sen...

Страница 35: ...Items in PASSWRORD Setup Screen Item Description ADMIN PASSWORD Set the administrator password After selecting this menu item you will be promoted for your current password and then the new password...

Страница 36: ...e the arrow controls to change the password as described in ADMIN PASSWORD above User password is asked for the Search function NETWORK PASSWORD Set the remote access password You will need to enter t...

Страница 37: ...etwork connection Options are LAN DHCP ADSL Note Other parts of the Network Setup screen change depending on what network type you select DHCP Sets to use HDCP If this is selected DVR automatically ge...

Страница 38: ...P port number for access to each unit from outside the LAN Also the IP sharing device must be configured for port forwarding so when each port is accessed on the IP sharing device it will forward to t...

Страница 39: ...d IP to DVR from IP sharer itself using DMZ function out of such sharer Input IP set in DMZ on IP field and Gateway of ADSL modem on Gateway field Similarly for Subnet Mask DNS address input relevant...

Страница 40: ...option is used as a way to automatically get IP address Figure 3 8 3 Network setup screen DHCP 3 8 2 3 ADSL PPPoE To use this ADSL PPPoE function when the network type connecting the DVR is using PPP...

Страница 41: ...up values that you have selected select YES Then system will reboot Figure 3 8 5 Network setup screen SAVE SETUP 3 9 Setup CONFIG Mode User can control the configuration of DVR Figure 3 9 1 Config set...

Страница 42: ...to another DVR using the USB Memory stick Put the USB stick on the front panel and press SEL to start the loading process LOAD DEFAULT Select ON to reset the system to the default settings Password da...

Страница 43: ...LOAD FACTORY DEFAULT Select ON to reset the system to the factory default settings 4 Saving Setup To preserve the setup values that you have selected select YES Figure 4 1 1 SAVE SETUP screen 43...

Страница 44: ...n Continuous recording in progress Manual recording in progress To set the Manual recording mode press the Record button on the front panel Motion alarm recording in progress Audio mute To set audio m...

Страница 45: ...channel 16 press the 10 and 6 key SEQ Enable disable the automatic sequential display of channels in full screen quad 9 split display mode PTZ Controls Pan Tilt Zoom operations SETUP Launch the SETUP...

Страница 46: ...TIME LOG and ARCHIVE on the screen 5 2 1 TIME LINE Search The TIME LINE search window is used to find the stored video by using the time line bar Figure 5 2 2 Time line Search 1 Select the date of the...

Страница 47: ...to the categories you have previously entered The ESC button will return the user to the previous screen Figure 5 2 3 Event Search screen 1 Select the date of the video to begin searching Use the LEF...

Страница 48: ...cting GO TO LAST TME on the SEARCH window 5 2 5 Go To Specific Time Figure 5 2 4 Go To Search Screen You can search for video data from a specific instance by setting the date and time in the GO TO se...

Страница 49: ...hrough the on screen listings 4 Use the LEFT and RIGHT buttons to display a list of stored events that happened previous to or after the current selection 5 Once the desired event has been selected pr...

Страница 50: ...right of the screen Jump Step backward The playback position moves 60 seconds backward Press to play or pause recorded video Jump Step forward Playback position moves 60 seconds forward Press to fast...

Страница 51: ...utton for FOCUS near or far of the selected camera INITIALIZE Initialize the PTZ settings of the selected camera Table 6 1 2 Description of RS 422 485 port NO Description Classification Rs 422 RS 485...

Страница 52: ...tick CD media or hard drive while playing back recorded video In playback mode press the BACKUP button to launch the archiving function 1 When you press BACKUP button the DVR will ask whether to archi...

Страница 53: ...EL to open the list of stored data 3 Use the UP and DOWN buttons to scroll through the on screen listings 4 Use the LEFT and RIGHT buttons to display a list of stored events that happened previous to...

Страница 54: ...54 7 4 2 Playback of backup video in exclusive NaFs format If the data is backed up in an exclusive file format this video can be playbacked only an exclusive player in CD that is provided with DVR...

Страница 55: ...amed upgrade After the firmware upgrade is copied into the USB memory stick connect the USB memory stick to the USB port on the front panel and do the following 1 Press the SETUP button and enter the...

Страница 56: ...cess the DVR at a time For remote viewing the frame rate is limited to 1 frame sec when there is no recording operation in the DVR When the DVR is recording the video frame rate for remote live monito...

Страница 57: ...Vista Network 10 100Base T 10 100Base T Others Direct X 8 1 Direct X 9 0 or Higher Before installing the program check the PC specifications The Network Client Viewer may not perform correctly if the...

Страница 58: ...ur desktop to start the program Figure 9 4 1 Main user interface Table 9 4 1 Main controls in Live NO Button Description 1 DATE TIME Displays the current date and time 2 CONNECT Click this icon to con...

Страница 59: ...con is clicked this pop up window appears The still image is captured in either jpeg or bmp file format 8 PLAY PAUSE Click this icon to play pause live video 9 RECORD Enable or disable recording of li...

Страница 60: ...the upper right of the main user interface Figure 9 5 1 Main user interface Table 9 5 1 Main controls in Search No Button Description 1 DATE TIME Displays the recording time of the data selected on th...

Страница 61: ...ne scale and move it to the time you wish to play back Click the play icon to display the recorded video 9 PLAY BUTTONS 10 DISPLAY MODE Click these icons to select display mode 9 5 1 Backup You can ba...

Страница 62: ...ord for security options Save Path Specify the location to record the receiving video for Backup and still image for Capture Automatic reconnection If a user selects this function the client S W will...

Страница 63: ...want to allow and the save path for the log file z LOG Select to save event log into log file z ICON Select to display the event on live video z EVENT LIST Select to show the event in the Event List...

Страница 64: ...for Always Event or Auto recording You can also select individual channels or all channels to record When you set the recording condition to Event you can set event for motion or alarm with duration Y...

Страница 65: ...n select which local disk to use and the amount of disk space you want to allow the program to use for recording You can also choose to overwrite data or stop recording when the maximum amount of disk...

Страница 66: ...10 1 Download Web Brower Viewer and Connection 1 User needs to access http ns standalone4ch com webview2 to get a web browser viewer Then the window will appear as bellow Click YES to download Web Bro...

Страница 67: ...3 Click button and enter IP address or Domain name using DDNS the password and Port number 4 Then user can access DVR 10 2 Main Features 10 2 1 Live Figure 10 2 1 Main user interface Live 67...

Страница 68: ...his icon to capture the image from live display 7 SETUP Click this icon to control remotely the setting of DVR 8 PAN TILT Use these buttons to control the PAN TILT features on the remote camera 9 ZOOM...

Страница 69: ...NDAR Use these buttons to control the ZOOM FOCUS features on the remote camera 10 Timeline Search Window The audio can be turned on or off by clicking the audio icon APPENDIX 1 How to register DDNS Dy...

Страница 70: ...stration No on the rear panel of the system Registration No can be provided by manufacturer or distributor 70 NOTE If there is not registration No on the system please contact the distributor or manuf...

Страница 71: ...tion DDNS is not the same as Domain name You may use alpha and numerical characters as well as hyphens for your Domain name i e A Z a z 0 9 or for your domain name and it is case sensitive 71 C Press...

Страница 72: ...your DVR via the provided Network Client S W A Run Network Client S W program and click the connect button B Enter your domain name instead of IP address in the IP Address field C Enter the Port no Pr...

Отзывы: