NAD T743 Скачать руководство пользователя страница 26

2 6

2 6

2 6

2 6

2 6

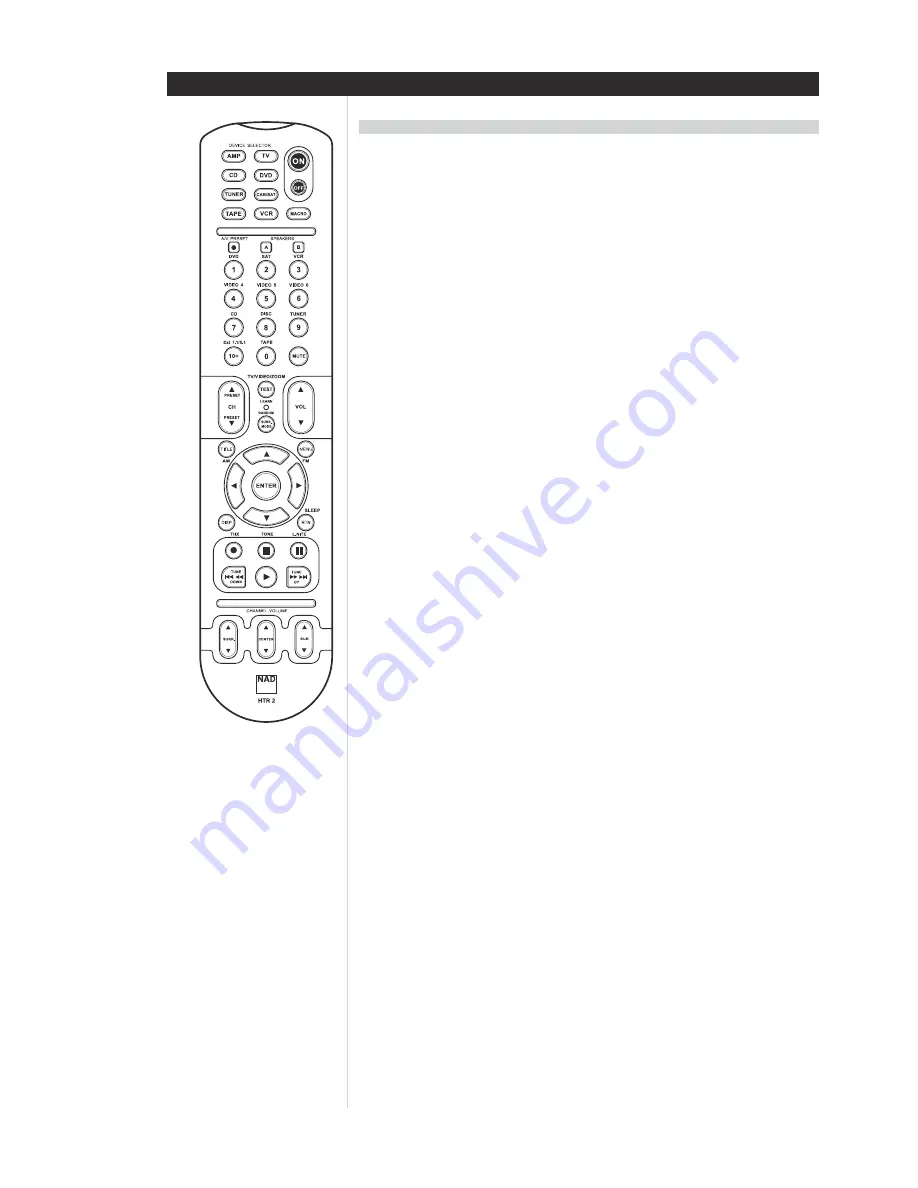
USING THE HTR 2 REMOTE CONTROL

• Controls up to 8 devices.
• 44 function keys.
• Learns up to 352 commands.
• Records up to 44 macros with a maximum of 64 commands each.
• Configurable punch-through.
• Key illumination with programmable timeout.
• Upgradable.
• Contains pre-programmed library of NAD remote codes.

The NAD HTR 2 is ready to operate the T 743 receiver right out of the box, but it is really eight remotes in
one. Each of the 8 Device Selector keys at the top of the handset can call up a new “page” of remote-
control codes to be transmitted by the remaining 44 keys. You may “teach” codes from any infrared-remote-
controlled component, regardless of brand, to any or all of these. Obviously, the most logical system is that
you teach the codes from your DVD player to the [DVD] Device Selector “page,” your television’s codes to
the [TV] “page,” and so on, but there is no required scheme: You may load any commands to any key on
any page (see “Learning Codes From Other Remotes,” below).

The HTR 2 is already preprogrammed with a full complement of commands for the T 743 receiver on its
[AMP] Device Selector page, and as well as with library commands to operate most NAD-brand DVD, CD, or
TAPE components on the corresponding Device Selector “pages.” These default commands are permanent:
Even if you teach the HTR 2 new commands to take their place, the underlying library commands remain in
place and can easily be recalled should you add an NAD component to your system later (see “Delete
Mode”, below).

NOTE

: For use with the T 743, it should not be necessary to re-program any keys on the HTR 2 [AMP]

page. However, in order for the HTR 2 to control your specific NAD-brand components you may need to
load one or more different code-libraries; see “Loading Code Libraries,” below.

CONTROLLING THE T 743

CONTROLLING THE T 743

CONTROLLING THE T 743

CONTROLLING THE T 743

CONTROLLING THE T 743

The HTR 2 is divided into two main sections. Eight Device Selector keys at the top—[AMP], [DVD,] [TV,] and
so on—set the handset’s remaining keys to a “page” of commands to control a particular component. A
Device Select key determines only what component the HTR 2 will command; it does not perform any
function on the receiver. All of the remaining keys are function keys that can “learn” control codes from
virtually any infrared remote controller, allowing you to teach the codes of your equipment, regardless of
brand, to the HTR 2.

However, the HTR 2 is already preprogrammed to operate the T 743. All of the function keys on the [AMP]
Device Selector “page” perform T 743 functions. (The HTR 2 can also command many other NAD compo-
nents, from its [DVD,] [CD,] [TUNER,] and [TAPE] pages.)

It is important to note that certain HTR 2 keys perform different functions depending on the selected Device
Selector “page.” The color of the Device Selector key-labeling corresponds to the labeling of the function
keys. Most centrally, the red [AMP] Device Selector “page” corresponds to the red input-select labeling
adjacent to the numeric keys: When the HTR 2’s [AMP] Device Selector page is active, these keys select the
receiver inputs. Similarly, the purple [DVD] Device Selector “page” corresponds to several purple labels, the
green [TV] page to green labels, and so on.

LEARNING CODES FROM OTHER REMOTES

LEARNING CODES FROM OTHER REMOTES

LEARNING CODES FROM OTHER REMOTES

LEARNING CODES FROM OTHER REMOTES

LEARNING CODES FROM OTHER REMOTES

Begin by positioning the HTR 2 “nose-to-nose” with the source remote so the two devices’ infrared windows
are about 2 inches apart.

• Enter Learning Mode: On the HTR 2, simultaneously press-and-hold for 3 seconds both a Device Selector

key and the [•] “record” key (just below the [DISP] key), until the Learn LED at the center of the HTR 2
turns steady green.

• Press the HTR 2’s function key you wish to teach a command; the Learn LED will turn amber.

• Press-and-hold the function key on the source remote: The HTR 2’s Learn LED will flicker amber for a

second or two, then turn solid green. The command is learned.

• Press the HTR 2’s Device Selector key again to exit the learning mode.

If the Learn LED does not flicker amber you may need to vary the distance between the remotes.
If the Learn LED turns red rather than green, that particular command of that source remote command
could not be learned.
Cancel Operation:
You can cancel configuring a key, by pressing the active Device Selector key before the learn is complete;
the Learn LED will turn red.

Example: Learning “DVD Pause”:

Position the HTR 2 and your DVD player’s remote as described above.
• On the HTR 2, simultaneously press-and-hold [DVD] and [•]; the Learn LED turns steady green.
• Press the HTR 2’s [ 

| |

 ] (pause) key; the Learn LED turns amber.

• Press-and-hold the DVD player’s remote’s pause key; the HTR 2’s Learn LED flickers amber and then

turns solid green. The command is learned.

• Press [DVD] again to exit the learning mode.

SPECIFICA

SPECIFICA

SPECIFICA

SPECIFICA

SPECIFICATIONS

TIONS

TIONS

TIONS

TIONS

Содержание T743

Страница 1: ...Owner s Manual ENGLISH...

Страница 2: ...rom each side Do not place on a bed rug or similar surface that may block the ventilation openings Do not install the unit in a bookcase cabinet or airtight rack where ventilation may be impeded 5 Obj...

Страница 3: ...the blades of the plug 5 When not in use Unplug the AC power cord from the AC outlet if the unit will not be used for several months or more When the cord is plugged in a small amount of current conti...

Страница 4: ...E ON SCREEN DISPLA ABOUT THE ON SCREEN DISPLA ABOUT THE ON SCREEN DISPLA ABOUT THE ON SCREEN DISPLAYS OSD AND FRONT YS OSD AND FRONT YS OSD AND FRONT YS OSD AND FRONT YS OSD AND FRONT PANEL READOUT PA...

Страница 5: ...d home theater and audiophile quality music listening for years to come We encourage you to take a few minutes now to read right through this manual Investing a little time here at the outset might sa...

Страница 6: ...ensure reliable infrared remote control communications The T 743 generates a modest amount of heat but nothing that should trouble adjacent components It is perfectly possible to stack the T 743 atop...

Страница 7: ...le for serious music listening Dolby ProLogic II Music and DTS Neo 6 Music modes can also create enjoyable experience from 2 channel sources On the digital side the T 743 combines extraordinarily high...

Страница 8: ...esigned to be easy to use and easy to understand Be sure to read the section Using the HTR 2 Remote Control to familiarize yourself with the remote s layout and operations before proceeding to setup y...

Страница 9: ...well if you like If your system includes a powered subwoofer connect the T 743 s AUDIO PRE OUT SW1 2 or both jacks to its line inputs Press in the main power switch black pushbutton on the T 743 s rea...

Страница 10: ...Listening to Radio below 5 MEMORY Use to store tuned stations to the T 743 s 40 preset memory locations see Listening to Radio below 6 FM MUTE MODE In the normal Mute position only the stations with...

Страница 11: ...via the on screen menus see Adjusting Channel Levels below NOTE The HTR 2 remote s Surr Center and Sub keys provide direct access to those channels relative levels however in this case the level chang...

Страница 12: ...signals so that S Video signals connected to the DVD SAT VCR and VIDEO 4 6 inputs will be present at both the S Video and composite MONITOR OUT jacks when any of these inputs is selected This provides...

Страница 13: ...hin the receiver s operating range Please check front center and surround speakers are rated to be 4 min per speaker IMPORTANT NOTE For optimum surround performance the T 743 speaker settings and leve...

Страница 14: ...Do not bundle analog audio cables with AC power cables or with coaxial digital audio cables It is best if they cross at right angles if they must be in close proximity Employ high quality well shielde...

Страница 15: ...UT SETTINGS From the main Setup menu select the Input settings menu item using the HTR 2 remote s and Enter keys Using the keys select the video input DVD SAT VCR VIDEO 1 6 you wish to configure Use t...

Страница 16: ...he current Listening Mode For more information see About the T 743 s Listening Modes NOTE Listening Mode is part of the T 743 s Preset system See Creating and Using Presets below NOTE The Listening Mo...

Страница 17: ...th the left front The level offset reading on the right will change by 1 dB increments 12 dB adjustment is available NOTE If you are balancing levels by ear choose one speaker usually the center as a...

Страница 18: ...settings accessible from the main Setup menu including Tone Control settings To save a collection of settings to a Preset use the HTR 2 remote s keys to scroll to the to main Save to Preset item Use...

Страница 19: ...om another If muting has been activated below adjusting master volume via the HTR 2 remote or the front panel knob automatically releases the mute function The T 743 will power up from Standby mode at...

Страница 20: ...reception assuming that a multiplex stereo station of sufficient strength is tuned FM Mute eliminates noise from empty FM frequencies but also mutes very weak or distant stations it also causes the s...

Страница 21: ...rround DOLBY PRO LOGIC DOLBY PRO LOGIC DOLBY PRO LOGIC DOLBY PRO LOGIC DOLBY PRO LOGIC Dolby Pro Logic is a surround format consisting of four channels front right centre front left and surround Media...

Страница 22: ...ndwidth sound to the rear channels in Movie mode offering sound that is more similar to Dolby Digital decoding The T 743 provides two PLII variations MOVIE and MUSIC See Adjusting Listening Modes belo...

Страница 23: ...alog input 2 channel whether the actual signal is monaural stereo or surround encoded and digital multichannel Dolby Digital or DTS Where a listening mode is not available to a given signal source it...

Страница 24: ...film soundtracks PLII MUSIC for music recordings DIMENSION 3 to 3 Adjusts front rear emphasis of the surround effect independently from the relative channel levels CENTER WIDTH 0 to 7 Modifies the ha...

Страница 25: ...2 are retained even if you cycle the receiver through Standby Channel Levels are part of the T 743 s Preset system See Creating and Using Presets Level settings are added subtracted to the setup level...

Страница 26: ...r equipment regardless of brand to the HTR 2 However the HTR 2 is already preprogrammed to operate the T 743 All of the function keys on the AMP Device Selector page perform T 743 functions The HTR 2...

Страница 27: ...ss You might use a macro to automate a simple command sequence such as Turn on the DVD player and then press play Or you might compose an elaborate macro to power up an entire system select a source c...

Страница 28: ...deleted so you need not worry that using Delete Mode might cause irreparable changes To enter Delete Mode simultaneously press and hold for 3 seconds both the desired key s Device Selector key and th...

Страница 29: ...t s Device Selector key and the A V PRESET key until the Learn LED turns green Press the DISP key the HTR 2 indicates the current code library by flashing its TAPE VCR and MACRO keys For example to in...

Страница 30: ...on Channel Levels menu Source s digital output is not connected to a T 743 digital input Batteries are flat or incorrectly inserted IR transmitter window on remote or IR receiver window on T 743 is ob...

Страница 31: ...impedance 400mV 50k ohms Frequency response 5 to 20 000 Hz 0 8dB Signal noise ratio ref rated power 8 ohms A WTD 96dB Signal noise ratio ref 1W 8 ohms A WTD 80dB Remote Control HTR 2 Tuner Section Inp...

Страница 32: ...ational 2003 NAD Electronics International 2003 NAD Electronics International 2003 NAD Electronics International A Division of Lenbrook Industries LTD All rights reserved No part of this publication m...

Отзывы: